

Can You Transfer a Wix Site to WordPress?
Wix is a hosted website builder that lets users create websites using a drag-and-drop editor. It is easy to use and requires little technical knowledge, making it a popular choice for beginners. WordPress, on the other hand, is an open-source content management system (CMS) that offers far greater flexibility. Therefore, many website owners choose to transfer from Wix to WordPress for several reasons:
- Greater customization with thousands of themes and plugins.
- Better SEO control, including advanced optimization tools and settings.
- More flexibility to add custom features as the website grows.
- Lower long-term costs, especially for larger or expanding websites.
- Full ownership of website files and hosting environment.

Yes, you can transfer a Wix site to WordPress, yet the official platform offers no native one-click tool to fully move your entire site automatically. This is because the two platforms use different website architectures and data structures. Wix operates as a closed SaaS platform, meaning users cannot directly export and migrate full site data. In contrast, WordPress is an open-source CMS built around independent databases and file-based structures. While much of your website content, such as blog posts, images, and pages can be migrated, some elements must be recreated manually after the transfer.
Things to Do Before Transferring Wix to WordPress
In the following sections, we'll introduce a step-by-step guide to help you move your Wix site to WordPress as smoothly as possible. Before you begin the migration, taking a few preparation steps can help prevent data loss and make the transition much smoother. Since some website elements cannot be transferred automatically, it's important to review your existing site and have everything ready before making changes.
Back up your Wix site content. Create a complete backup of all data from your Wix site. This way, if any unexpected issues pop up during migration, all your site content stays fully protected and safely stored within the backup files.
Audit your current Wix website. Make a list of pages, blog posts, menus, forms, galleries, and other features so you can verify that everything has been transferred or recreated after the migration.
Identify content that requires manual rebuilding. Since Wix themes, page layouts, apps, and many design elements cannot be migrated directly, knowing what needs to be recreated in advance will help you estimate the migration effort.
Keep your Wix site online until the migration is complete. Avoid deleting or unpublishing your Wix website before confirming that all content has been successfully transferred and your new WordPress site is working properly.
How to Transfer Wix Site to WordPress Manually
If you prefer full control over your migration process, the manual method allows you to rebuild and transfer your Wix content step by step. Follow these instructions to transfer your Wix site to WordPress while preserving your SEO value and preventing unnecessary content loss.
Step 1: Purchase WordPress Hosting and Set up Your Site
Start by choosing a reliable WordPress hosting provider like Bluehost and purchasing a hosting plan that fits your website needs. After that, install WordPress using the one-click installation tool provided by most hosts.
Once installed, access your WordPress dashboard and configure basic settings such as site title, permalink structure, theme, etc. At this stage, you are preparing a clean environment where your Wix content will be rebuilt.
Step 2: Import Your Blog Content via RSS
Wix allows you to export blog content using an RSS feed, which can be used to bring posts into WordPress. Locate your Wix blog RSS feed URL by ending in /feed.xml, or blog-feed.xml.

You'll see a page full of XML code. Right-click on the page and save it as an XML file to your computer.
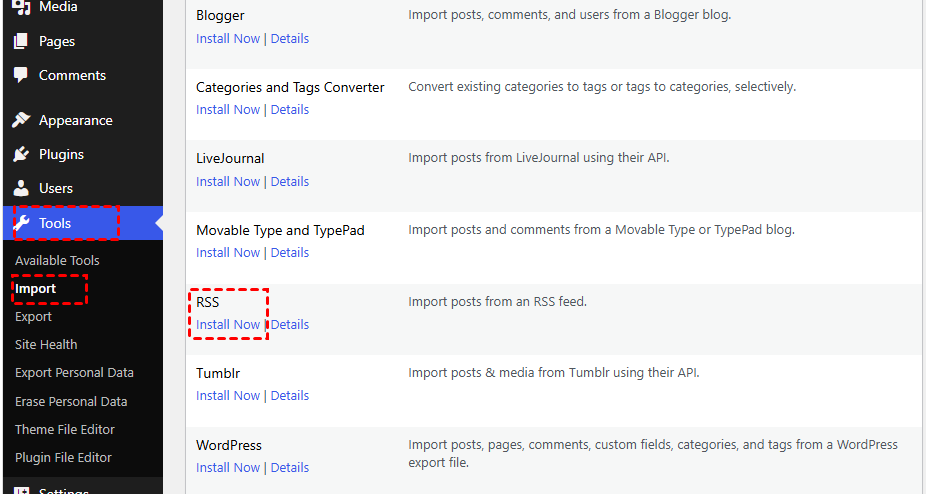
Go back to WordPress dashboard and head to "Tools" > "Import", then scroll down and click "Install Now" under "RSS".
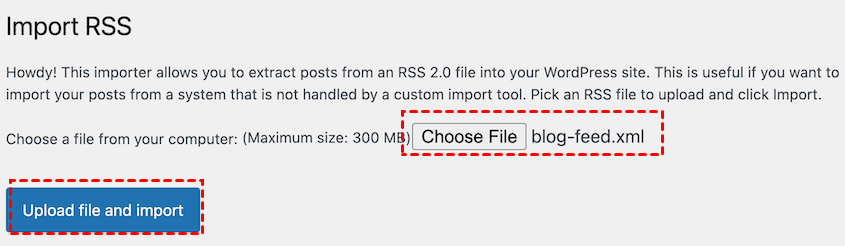
Click "Run inPropeter" > "Choose File" to import the saved XML file, them tap "Upload file and import".
After importing, review each post to ensure formatting, images, and categories are correctly displayed.
Step 3: Recreate Your Pages and Design
Since Wix page layouts cannot be directly transferred, you will need to manually rebuild your pages in WordPress one by one. This step is important because it directly affects how your website looks and functions after migration.
You can use a WordPress theme or page builder (such as block editor or Elementor) to replicate your design.
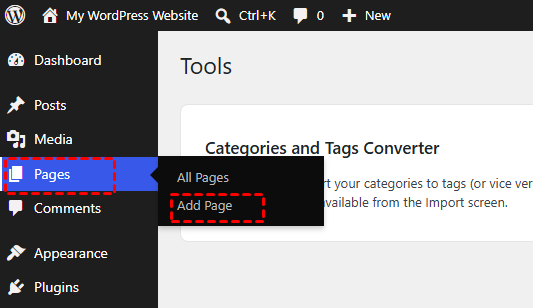
In WordPress, navigate to "Pages" > "Add Pages". And open your Wix site in browser and locate the page you want to migrate to WordPress firstly, copy the content including titles, text to new WordPress page.
Step 4: Secure Your Images and Media Files
Wix does not provide a full media export, so images and media files must be saved manually or extracted through your existing site. Proper media migration ensures your site maintains visual consistency and avoids broken image links.
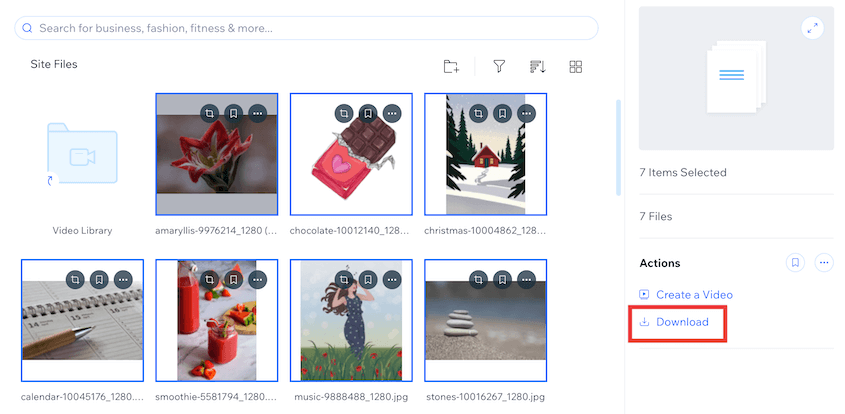
Open your media files in Wix and select the images you want to migrate, then click "Download".
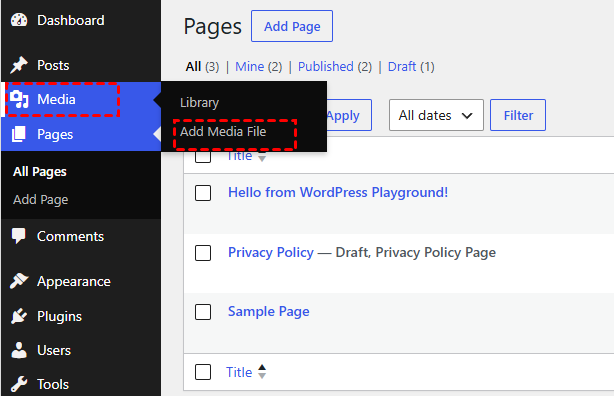
Go to "Media" > "Add Media Files" to upload all media files to WordPress.
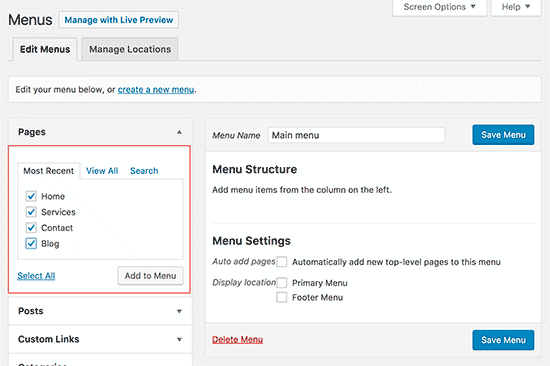
Then, you can create your navigation menu by locating "Appearance" > "Menus". Enter your menu name, add whatever pages to main menu, select the menu display location like Primary Menu or Footer Menu.
How to Transfer Wix Site to WordPress Automatically
If your Wix website contains a large number of pages, product listings, or a more complex structure, manual migration can quickly become time-consuming and error-prone. In such cases, an automated migration service offers a faster and more streamlined solution. These tools are designed to transfer core website data from Wix to WordPress with minimal manual effort, making them ideal for business sites or content-heavy websites.
How to Protect SEO & Site Functionality After Migration to WordPress
Once your Wix content has been successfully moved to WordPress, whether manually or through an automated service, the next critical step is ensuring your website maintains its SEO performance and continues to function correctly. Since WordPress and Wix use different URL structures and page handling systems, overlooking post-migration optimization can lead to broken links, traffic loss, or ranking drops.
Set up 301 redirects from old Wix URLs
Map your original Wix pages to their new WordPress equivalents. This helps search engines understand the page relocation and preserves existing rankings and backlink value.
Verify permalink structure in WordPress
Go to WordPress settings and configure clean, SEO-friendly URLs that closely match your original site structure whenever possible. Consistent URL patterns reduce indexing issues.
Fix broken links and missing media
After migration, scan your site for broken internal links or missing images. Update or replace any content that did not transfer correctly to avoid poor user experience.
Re-submit your sitemap to search engines
Generate a new XML sitemap using a WordPress SEO plugin and submit it to Google Search Console. This ensures search engines quickly re-index your new site structure.
Test site performance and responsiveness
Check loading speed, mobile layout, and navigation across different devices to ensure your WordPress site functions smoothly after migration.
Bonus: How to Protect Your New WordPress Site More Easily
Once you confirm the migrated Wix site from WordPress functions properly, keeping regular backups of your new website is essential to avoid data loss and simplify future recovery. Instead of relying only on hosting or manual downloads, you can use a cloud-based solution like MultCloud to manage and back up your WordPress-related files more efficiently.
MultCloud's website backup feature helps you automatically create a full website backup across multiple cloud drives without downloading everything to your local device. It even allows you to transfer WordPress site to another site. This is especially useful for WordPress users who want a safer and more flexible backup strategy.

- Cross-Platform Integration: Support over 40+ cloud services in one unified interface, including Google Drive, Dropbox, OneDrive, MEGA, and more.
- Scheduled Automation: Set up daily, weekly, or monthly tasks for file transfer, synchronization, or backup without manual operation.
- Secure Cloud-Based Operation: All transfers are processed in the cloud, reducing local exposure and ensuring secure data handling with encrypted connections.
- Absolute File Security: All transferred files are protected with 256-bit AES encryption to prevent data leakage, and OAuth authorization further enhances account security.
Step 1. Create a free account and log in to MultCloud.

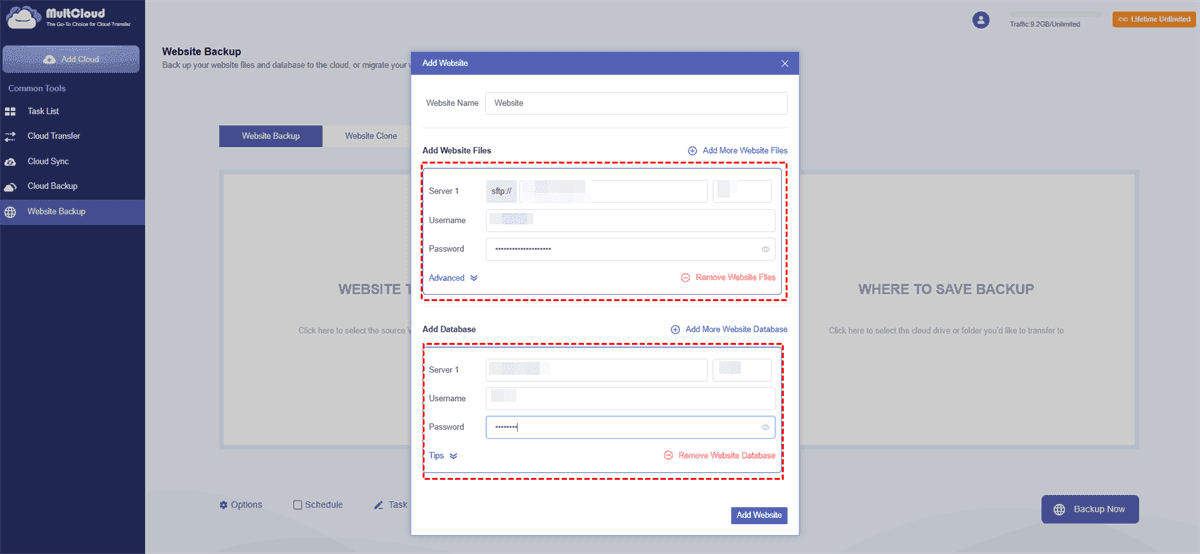
Step 2. Select "Website Backup" and click "WEBSITE TO BACKUP" > "Add Website". Enter your website files and database server, username and password to add it as source.
Step 3. Click "WHERE TO SAVE BACKUP" and select a cloud storage or another website to add as destination drive.
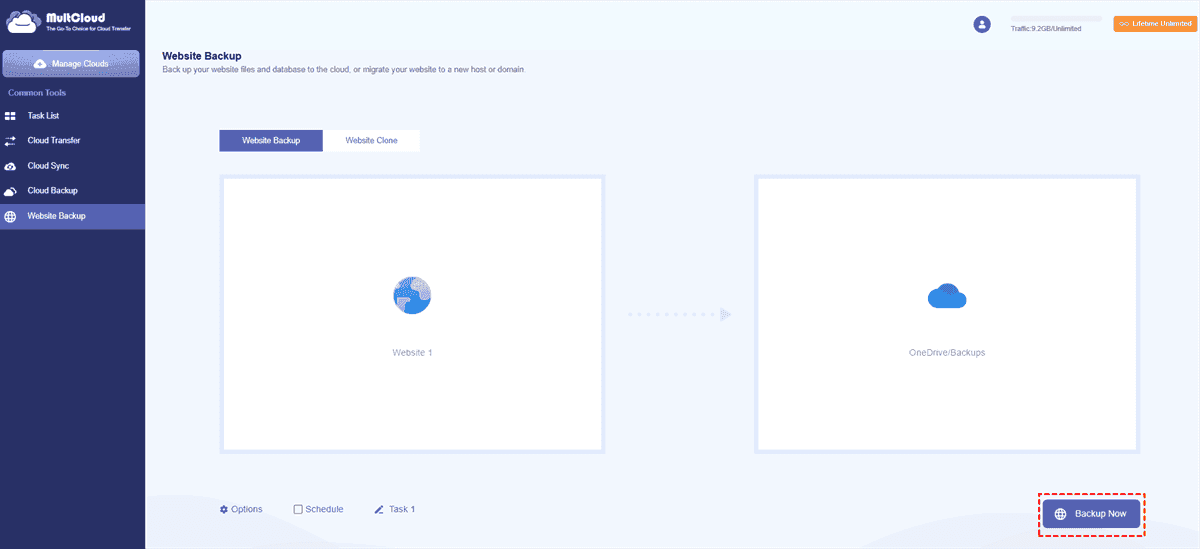
Step 4. Click "Backup Now" to begin the process.
- ★Tips:
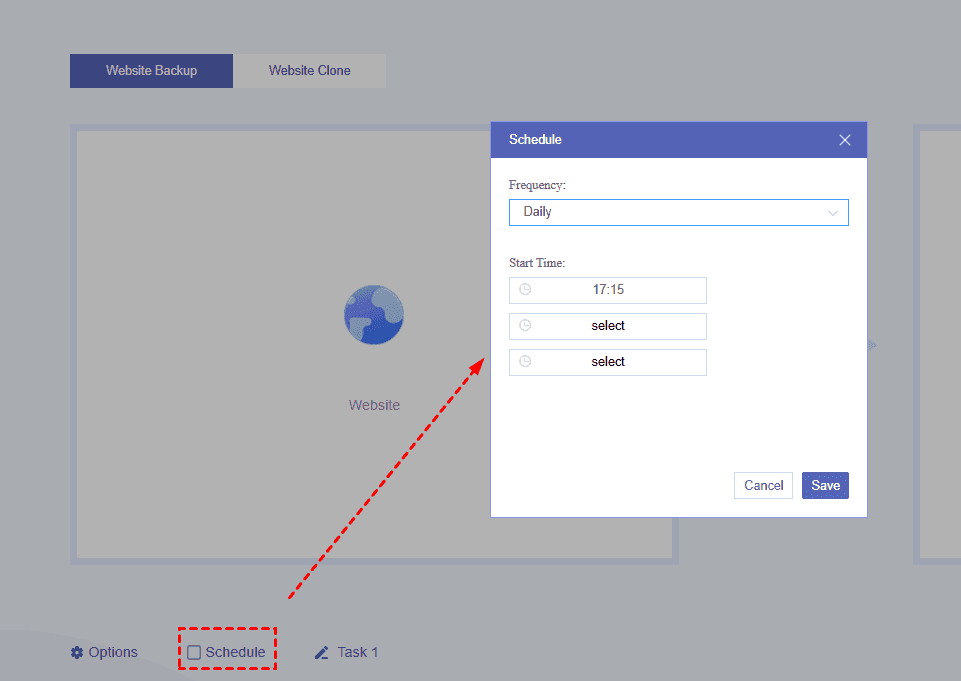
- You can set up email nofitication in "Options" or scheduled (daily, weekly or monthly) backup task in "Schedule".
- Upgrading to MultCloud Premium, you can add file filters to include or exclude files in the backup plan.
Conclusion
Migrating a Wix site to WordPress is a structured process that can be completed through either manual steps or automated tools, depending on the size and complexity of your website. While Wix does not support full one-click migration, both methods allow you to transfer core content such as pages, posts, and media into a more flexible WordPress environment.
After migration, the most important focus shifts to SEO preservation and site stability. To ensure long-term reliability, it is also recommended to implement regular backups and ongoing site maintenance. Using tools like MultCloud can further simplify data protection by enabling automated storage and cross-cloud synchronization.
FAQs
Q1: Can I transfer my website from one host to another?
Yes, you can transfer a website between hosts. This usually involves backing up all website files and databases, then uploading them to the new hosting provider. You also need to update DNS settings to point the domain to the new host. MultCloud simplify the process within just one-click.
Q2: How do I professionally transfer a Wix site to WordPress?
A professional Wix to WordPress transfer involves planning, content extraction, and structured rebuilding. Since Wix has no full export tool, you migrate content like blog posts and media manually or via RSS, then recreate pages in WordPress. You should also set up redirects, preserve SEO settings, and test everything before going live.
Q3: How to transfer Wix site to WordPress without downtime?
To avoid downtime, build your WordPress site on a staging environment first while keeping your Wix site live. Once WordPress is ready, switch DNS settings and enable redirects quickly. This ensures visitors are always directed to an active site during the transition with minimal disruption.
Q4: How long does it take to transfer a domain away from Wix?
Domain transfer from Wix typically takes 5 to 7 days. The process includes unlocking the domain, obtaining an authorization code, and updating DNS records with the new provider. Timing may vary depending on the domain registrar and verification steps required.
Q5: How do I transfer a website to WordPress?
To transfer a website to WordPress, first set up hosting and install WordPress. Then migrate content from your old site using plugins, RSS feeds, or manual copying. Rebuild design elements, upload media files, and configure permalinks. Finally, test the site before switching your domain to go live.
MultCloud Supports Clouds
-
Google Drive
-
Google Workspace
-
OneDrive
-
OneDrive for Business
-
SharePoint
-
Dropbox
-
Dropbox Business
-
MEGA
-
Google Photos
-
iCloud Photos
-
FTP
-
box
-
box for Business
-
pCloud
-
Baidu
-
Flickr
-
HiDrive
-
Yandex
-
NAS
-
WebDAV
-
MediaFire
-
iCloud Drive
-
WEB.DE
-
Evernote
-
Amazon S3
-
Wasabi
-
ownCloud
-
MySQL
-
Egnyte
-
Putio
-
ADrive
-
SugarSync
-
Backblaze
-
CloudMe
-
MyDrive
-
Cubby


Stay Updated With Our
Latest Tips
Add us as a preferred source on Google to never miss helpful guides.
 Add as preferred source >>