

Can I Transfer Ownership of WordPress Site?
Many website owners eventually face a moment when they need to hand over the keys to their digital asset, whether you’re selling a profitable blog, passing a client’s site to a new host, or parting ways with a developer. But transferring ownership of a WordPress site isn’t as simple as sharing a password and calling it a day. A complete ownership transfer may involve moving user access, website files, database, domain settings, hosting accounts, and connected services.
People usually transfer WordPress site ownership for several reasons:
Selling a website: Website owners may need to hand over complete control of a site to a buyer, including its content, settings, and technical assets.
Delivering a completed website to a client: Developers or agencies often transfer ownership after building and launching a WordPress website for a customer.
Changing business responsibilities: Companies may need to move website management rights when ownership, teams, or website administrators change.
Moving a website to a new owner or partner: Some website owners transfer control when handing over a project, business, or online brand.
A safe ownership transfer should preserve everything that contributes to your website’s value, including pages, posts, images, themes, plugins, SEO settings, traffic data, and domain authority. By following the correct steps, you can hand over your WordPress site securely without affecting your existing content or search rankings.
Before Transferring WordPress Site Ownership
Before handing over your WordPress website to a new owner, it is important to prepare the site and collect all necessary information. Proper preparation can help prevent unexpected issues, ensure a smooth transition, and protect your website data throughout the transfer process.
Create a complete website backup: Back up your WordPress files and database, including themes, plugins, uploads, posts, pages, and settings. A backup provides a recovery point if anything goes wrong during the transfer.
- ★Tips:
- If you want a straightforward, automated backup solution for your WordPress site, MultCloud is well worth trying. MultCloud's Website Backup allows you to link your site via FTP/MySQL and back up the entire website directly to your cloud storage (like Google Drive, OneDrive, Dropbox, etc.) or an alternative server automatically.
Review user accounts and permissions: Check all existing users and remove unnecessary accounts. Make sure the new owner will receive the appropriate level of access, usually through a new Administrator account.
Gather important website information: Prepare details related to your domain registrar, hosting provider, FTP/SFTP access, email services, and third-party tools connected to your website.
Check SEO and analytics settings: Confirm that important SEO configurations, Google Search Console, Google Analytics, tracking codes, and other marketing tools are properly documented before the ownership change.
Confirm website functionality: Test key elements such as pages, forms, links, login access, and eCommerce features to ensure the website is working correctly before the transfer.
Scenarios 1. For Sites Hosted on WordPress.com
If your WordPress site is already hosted on WordPress.com and you only need to hand over control to new owner, the process is relatively straightforward. In most cases, you do not need to move website files or databases. Instead, you need to transfer administrative access, content ownership, and related account information.
New owner should create a WordPress.com account if don't have.
Step 1. Log into the WordPress.com dashboard with your current owner account.
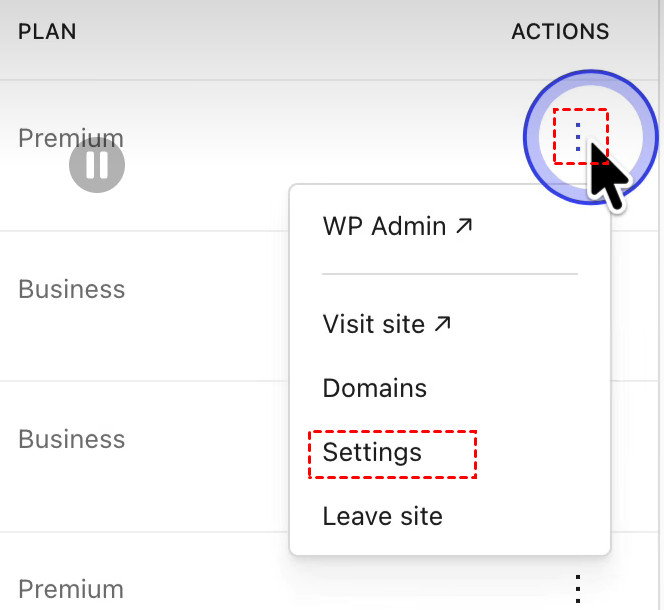
Step 2. Select the target site and click the three-dots button, then click "Settings".
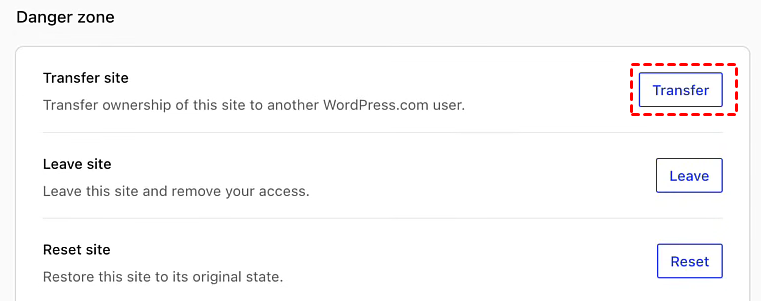
Step 3. Scroll down to the "Danger zone" section and click "Transfer" to move the control of your site.
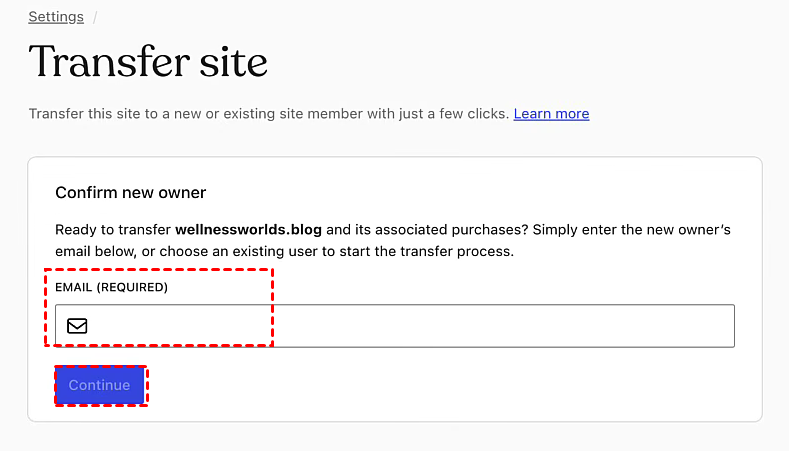
Step 4. Enter the new owner's email address and click "Continue". Check the statements and click "Start transfer". Your site’s content, ownership rights, upgrade entitlements and domain name will all be transferred to the new owner in full.
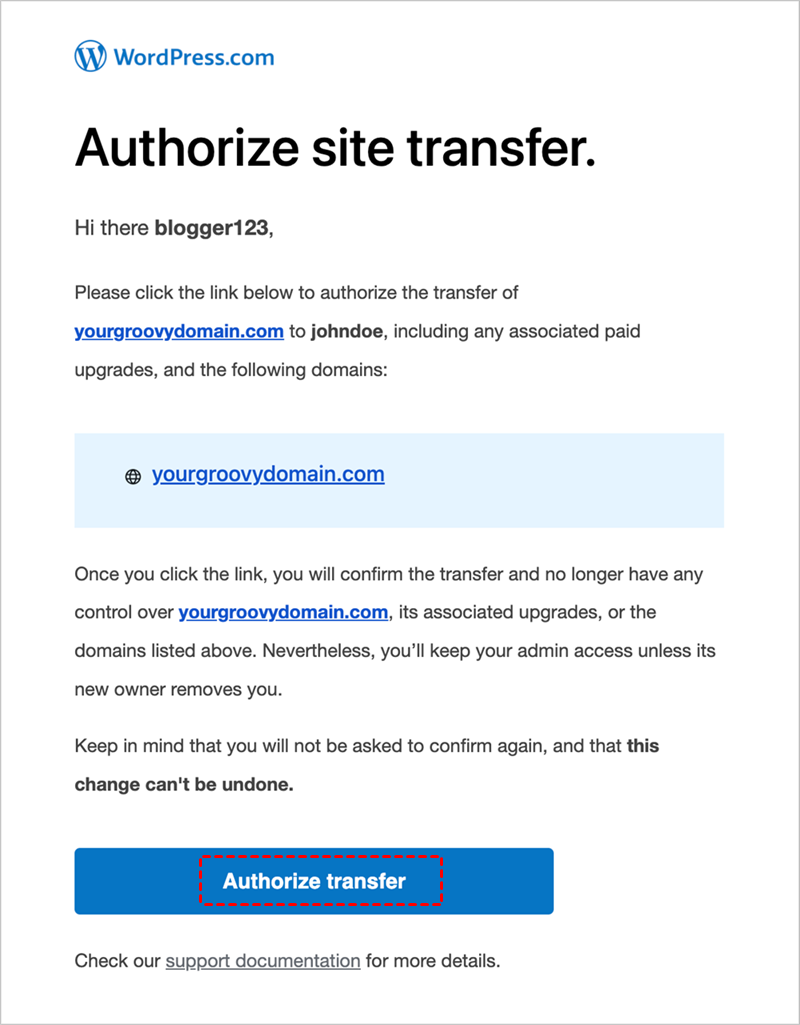
Step 5. You will receive an email asking you to confirm the transfer, click "Authorize transfer" to start the process. The new owner will also receive a confirmation email.
Scenarios 2 For Self-Hosted WordPress Site
For a self-hosted WordPress website, transferring ownership is more involved because the website is managed through multiple separate services. It requires you to move control of the WordPress account, hosting environment, domain, and connected services separately. Follow the steps below to complete the transfer securely.
Part 1. Transfer the WordPress Administrator Account
The first step is to give the new owner access to the WordPress dashboard and transfer website management permissions.
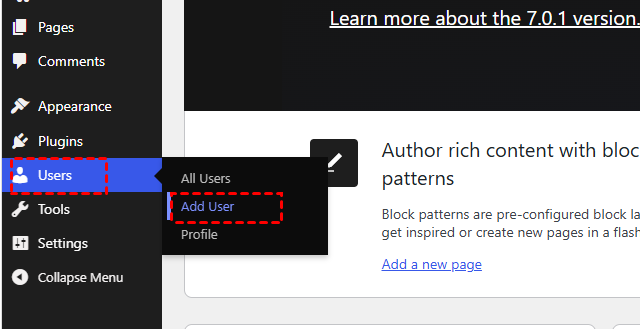
Step 1. Log in to your WordPress dashboard and go to "Users" > "Add Users".
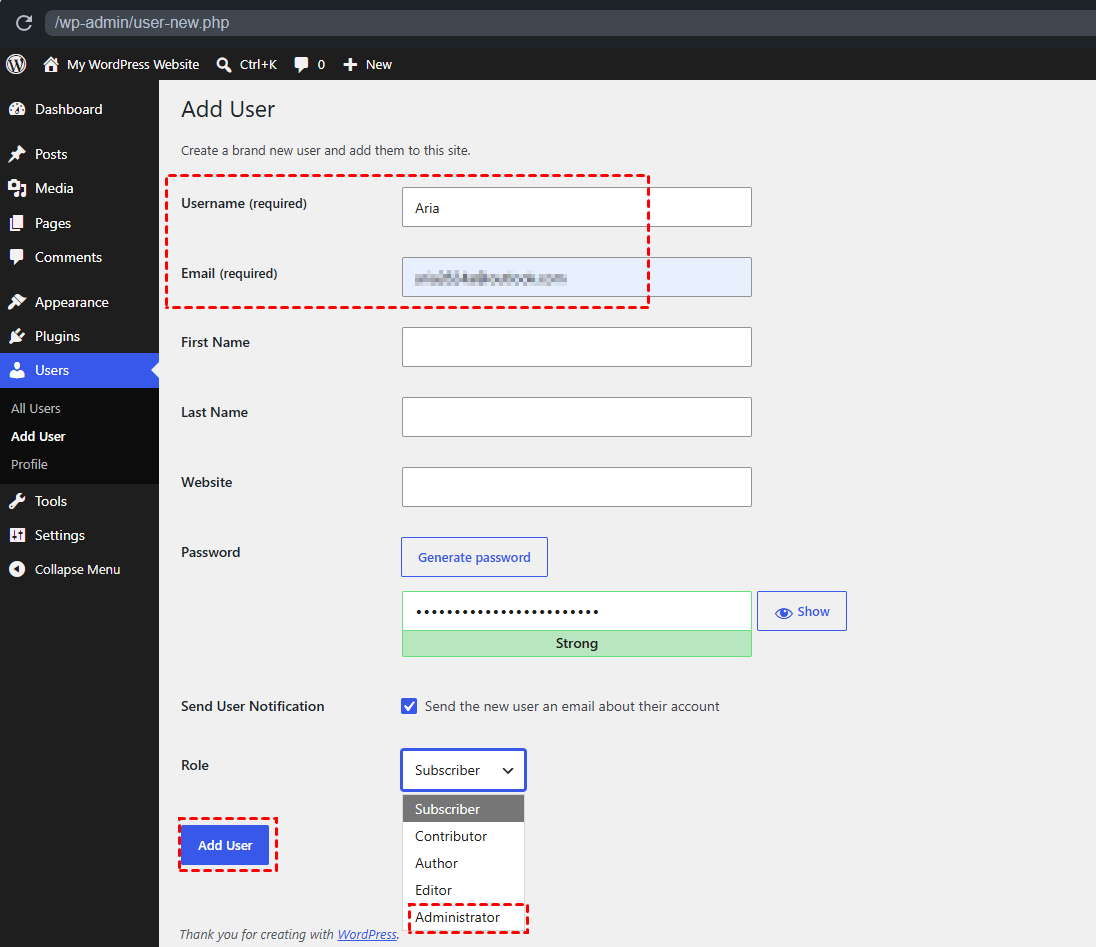
Step 2. Enter the new owner's username, email address and password. Select the user role as "Administrator" and click "Add User".
Step 3. Ask the recipient to log into the new account, navigate to "Users" > "All Users", and delete your original old administrator account.
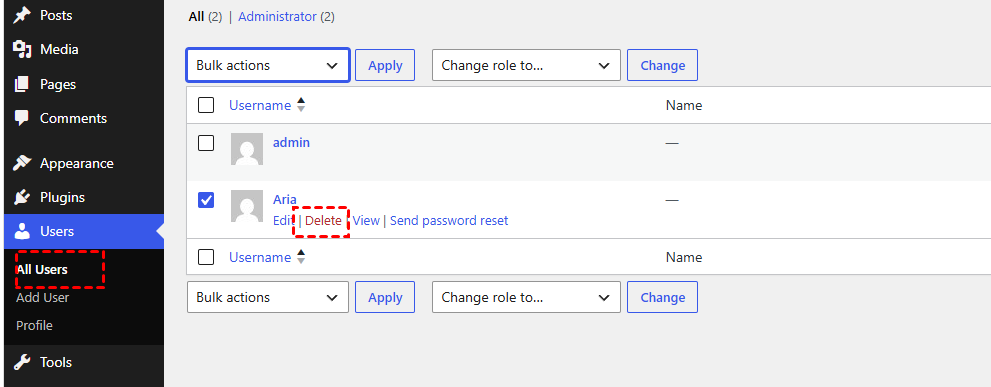
Step 4. When deleting your old admin account, a pop-up prompt will appear asking how to handle all posts published under this account. Be sure to select "Attribute all content to: [New Administrator]"; otherwise, all your previous articles will be permanently removed.
Part 2. Transfer Hosting Account and Content
For self-hosted WordPress websites, the hosting account controls the server where your website files and database are stored. Transferring hosting access ensures the new owner has full control over website management.
Option A: Transfer Hosting Account Directly
If your hosting provider offers a dedicated site transfer feature and your account only contains this single website, log in to the provider’s official portal to update the account’s linked email, login password, and payment methods such as credit cards or Alipay. You may then transfer the entire hosting account directly to the new owner. The ownership handover will be finalized once the new owner verifies their login access.
Option B: Manually Transfer Website to New Host
Step 1. Back up the files and database of your WordPress site using the plugins or hosting backup feature and export the backup file.
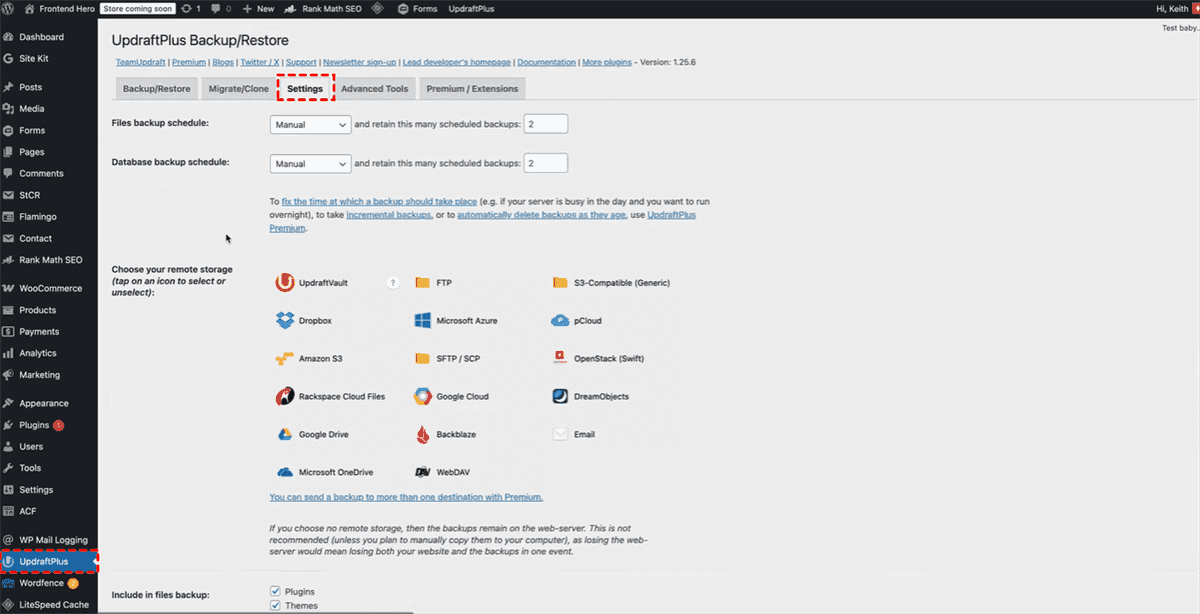
Step 2. Ask the recipient to set up a brand-new, clean WordPress site on their own new server and import the backup file accordingly.
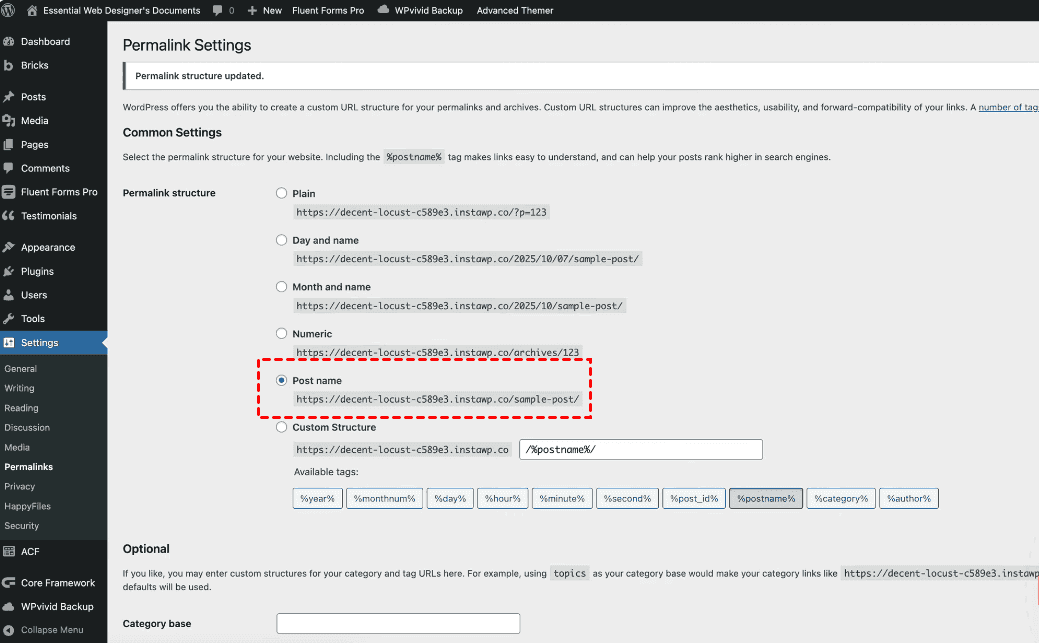
Step 3. Update the permalink on new server to remove the 404 errors and change the DNS management settings to the new server IP address.
Part 3. Transfer Domain Name
The domain name is a separate asset from your WordPress website. To give the new owner complete control, you also need to transfer domain ownership or access.
The domain transfer workflow depends entirely on your domain registrar. If the new owner also holds an account with the same provider, you can use the "Account Change/Push" feature inside your backend. Simply enter the recipient’s account username or email address, and the domain will be moved to their account instantly with zero transfer fees.
If the buyer intends to switch to a different domain registrar, you must first disable the domain transfer lock in your admin panel and retrieve your unique EPP transfer authorization code (Auth Code). The recipient will submit a domain transfer request at their new registrar using this code. This cross-registrar process generally takes 5–7 business days to finish, and the receiving party is required to pay for one full year of domain registration renewal upon completion.
Part 4. Transfer Third-Party Service
Beyond the steps covered above, WordPress sites are often linked to a range of third-party external services, including security and optimization plugins, payment gateways (critical for e-commerce stores), analytics tools, and more. Remember to unlink all bindings from your original accounts and replace them with the new owner’s own email addresses or accounts.
Post‑Transfer Checklist for Security
You have successfully moved the core technical assets of your WordPress site. However, transferring ownership extends well beyond these basic procedures. To prevent future financial liabilities, avoid data leaks, and ensure the new owner has 100% secure control, both parties must complete a few essential post-transfer tasks.
🧑 For the Previous Owner:
As the seller, your main goal is to fully detach yourself from the website to avoid any ongoing legal, financial, or cybersecurity liabilities.
- Remove Payment Methods and Credit Cards: Log in to any premium plugin sites, CDN services, or domain registrars connected to the site. Remove your credit cards, PayPal, or Alipay accounts and disable auto-renewal so you don’t get billed in the future.
- Delete Local Backups and Cached Data: Once the buyer confirms the website is running smoothly, permanently delete any local SQL databases and site files from your computer or personal cloud storage to protect user privacy.
- Sign a Handoff Agreement: For business or high-value website sales, sign a final transfer agreement stating that all intellectual property and liabilities have been officially transferred to the new owner as of the specified date.
🧑 For the New Owner:
As the new site owner, your top priority is to fully remove all access privileges belonging to the previous owner to secure your newly acquired website.
- Reset All Core Passwords: Immediately change the credentials for the WordPress admin account, FTP/SFTP accounts, SSH, hosting cPanel/Plesk, and the MySQL database.
- Renew SSL Certificates: Ensure the HTTPS connection is valid on your new server. Reinstall or reissue a free Let's Encrypt SSL certificate in your hosting panel if you migrated to a new server.
- Update Tracking and SEO Verification: Verify your own ownership in Google Search Console and remove the previous owner's verification. Update the measurement ID in GA4 so traffic data flows to your account.
- Establish Your Own Backup Schedule: Never rely on the previous owner's backup configurations. To ensure your newly acquired asset is fully protected from day one, use MultCloud's Website Backup feature. You can easily connect your server via FTP/MySQL to your private cloud storages and set an automated weekly backup schedule. If anything goes wrong during your initial optimizations, you can restore your site to a healthy state with just a single click.
Conclusion
Transferring ownership of a WordPress site is a multi-step process that requires careful attention to detail. By systematically handling your administrator accounts, hosting environments, domain settings, and third-party tools, you can ensure a seamless transition without losing valuable SEO rankings or data.
To simplify your transfer process, sign up for a free MultCloud account to leverage its specialized Website Backup and Cloud Transfer features. Move, back up, and manage your website assets seamlessly in the cloud with just a few clicks!

- Cross-Platform Integration: Support over 40+ cloud services in one unified interface, including Google Drive, Dropbox, OneDrive, MEGA, and more.
- Scheduled Automation: Set up daily, weekly, or monthly tasks for file transfer, synchronization, or backup without manual operation.
- Secure Cloud-Based Operation: All transfers are processed in the cloud, reducing local exposure and ensuring secure data handling with encrypted connections.
- Absolute File Security: All transferred files are protected with 256-bit AES encryption to prevent data leakage, and OAuth authorization further enhances account security.
FAQs
Q1: How do I transfer a WordPress website from one host to another?
To transfer a WordPress website to another host, back up your website files and database, set up WordPress on the new server, import your backup, update DNS settings, and test the website. You can also use migration tools to automate the transfer process and reduce manual work.
Q2: How do I transfer ownership of a website domain?
To transfer domain ownership, update the domain registrant information or move the domain to the new owner’s registrar account. The process usually requires unlocking the domain, obtaining an authorization code, and approving the transfer request through email.
Q3: Will my website go down during a domain transfer?
No, your website usually will not go down during a domain transfer because the transfer only changes the domain registrar. Your website files and hosting remain unchanged. However, incorrect DNS updates or expired hosting services may cause temporary downtime, so verify your DNS settings before completing the transfer.
Q4: What happens to my website when I transfer my domain?
Transferring a domain does not automatically move your website files or hosting. Your website will continue working as long as the DNS settings still point to the correct server. If DNS records are changed incorrectly, your website or email services may become temporarily unavailable.
Q5: How do I transfer a page from one account to another?
The method depends on the platform you use. For WordPress, you can create a new user account, transfer content ownership, or export and import pages. Make sure the new account has proper permissions before removing the original owner’s access.
Q6: Do I have to wait 60 days to transfer domain?
In many cases, yes. ICANN rules typically prevent domain transfers within 60 days of a new registration, transfer, or certain ownership changes. However, some registrars may allow account changes without triggering the 60-day transfer lock.
MultCloud Supports Clouds
-
Google Drive
-
Google Workspace
-
OneDrive
-
OneDrive for Business
-
SharePoint
-
Dropbox
-
Dropbox Business
-
MEGA
-
Google Photos
-
iCloud Photos
-
FTP
-
box
-
box for Business
-
pCloud
-
Baidu
-
Flickr
-
HiDrive
-
Yandex
-
NAS
-
WebDAV
-
MediaFire
-
iCloud Drive
-
WEB.DE
-
Evernote
-
Amazon S3
-
Wasabi
-
ownCloud
-
MySQL
-
Egnyte
-
Putio
-
ADrive
-
SugarSync
-
Backblaze
-
CloudMe
-
MyDrive
-
Cubby


Stay Updated With Our
Latest Tips
Add us as a preferred source on Google to never miss helpful guides.
 Add as preferred source >>