Quick Content Overview:
What is Email Upload in Box?
For the Box Business or Enterprise plan, you are able to upload files or send email attachments to a Box folder by email after enabling the Allow uploads to this folder via email option if your admin has enabled email uploads. So, if your Box account is a Business Starter or a personal account, you cannot use this feature at all. Besides, you can’t perform consequently automated email uploads with the Box email upload feature.
With this feature, you’re able to invite people to upload files to Box without giving them access to this folder, just like Box File Request.
Why Upload to Box via Email?
Uploading files to Box via email simplifies the process of moving files between two services, and allows you to access files anywhere and anytime, collaborates with other people seamlessly.
Generally speaking, emails contain many more important files you’d like to save, and the local disk is not your first option because of disk failure, software corruption, and other disasters. Box upload via email allows you to manage files altogether.
So, how to perform Box mail upload to send files from emails easily and directly, see the following part.
How to Ensure Box Admin Has Enabled Email Uploads
How to check if your Box plan has enabled Email Uploads or not? Ask your Box admin to check the following information:
1. Please log in to your Box admin account.
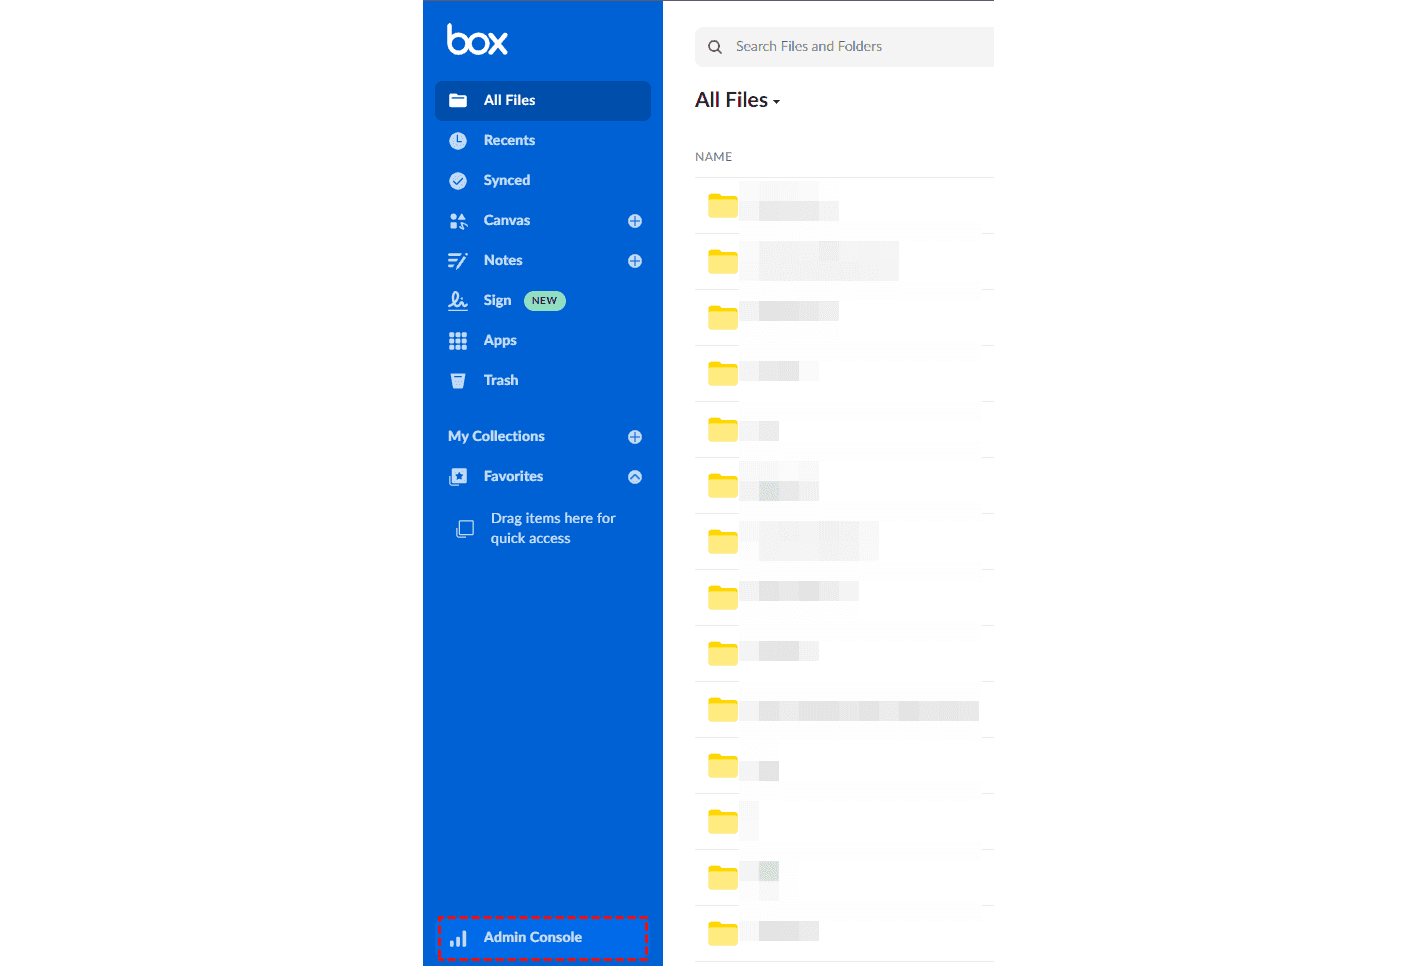
2. Click Admin Console on the bottom left.
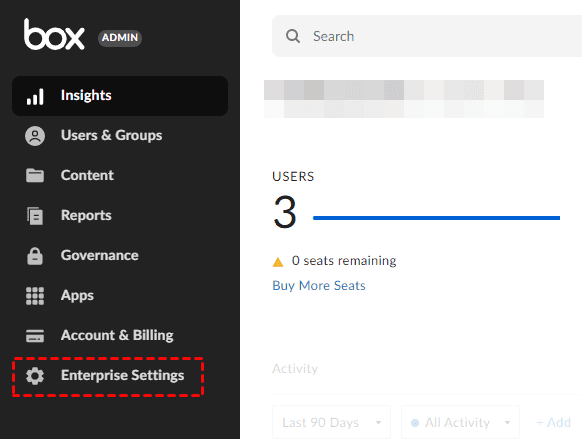
3. Select Enterprise Settings on the left.
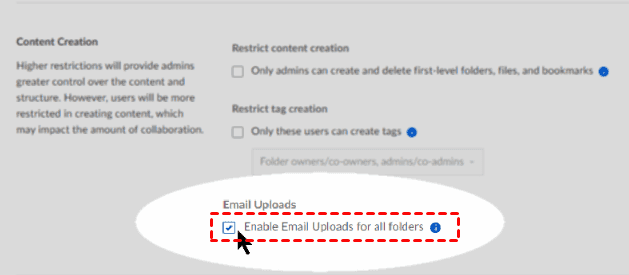
4. Click the Content and Sharing tab, and scroll down to choose Content Creation.
5. Tick Enable Email Uploads for all folders under the Email Uploads section, and click Save.
Ensure your admin has enabled Email Uploads in step 5. Or follow the above steps to enable Email Uploads in Box.
How to Upload Files to My Box Account via Email?
After that, you have to enable email upload for a folder to upload files to Box via email:
1. Please sign in to your Box account, and click All Files on the control panel.
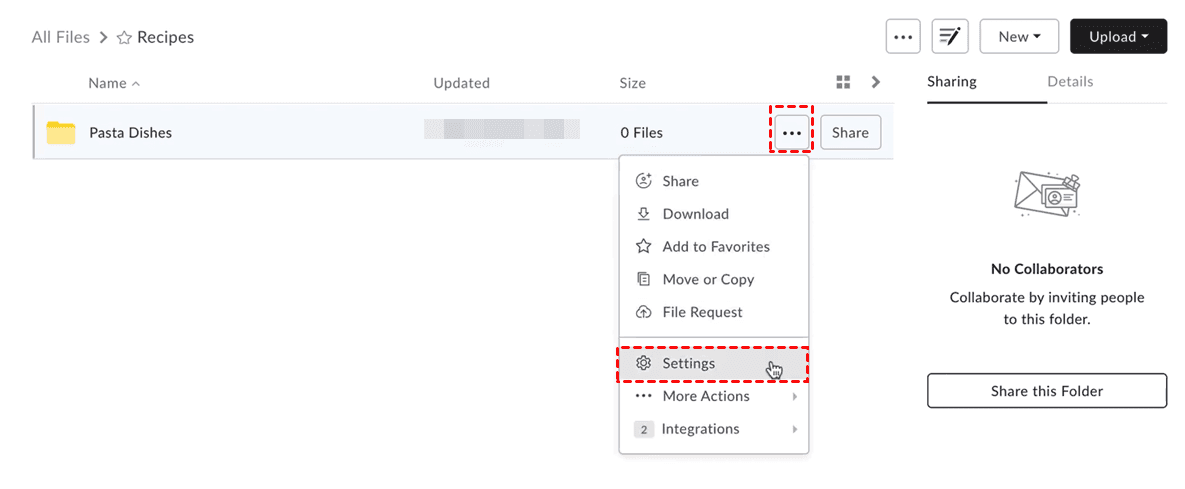
2. Select the three-dots icon at the end of the folder you want to store files from email and choose Settings.
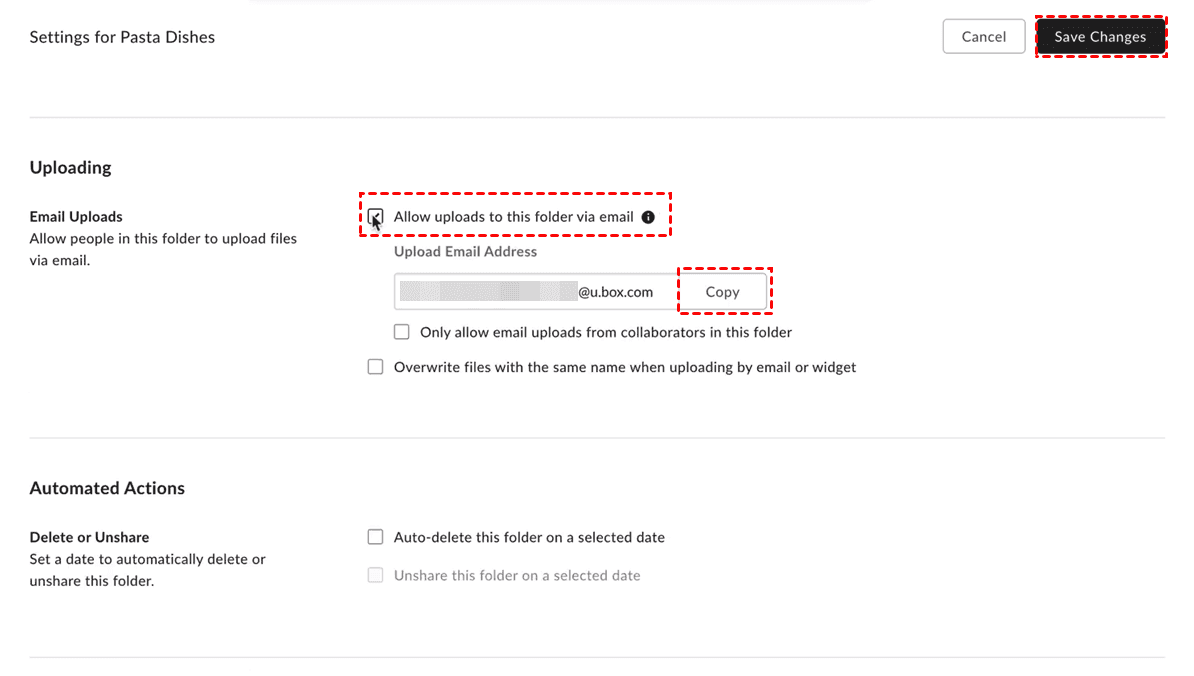
3. Scroll down to find the Uploading section, tick "Allow uploads to this folder via email", and tap Copy next to Upload Email Address to get the Box folder email address, then click Save Changes.
Tips:
- Besides, you can tick the option Only allow email uploads from collaborations in this folder or Overwrite files with the same name when uploading by email or widget according to your needs.
- The copied Box folder email address is like the @u.box.com email format.
4. Then go to an email server, and compose an email, input the copied Box folder email address in the To section, and attach your files, photos, and other documents, click Send to do Box mail upload.
5. Your Box folder will save the attachments automatically.
Besides, you can share the copied Box folder email address with others, which allows them to upload files to the Box folder without giving them access to the folder. However, Email Upload in Box has some limitations.
Limitations:
- This way allows you to upload the attachments to Box without any email content body included.
- It doesn't work at all if your email size, including message body, attachments, and signature, exceeds 50MB.
- Email upload files for .msg and .eml file format will be failed.
After uploading files to Box, the sender, and the folder owner will get a notification about the email upload to Box folder.
Another Easy Way to Upload to Box via Email
Box allows you to upload files or attachments to a specific Box folder for Box Business or Enterprise plan. If uploading emails and all attachments is your goal or want to migrate files from email to Box for Box personal or Starter account, Box cannot meet your demands at all. Fortunately, the powerful web-based multi-cloud manager - MultCloud will do you a big favor.
- MultCloud allows you to upload emails to Box directly with all attachments, as well as the quoting information no matter what Box plan you have.
- There is no file size limit on MultCloud, which is more powerful than Box email upload.
- MultCloud supports Gmail, Outlook, and other 30+ clouds, such as Google Drive, Dropbox, OneDrive, Google Workspace, OneDrive for Business, Dropbox Business, iCloud Drive, iCloud Photos, MEGA, and more. Microsoft 365 Mail will soon be supported.
- You're able to download all emails with attachments in PDF file format simultaneously, which is very useful for managing emails.
To upload emails and attachments from Gmail to Box with MultCloud, just follow the simple steps below:
1. Please create a MultCloud account and sign in.
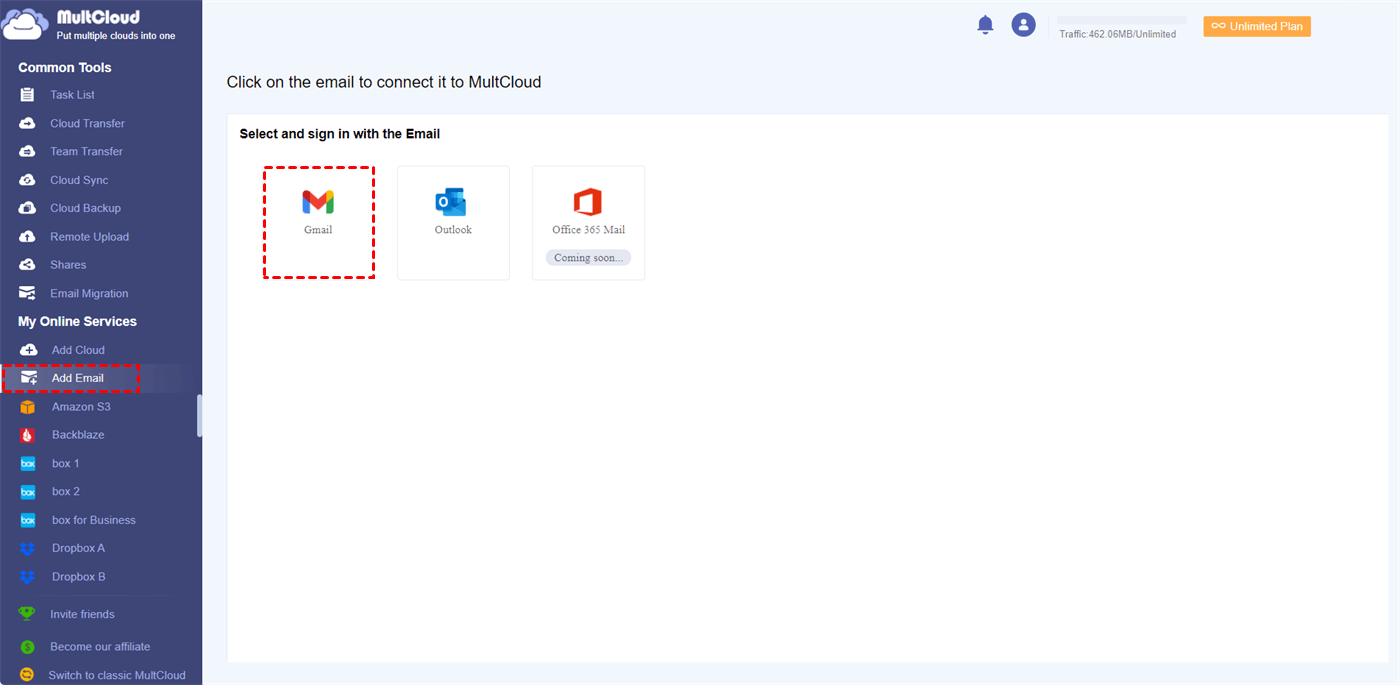
2. Click Add Email and Gmail to add, then click Add Cloud > Box to add.
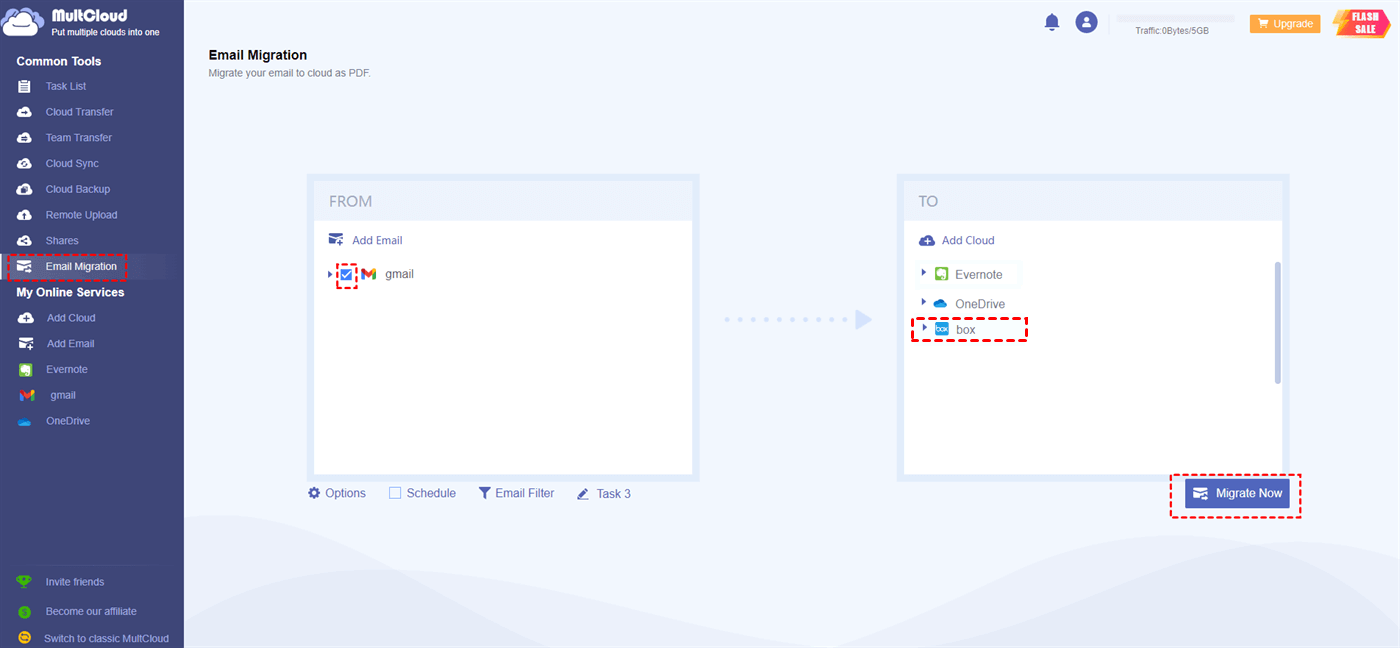
3. After adding, click Email Migration, click Gmail as the source, and choose a folder in Box as the target.
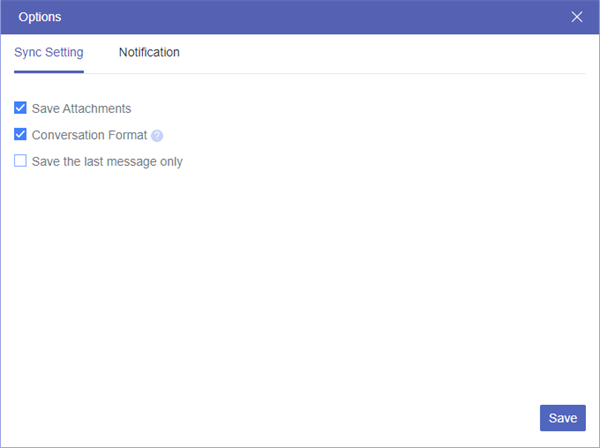
4. Tap Options > Save Attachments, and click Save.
Tips:
- Besides, you can also choose Conversation Format in Options to hide the quoting information within the email, save the last message only, or automatically rename the files that contain special characters and generate a script file. Or, enable the email alert to notify you about the task result.
- The Schedule has the ability to perform the task every day, week, or month as you like.
- The Email Filter allows you to migrate only the emails matching your filters, like From, To, Date, Has attachment, or Is unread filter.
- You have up to 50 email-to-PDF conversions, for unlimited conversions, please unlock it, and then you can enjoy all advanced features, including Schedule and Email Filter, and the fast migration speed (up to 10 threads instead of 2).
5. Hit the Migrate Now button to migrate Gmail emails and their attachments to Box directly.
Besides, you can migrate Box files to Google Drive, OneDrive, Dropbox, or other 30+ clouds directly. If you have more than one cloud currently, adding all of them to MultCloud allows all clouds can be managed in one place without switching accounts frequently.

- Smart Share: Share cloud files via public, private, or source mode.
- One-key Move: Quick data transfer, sync, and backup among clouds.
- Email Archive: Protect emails to other clouds or local disks.
- Remote upload: Effectively save web files to clouds via URL.
- Save Webpages as PDF/PNG: Keep them locally or online.
- Safe: Full-time 256-bit AES and OAuth authorization protections.
- Easy: Access and manage all clouds in one place with one login.
- Extensive: 30+ clouds and on-premise services are supported.
3 Tips: Manage Box Files Safely
Except for Box email upload, MultCloud can do the following useful things if you frequently use Box in daily life:
- Upload files to Box directly and quickly.
- Remote upload files from a website, or URL to Box directly without downloading.
- Perform Box file requests to collect files from others.
- Migrate files from Box to Dropbox, Google Drive, OneDrive, etc., or vice versa.
- Share Box files and folders with password-protected, or in a public way.
- Transfer all files from all accounts in Box for Business to Google Workspace, Dropbox Business, and OneDrive for Business smoothly without a workflow break.
Tip 1. Upload Files to Box Quickly with MultCloud
Here is an easy way to upload files to Box with MultCloud, try and enjoy.
1. Please log in to your MultCloud account, and tap Box.
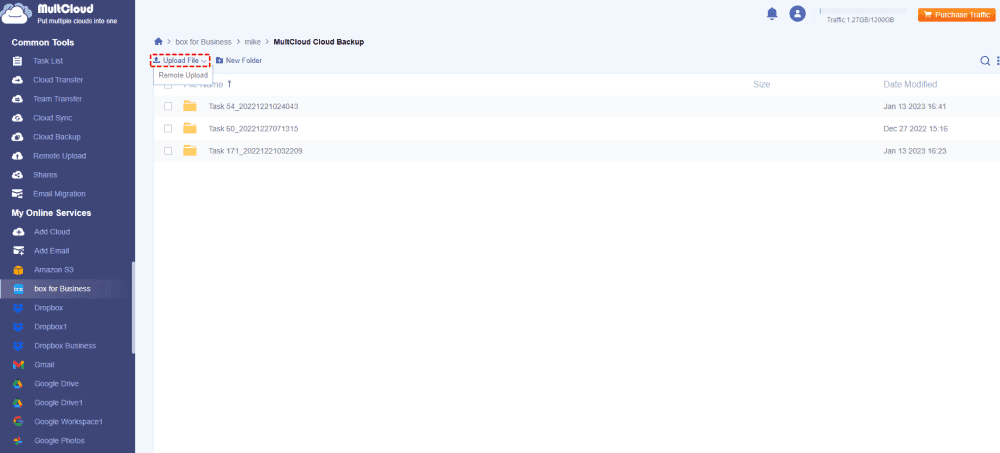
2. Select a folder, and hit Upload File from the left top menu.
Tip: If you hover over the Upload File, it shows you Remote Upload, which allows you to upload files from the link to Box directly instead of downloading and uploading manually.
3. Choose the files on your computer, or other devices, and hit Open to upload files to Box in a fast way.
How to automatically upload files to Box, you can download the Box desktop app on your computer, and then all the files in your Box folder will be automatically synced to the cloud.
Tip 2. Collect Files from Others by Sharing
How to upload to Box without an account? You can share the Box folder and allow others to upload with MultCloud just like the Box file request, here you can see how it works.
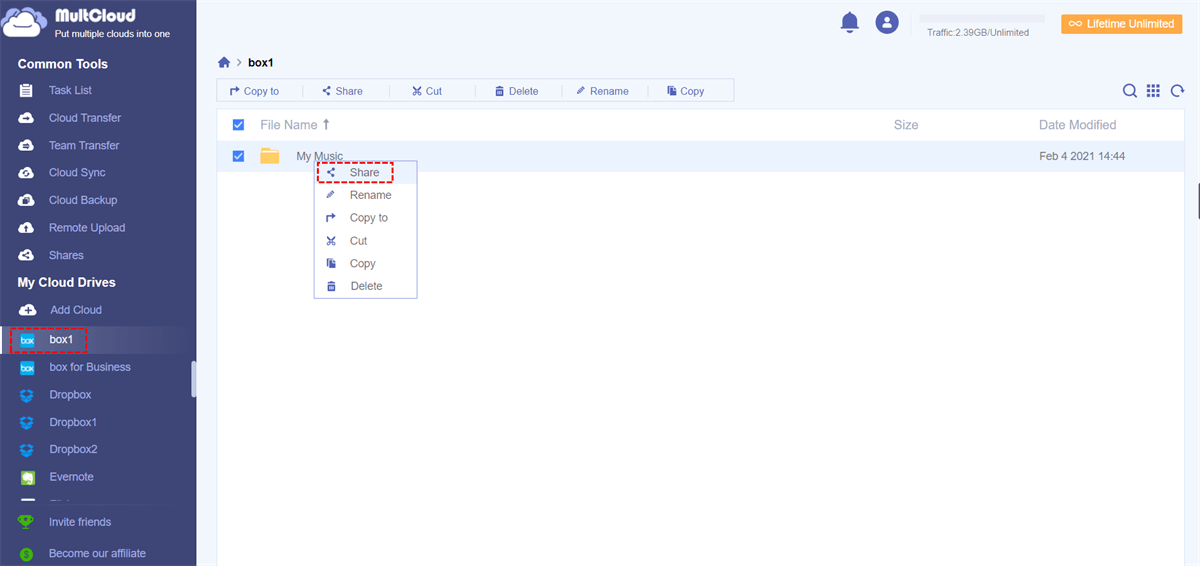
1. After adding Box, choose a folder, and select Share > Share with MultCloud.
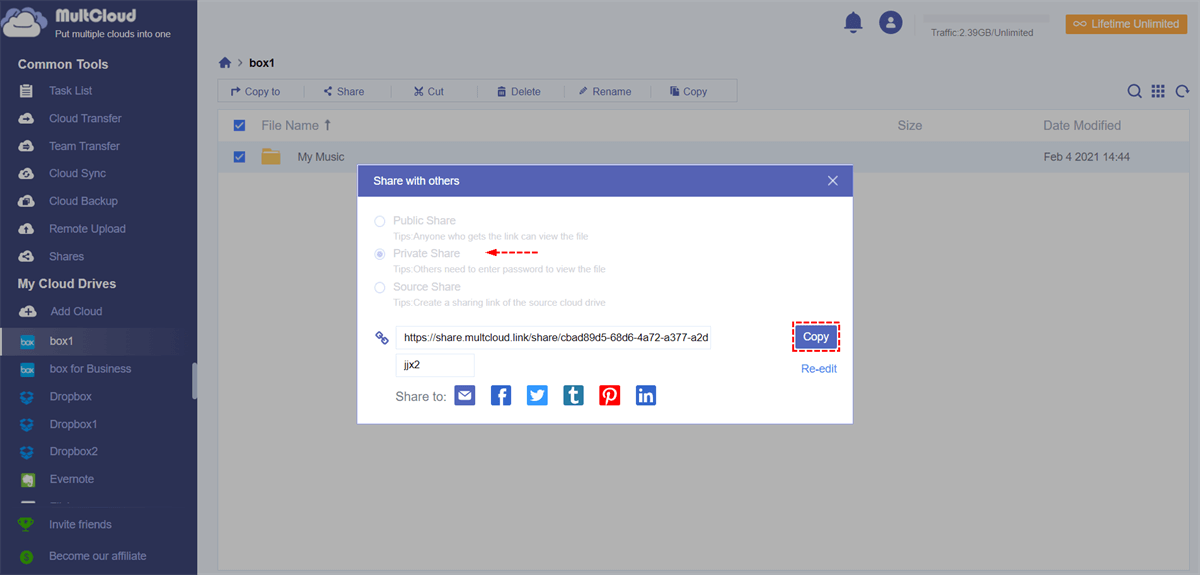
2. Choose Private Share, Public Share, or Source Share, and hit Create Share.
3. Hit Copy to copy the Box folder link to paste it to others.
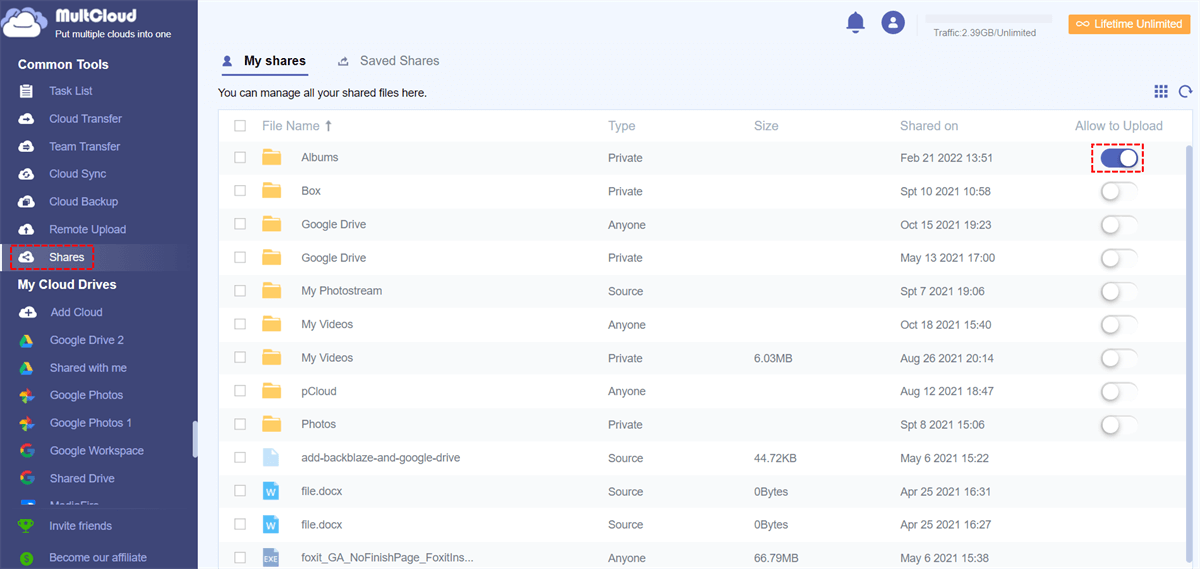
4. Tap Shares from the toolbar on the left, find the folder, and enable the Allow to Upload option.
5. When others open the link, they can hit the Upload File to send content to your Box folder.
Now, you have collected files from others. Besides, you can still cancel Box upload anytime, just disable Allow to Upload in the Shares section on the MultCloud interface. Moreover, you can share the Box folder with external users.
Tip 3. Transfer Files from Box for Business to Google Workspace
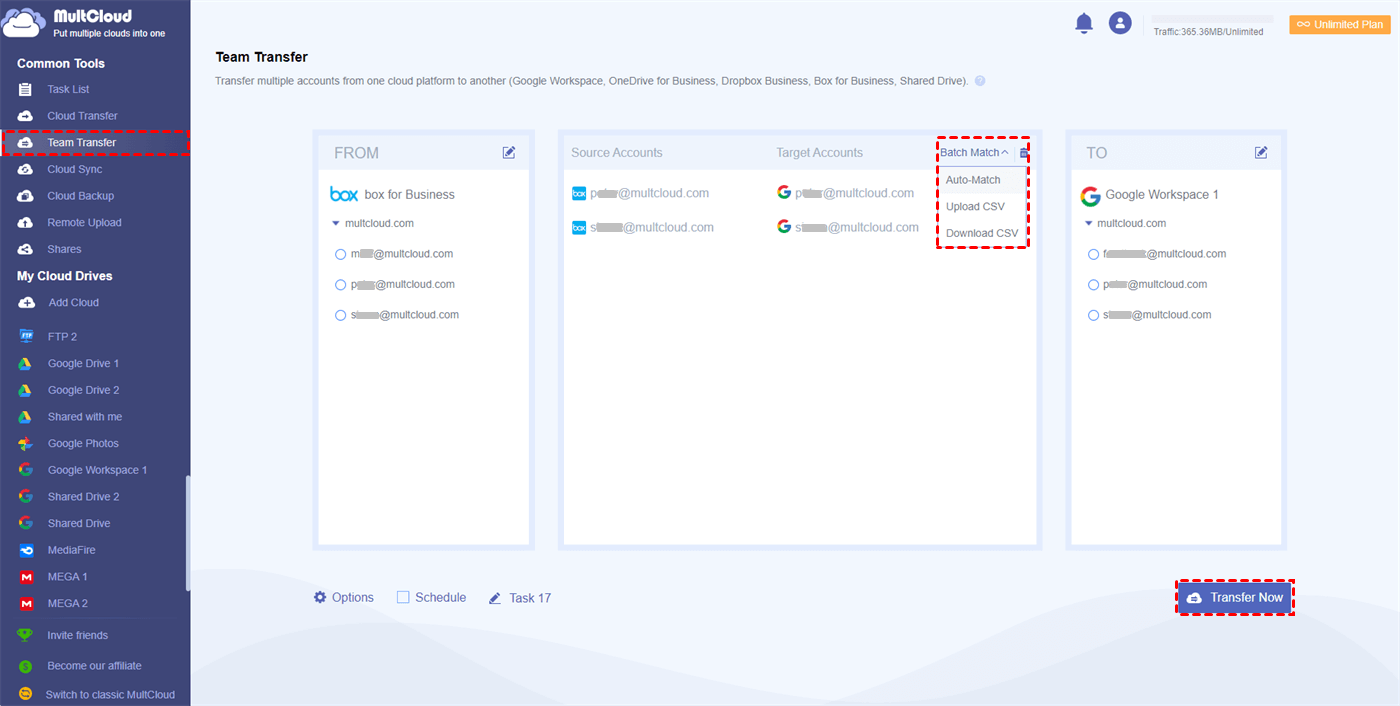
If you're using Box for Business account, and trying to use Google Workspace as its alternative, you can use Team Transfer to move everything from all accounts in Box for Business to Google Workspace or other business clouds, here you can find the simple steps.
1. Please click Add Cloud > Box for Business, then follow the guide to add, and then add Google Workspace.
2. Tap Team Transfer, choose Box for Business as the source, and Google Workspace as the target.
3. Tap Batch Match, then choose Auto-Match, Upload CSV, or Download CSV to match all the accounts from Box for Business to accounts in Google Workspace.
4. Hit Transfer Now to move everything from Box for Business to Google Workspace now.
If you're using the free Box account, and don't know if Google Drive, OneDrive, or Dropbox is good for you, you can check the details on OneDrive vs. Box, Box vs. Google Drive, and more.
FAQs about Box Email Upload
What Box Email Upload Do?
How Do I Upload Emails to Box?
How Long Does It Take to Perform Box Mail Upload?
Can Someone Upload A File to My Box Account?
The End
Now, you have a clear idea about Box email upload. To upload files to Box via email, please ask your Box admin to enable Email Uploads for all folders. Then go to your Box account and enable Box email upload. Then compose an email to forward attachments to Box directly.
However, Box email upload is only available in Box Business or Enterprise plans, how to upload files to Box via email if you have a Box personal account or Business Starter plan, MultCloud is the best option for you. And you can migrate files from one Box account to another directly.
MultCloud Supports Clouds
-
Google Drive
-
Google Workspace
-
OneDrive
-
OneDrive for Business
-
SharePoint
-
Dropbox
-
Dropbox Business
-
MEGA
-
Google Photos
-
iCloud Photos
-
FTP
-
box
-
box for Business
-
pCloud
-
Baidu
-
Flickr
-
HiDrive
-
Yandex
-
NAS
-
WebDAV
-
MediaFire
-
iCloud Drive
-
WEB.DE
-
Evernote
-
Amazon S3
-
Wasabi
-
ownCloud
-
MySQL
-
Egnyte
-
Putio
-
ADrive
-
SugarSync
-
Backblaze
-
CloudMe
-
MyDrive
-
Cubby
