Migrate files across different cloud drives without manually downloading and re-uploading.

Sync two clouds or directories in two different cloud drives via one-way or two-way sync.

Backup one cloud data to another cloud for an extra protection and easy recovery.
With two-step verification, you add an extra layer of security to your MultCloud account. When logging in with an "untrusted device" or changing your password, you have to enter your email address or phone number to verify identity. This will prevent your account from being stolen and better protect your account. How to enable it in MultCloud? Please see below for more details.
Step 1: Log in MultCloud. Set up two-step verification by clicking “Account” button, select “Settings”-->”Two-step verification”.

Note: if you are a Guest account, you need to Bind Email first. Then to set up the two-step verification.
Step 2: Please select a way to verify. There are two way for verify: email address and phone number. We will explain the methods one by one.
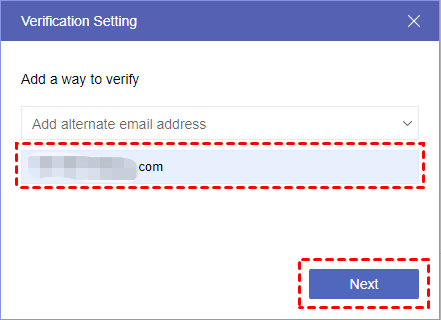
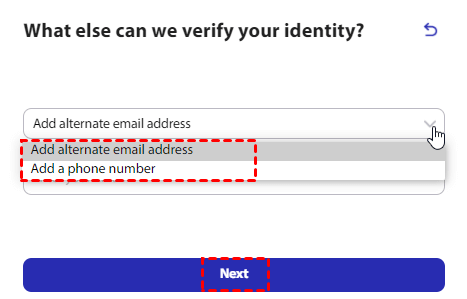
Step 3: We select “Add alternative email address” method, you need to enter an email address. Then click “Next”.
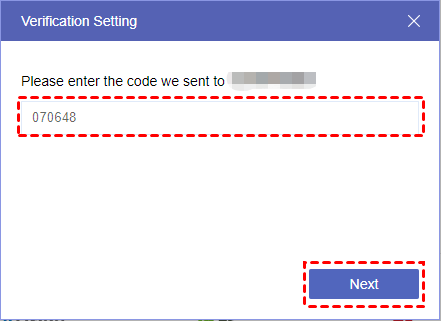
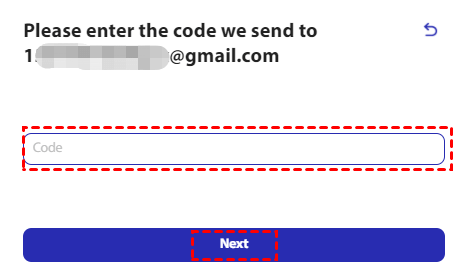
Step 4: After clicking “Next”, then a code will be sent to your email address. Please check your email and enter the verification code.
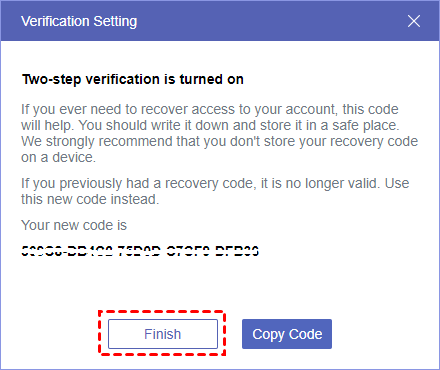
Step 5: Then click “Next” to finish the verification. We advise you could copy and save the recovery code on a safe place. Recovery code is mainly used to recover your account when you don’t have access to the email or phone number, using re-add verification to replace the previous verification method.
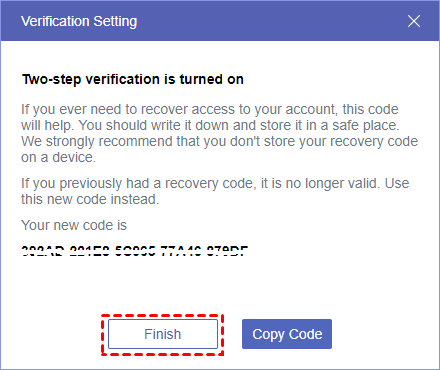
Step 6: After clicking “Finish” button, you can see that the two-step verification is turned on and the verification method of sending verification code to email address has been successfully added.
Tips:
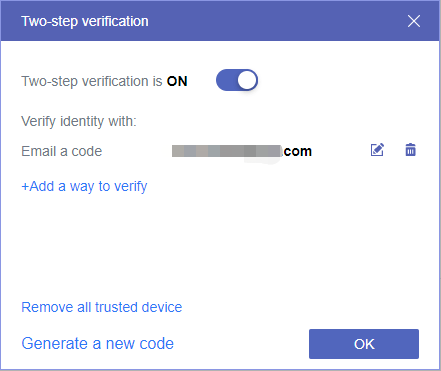
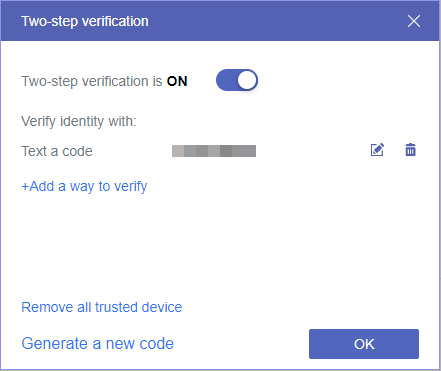
1. Click the switch button behind Two-step verification is ON to turn off/on the two-step verification feature.
2. The two icons on the right of mailbox are "Edit" and "Remove" buttons. You can modify the current validated mailbox address or remove the current mailbox directly.
3. Add a way to verify: add phone number way to the verification method. The details please see below. Currently only two verify methods can be added.
4. Remove all trusted device: If you’ve lost access to a device you’ve trusted, we recommend you do this.
5. Generate a new code: You can reset the Recovery code if you don’t remember it.
Step 1: If you want to use the phone number verification, you could click the downward arrow to select it.
Then you will see below window, you need to choose the area code from the drop-down list, then enter the correct phone number. Then click “Next”.
Or you can also add a phone number verification after adding email address method.
Step 2: After clicking “Next”, there will be a code sent to your phone. Please check your Text message and enter the verification code.
Step 3: Then click “Next” to finish the verification. There is also a recovery code that you should save to a safe place.
Step 4: After clicking “Finish” button, you can see a window that prompt you the two-step verification is turned on and the verification method of sending verification code to phone has been successfully added. You can also change or add an email address to the verification method.
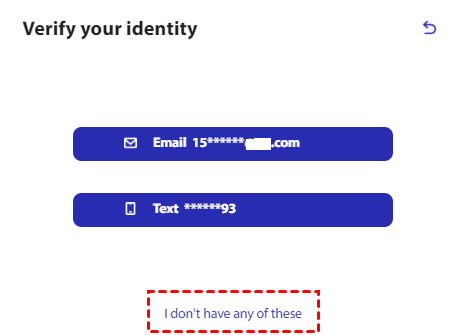
If you have successfully enabled the two-step verification feature and are logging in from an "untrusted device", click the “Log in” button after entering the correct account password, the login popup will go to the following image and you will need to authenticate.
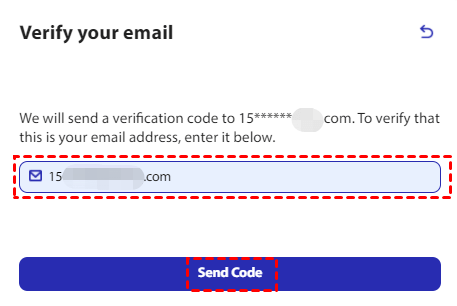
Case 1: If you select email to verify your identity, you need to enter the email address first, then send a code to your email.
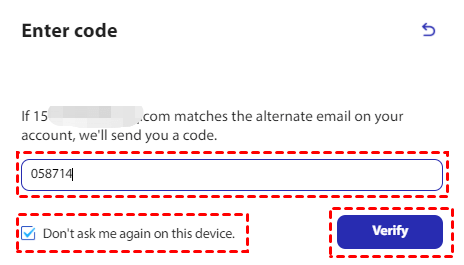
Then, enter the code, click “Verify” button to finish the verification. After that, you will log in MultCloud directly.
Tips:
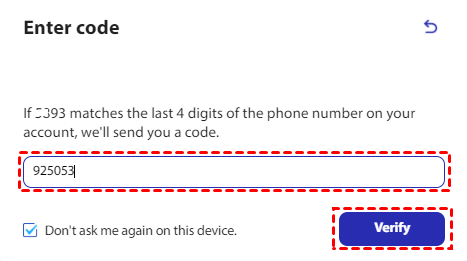
1. “Don’t ask me again on this device”: The check box is checked by default; if it is checked, the device will be added as a "trusted device" for the account after successfully logging into MultCloud. If it is unchecked, you will need to authenticate this device again the next time you log in to it.
2. If the device is no longer trusted. You can go to two-way verification settings to remove all trusted devices.
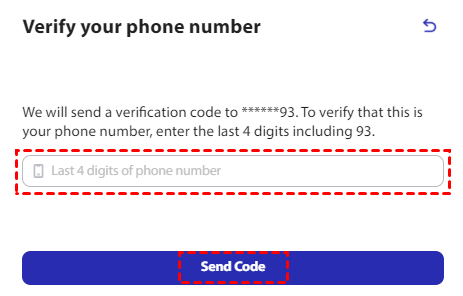
Case 2: If you select phone number method, you need to enter the last 4 digits of your phone number.
Then, enter the code, click “Verify” button to finish the verification. After that, you will log in MultCloud directly.
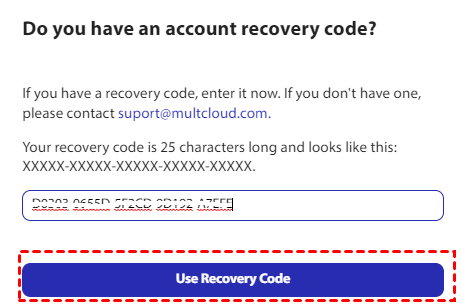
Step 1: If you don’t have access to your verify email or phone number, you could click “I don’t have any of these” to use recovery code to verify your identity.
Step 2: Please copy and paste your Recovery Code.
Step 3: Click the arrow button, then please add an alternate email address or a phone number to verify your identity.
Step 4: Please check and enter verification code.
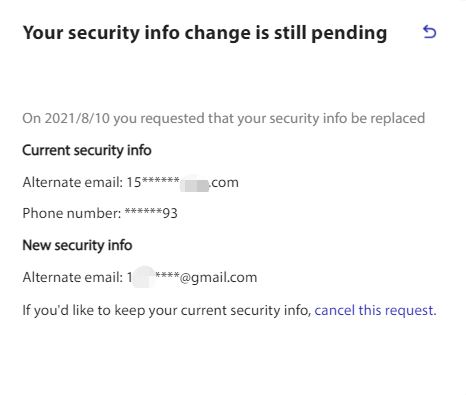
Step 5: Then you can see the security info change is on pending. Replacing your security info takes 30 days! If you do not cancel this request within 30 days, the previous authentication method will be automatically replaced with your new authentication method on the 30th day. After 30 days, you could log in your account by the new verification email address/phone number.
Two-Factor Authentication (2FA) enhances the security and reliability of our accounts. This allows us to use MultCloud with greater peace of mind when managing files between different clouds.
Google Drive
Google Workspace
OneDrive
OneDrive for Business
SharePoint
Dropbox
Dropbox Business
MEGA
Google Photos
iCloud Photos
FTP
box
box for Business
pCloud
Baidu
Flickr
HiDrive
Yandex
NAS
WebDAV
MediaFire
iCloud Drive
WEB.DE
Evernote
Amazon S3
Wasabi
ownCloud
MySQL
Egnyte
Putio
ADrive
SugarSync
Backblaze
CloudMe
MyDrive
Cubby