Quick Search:
User Case: How to Hide Albums on Google Drive?
Hiding albums on google photos
Does google photos really not give you the option to hide certain albums? When I searched online it only mentioned the locked folder. It just seems like a really simple feature that is available on most gallery apps.
- Question from Reddit
What Does Hidden Album in Google Photos Mean?
Google Photos has become the best free online photo storage for people to store pictures, videos and audio files nowadays. This convenient service helps users organize photos orderly and also save the storage space of their local devices like smartphone and computer. However, there are some private pictures that we don’t want to show up on the homepage of Google Photos.
And that’s the time when the hidden album in Google Photos matters. If you hide albums or photos on Google Photos, those albums or photos are not deleted, but just not displayed on the main page of Google Photos. In this way, others cannot view the secret pictures on Google Photos’ main page, which could protect your privacy to some extent.
Can You Make a Google Photos Hidden Album?
Imagine that you are doing a presentation at a regular company meeting by using Google Photos, and your computer is connected to a projector. Suddenly, some private images such as conversation screenshots, stupid selfies, or funny nudes are displaying on the main page of Google Photos, which may cause a social death. In this situation, you must be awkward and want to escape to another planet to live as soon as possible.

So, is it possible to create a hidden album on Google Photos? The answer is an absolute yes! Google Photos is user-friendly and allows users to hide images effortlessly. Basically, you could use the “Archive” feature of Google Photos to make your pictures secret. Besides, Google is rolling out a new function called “Locked Folder” to lock your photos as well. Read below to learn more.
Easy Way to Make a Google Photos Hidden Album on a Computer
If you don’t want to show up your private photos on the main page of Google Photos, but still want to search for certain images quickly when needed, you could directly ask the “Archive” feature for help. And the good thing is that Archive can be used on the Google Photos webpage and desktop app on a computer.
By adding photos or albums to Archive, they will not be shown on the homepage of Google Photos. However, you can access those hidden images in albums, search results, and your Archive. Now, please read below to find out the detailed operations.
Step 1: Head to Google Photos, and click on the “Archive” button on the left sidebar.
Step 2: Press “+ Add photos” in the top right corner.
Step 3: Select the photo or photos you want to hide, and then tap “Done” on the upper right side.
Tips:
1. Or, you can also add a photo to the Archive by selecting the photo on the homepage, and then click the “3 dots” button on the upper right corner to choose “Archive”. In this way, the picture will not show up on the main page of Google Photos.
2. In case you want to unhide the photos, you could select the photo in Archive, and click “3 dots” to choose “Unarchive”.
2 Top Ways to Create a Google Photos Hidden Album on a Mobile
It is more likely to hand the phone to others to show pictures in people’s daily life. So, to protect privacy, most of you want to know the way to hide photos in Google Photos on your phone. There are 2 useful ways for your reference.
Way 1: Using the Archive Feature
Similar to using the Archive feature on a computer, the way to create a Google Photos hidden album on a phone is very easy. Now, the detailed steps are as follows:
Step 1: Go to the Google Photos app on your phone.
Step 2: Select the photo you want to hide, and click on the “3 dots” button to choose “Archive”. Next, press “DONE”. In this way, the photo you have selected will be added to the Archive and will not be shown up on the main page of Google Photos.
Way 2: Creating a Google Photos Hidden Album by Locked Folder
Have you ever encountered a situation like this: when handing your phone to others to show off wonderful photos, you suddenly realize they scrolled too far to view some sensitive photos. If you want to keep those photos secret, you could use the new feature of Google Photos called Locked Folder.
Literally, “Locked Folder” means that saved items in the Locked Folder won't appear on Google Photos. Others cannot view them in albums, main page, and search results, which is different from Archive. Likewise, the photos in Locked Folder are not available to any other apps on your phone. So, that’s a safer way to keep your privacy.
Now, you could follow the steps below to create a Google Photos secret album by setting up Locked Folder:
Step 1: First, you should set up the Locked Folder on your Google Photos. Once open your Google Photos app, go to the “Library” tab.
Step 2: Press “Utilities” to select the “Locked Folder” option.
Step 3: Click on the “Set up locked folder” button in the pop-up window. And follow the instructions to complete the set-up process.
Step 4: After creating the Locked Folder, you could add photos to the Locked Folder by selecting them, and then tap the “3 dots” button on the upper right side.
Step 5: Choose “Move to locked folder”. In this way, others cannot view them without a password.
Tips:
1. You can't back up any of the pictures that the Locked Folder contains. If you move existing photos to the Locked Folder, backups of these images will be deleted automatically.
2. It is said that the Locked Folder feature will launch first on Google Pixels, and then will be coming to other Android phones throughout the year. So, it is friendly to Android users.
Bonus Tip: How to Free up Space on Google Photos
Although Google Photos offers a generous 15GB of free storage space, it shares the space with Google Drive and Gmail. Therefore, it is very easy to run out of the storage space very quickly. If you don’t plan to buy the premium plan but still want to keep using this app, you need to seek other ways to expand the storage space of Google Photos.
In this case, you can consider MultCloud. As a professional cloud file manager, MultCloud is specialized in managing cloud services and data in cloud drives in just one place. Supporting 32 popular cloud drives currently, MultCloud offers users some basic operations like uploading photos to Google Photos, syncing folder with Google Drive, and sharing Dropbox folder.
Besides, MultCloud provides main features such as Cloud Transfer and Cloud Sync. In addition, MultCloud allows users to do Remote Upload, which can help upload or download from URLs, magnet links, and torrent files.
If you want to continue using Google Photos, you could move some photos or videos from Google Photos to any other cloud, and then delete them to free up the storage space of Google Photos. In this case, the Cloud Transfer feature of MultCloud can help you transfer from one cloud to another effortlessly. Now, read below to learn the way to expand the storage space of Google Photos.
Step 1: Head to MultCloud and sign up for free with your email.
Step 2: Click the “Add Cloud” button on the left menu bar, and add the cloud you need. Here we add Google Photos and OneDrive.
Step 3: Go to “Cloud Transfer”, then select Google Photos as the source directory and OneDrive as the target directory. Next, tap “Transfer Now”.
On top of transferring, users could use Cloud Sync to sync files from Google Photos to another, for example, syncing Google Photos with OneDrive. Besides, there are 8 brilliant sync modes such as Real Time Sync, Mirror Sync, Move Sync, Cumulative Sync, and so on.
Tips:
1. MultCloud is based on data traffic to upload, download, transfer, and sync files. So, if the network connection is interrupted, it will not affect the process. In this way, you don’t need to sit in front of the computer to oversee the process.
2. If you have large files to transfer, sync, or upload, you could purchase a premium plan to get more data traffic. Meanwhile, you can enjoy other professional functions as well, such as Quintupled Transfer Speed, Double-syncing, and File Transfer/Sync Filter.
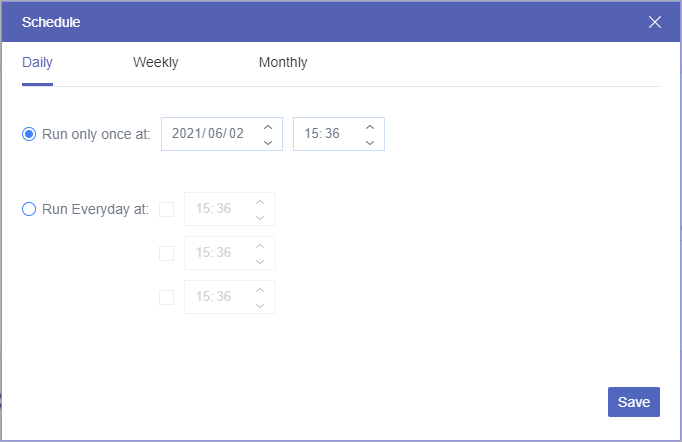
3. If you have many photos to migrate from Google Photos to OneDrive, and plan to move them in batches, you could set up scheduled transferring according to your needs by clicking the “Schedule” button.
In the End
After reading this article, you’ve learned simple methods to make a Google Photos hidden album on a computer and phone using by Archive and Locked Folder features. Meanwhile, there is a third-party app, MultCloud, for you to expand space on Google Photos. By using this service, you can transfer or sync pictures from Google Photos to another account efficiently and free up space in Google Photos.
MultCloud Supports Clouds
-
Google Drive
-
Google Workspace
-
OneDrive
-
OneDrive for Business
-
SharePoint
-
Dropbox
-
Dropbox Business
-
MEGA
-
Google Photos
-
iCloud Photos
-
FTP
-
box
-
box for Business
-
pCloud
-
Baidu
-
Flickr
-
HiDrive
-
Yandex
-
NAS
-
WebDAV
-
MediaFire
-
iCloud Drive
-
WEB.DE
-
Evernote
-
Amazon S3
-
Wasabi
-
ownCloud
-
MySQL
-
Egnyte
-
Putio
-
ADrive
-
SugarSync
-
Backblaze
-
CloudMe
-
MyDrive
-
Cubby

Stay Updated With Our
Latest Tips
Add us as a preferred source on Google to never miss helpful guides.