Can I Sync iCloud to External Hard Drive?
You can sync iCloud to an HDD and it is not difficult to achieve. You can find the 4 easiest solutions in the following sections. In this section, let’s explain what benefits can be brought to you by syncing iCloud to a hard drive.
- Backup: The data on your iCloud can get additional protection if you copy it to a hard drive. When you accidentally delete a file or you want to find the old version of a file, you can turn to that external hard drive for help.
- Storage Saving: If you have an external hard drive and your iCloud space is about to run out, transferring some content like photos on iCloud to your hard drive will be a good choice. By doing so, you don’t need to pay for extra iCloud storage.
- Accessibility: iCloud is an online service, so you can access the data on it only if your device is connected to the network. However, the data on a hard drive can be accessed offline. Therefore, syncing iCloud to a hard drive can make you use the data online and offline.
Sync iCloud to External Hard Drive [4 Methods]
In this section, you can learn how to sync iCloud to an external hard drive through MultCloud, iCloud.com, Mac Finder, and iCloud for Windows. Whether you apply which method, don’t forget to plug your external hard drive into your computer.
Method 1: iCloud Sync to External Hard Drive via MultCloud
MultCloud is a free cloud management service, aiming to transfer and manage all clouds with one app. Although its popular functions focus on cloud-to-cloud transfer, sync, and backup, it also supports downloading files from the cloud. There are 2 advantages of using MultCloud to sync:
- Since MultCloud is a web-based app which can be used on any browser with a network connection, this method to sync iCloud to external hard drive is available whether you are a Mac user or a Windows PC user.
- MultCloud uses data traffic to transfer files, so the transfer speed will be fast. Besides, offline transfer is another obvious benefit of using data traffic. You can close the task window or your computer after creating the task and the transfer will keep running before it is completed.
Before going with the MultCloud Download steps, please change the downloading destination to your hard drive in the browser settings. By doing so, you don't have to transfer the files again from a local position to your external HDD.
Step 1: Get a MultCloud account for free.
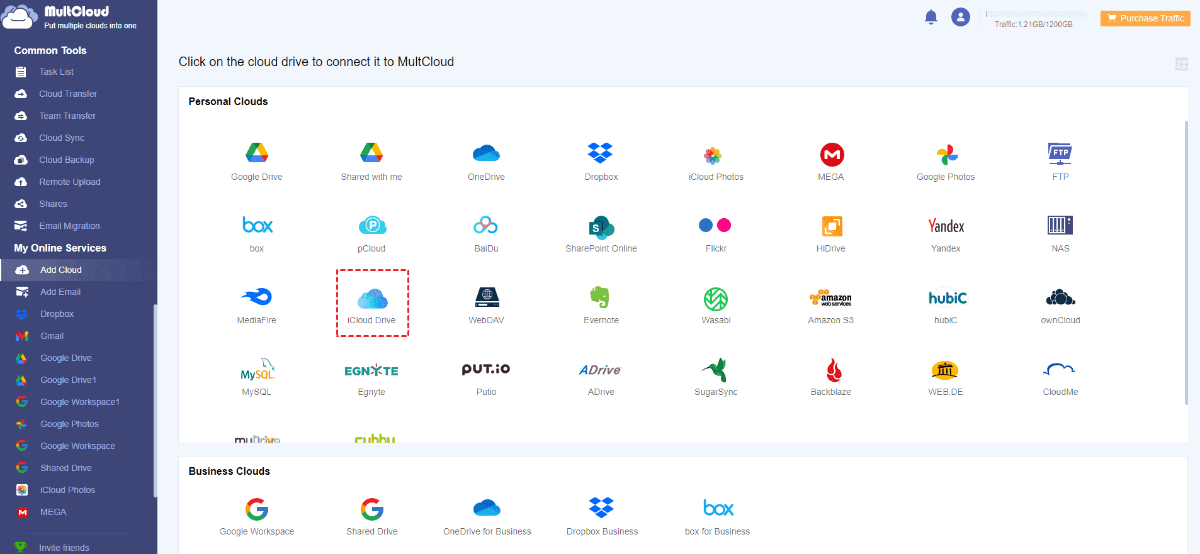
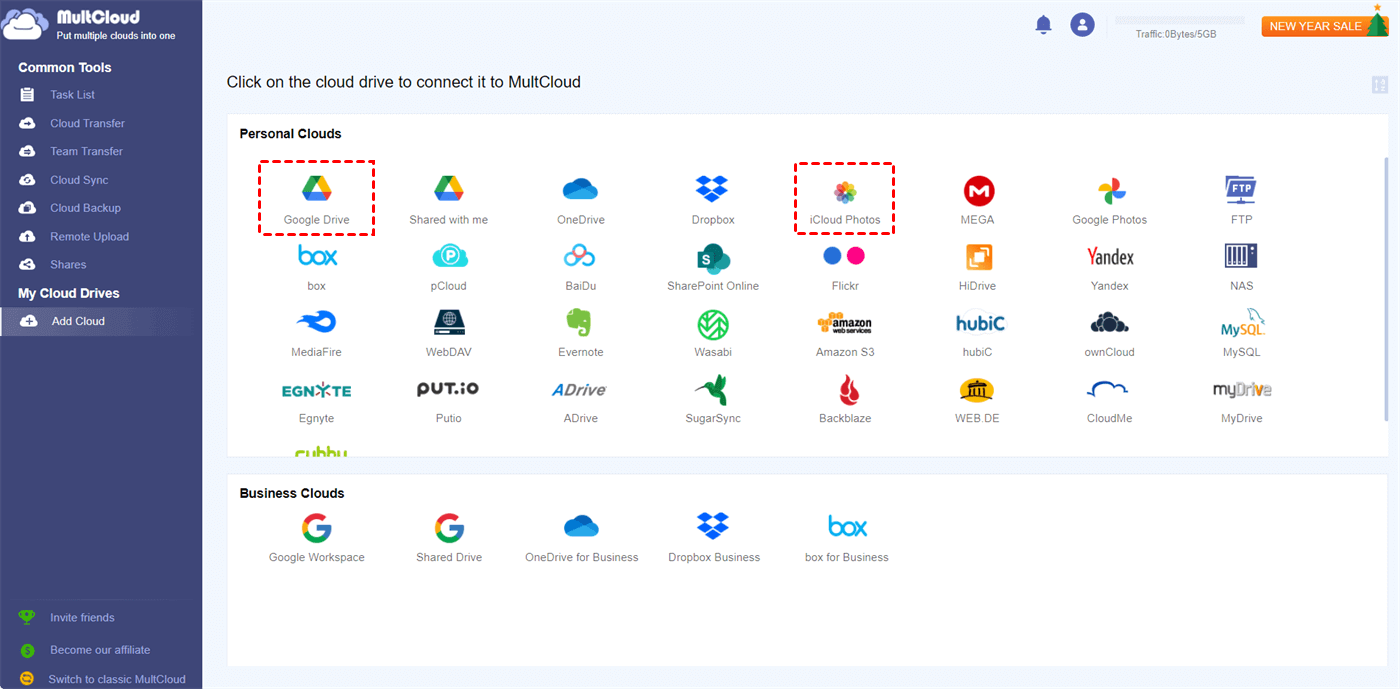
Step 2: Add iCloud Drive to MultCloud. The operations are: Click "Add Cloud" > Select iCloud Drive icon >Sign in to your Apple ID > Go through two-factor authentication > Grant MultCloud's access.
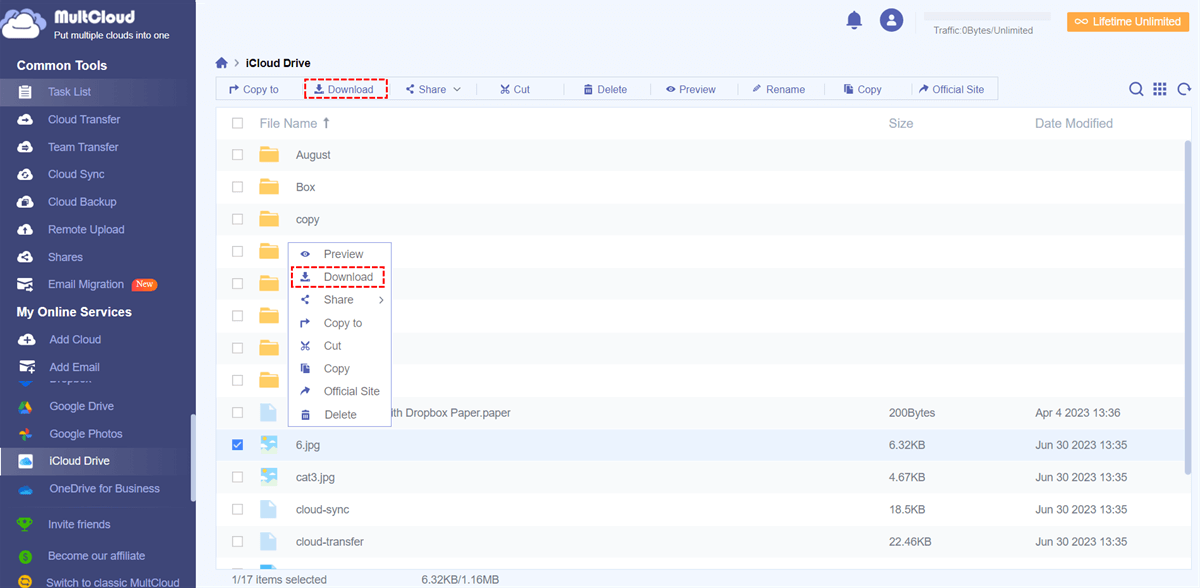
Step 3: Open iCloud Drive on MultCloud, choose the files you want to download, and click the "Download" button in the upper bar. Then the files start to download to your hard drive.
Note: If you want to sync an external hard drive to iCloud, uploading files from your external hard to iCloud on MultCloud is also a good way, because Apple claims that the external hard drive cannot be synced with iCloud directly.
Method 2: iCloud Sync to a Hard Drive via iCloud.com
Also, to ignore the step of uploading files from a local position to your hard drive, you’d better change the downloading destination to the hard drive in your browser first.
Step 1: Enter iCloud.com and log in to your account.
Step 2: Choose content that needs to be moved and click the download icon in the upper bar. After that click, the content will be transferred to your external hard drive.
Note: You can only download a single file at once, so it may be annoying if you have a lot of data to sync.
Method 3: Sync iCloud to External Hard Drive via Finder
Before the next operation, make sure that you turn on iCloud Drive on your Mac.
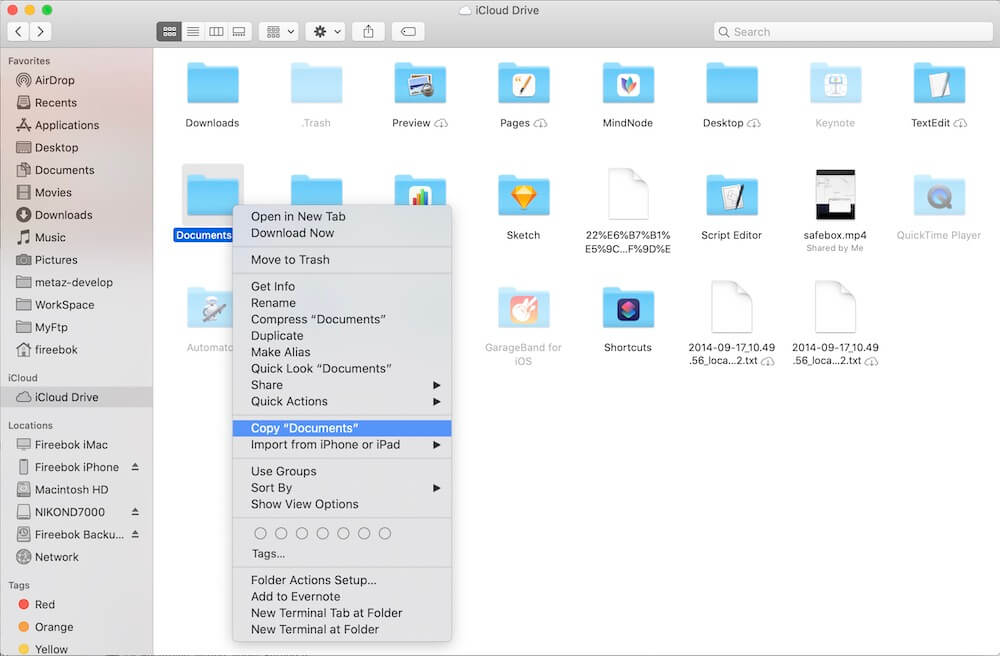
Step 1: Open Finder and click “iCloud Drive” in the left sidebar.
Step 2: Select the content that you are willing to sync and right-click on it. Then choose “Copy ‘Documents’” in the menu.
Step 3: Paste the copied content to your external hard drive and wait for it done.
Method 4: Use iCloud for Windows to Sync to an External HDD
If you haven't downloaded iCloud for Windows on your PC before, you have to download it or the next steps can’t be operated.
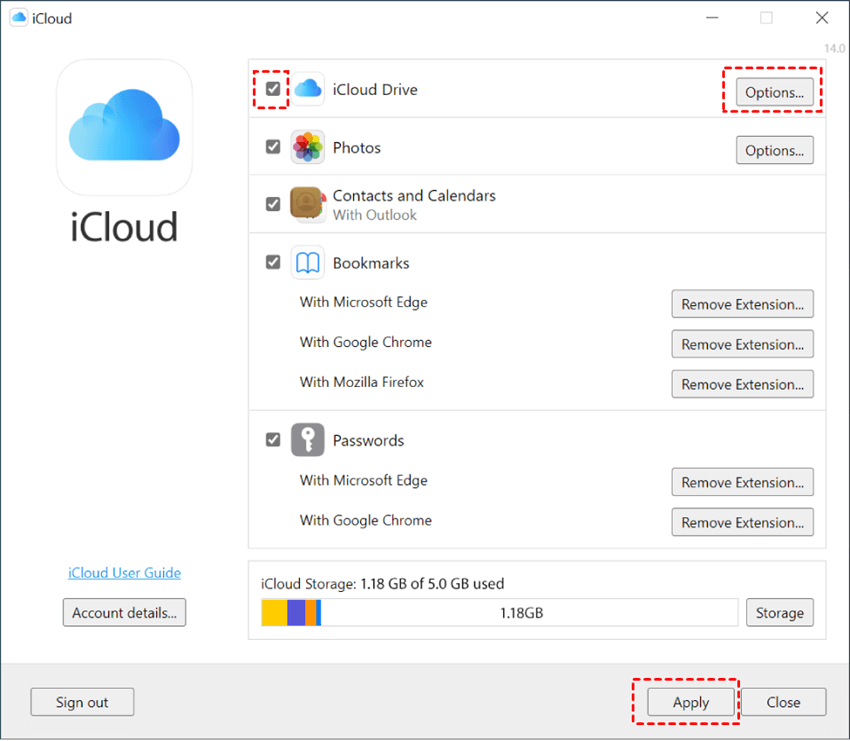
Step 1: Open iCloud for Windows and log in to your account.
Step 2: Tick the box beside iCloud Drive and click “Apply”. You can change the downloading destination by clicking “Change”.
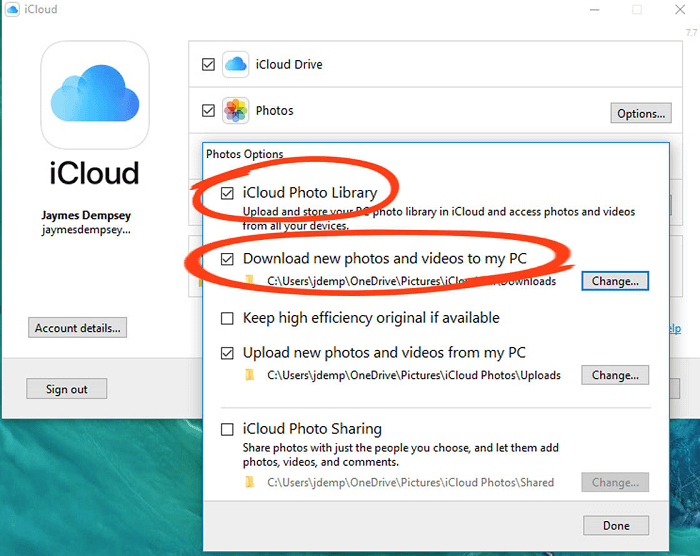
Note: If you want to sync iCloud photos to external hard drive, you can tick “Photos” and click “Options”. When a pop-up window appears, you can select the options shown in it and click “Done” and “Apply”. By doing so, the photos on iCloud will be downloaded to your PC and you can move them to an external hard drive.
Step 3: Turn to File Explorer and open the iCloud Drive folder. Then copy what you’d like to sync and paste them to your external hard drive.
Bonus Tip: Sync iCloud Photos with Other Clouds via MultCloud
Unlike a file which is small in size, photos always occupy much space on cloud drives or hard drives. If you have a lot of photos on your iCloud and you don’t want to upgrade to a higher plan or store photos on hard drives, you can sync iCloud Photos with Google Drive, OneDrive, or other clouds that have more storage and cheaper plans.
Using MultCloud Cloud Sync is undoubtedly the best way to sync iCloud Photos or iCloud Drive to other clouds. Cloud Sync is designed to make cloud-to-cloud sync swiftly and automatically without manually downloading. Also, you can use the various sync modes to make the sync task more personalized.
Step 1: Open MultCloud and create a MultCloud account by clicking “Get started for free”.
Step 2: Click “Add Cloud” and then choose iCloud Photos to add it to MultCloud. Then you have to repeat the same steps to add Google Drive (for example) to MultCloud.
Note: You will log in to iCloud Photos and Google Drive accounts to add them successfully. When logging in to iCloud Photos, there will be a two-factor authentication that needs you to go through.
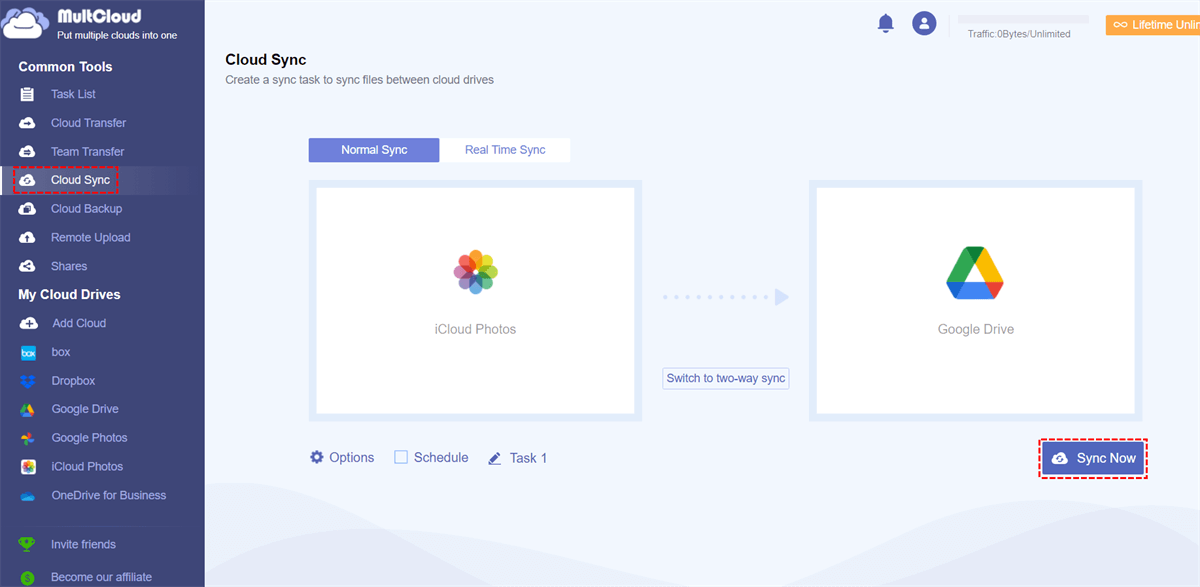
Step 3: Tap Cloud Sync and choose iCloud Photos and Google Drive in their corresponding boxes. Then click “Sync Now” and your photos will be sent to Google Drive very soon.
Notes:
- MultCloud gives 5 GB of free data traffic every month for file transfer. If you have masses of photos to sync, you can subscribe to a paid plan to get more data traffic and transfer files at faster speed.
- If you want to update photos in another cloud automatically, you can choose to schedule the sync process. The "Schedule" allows you to order the sync process to run daily, weekly, or monthly according to your needs.
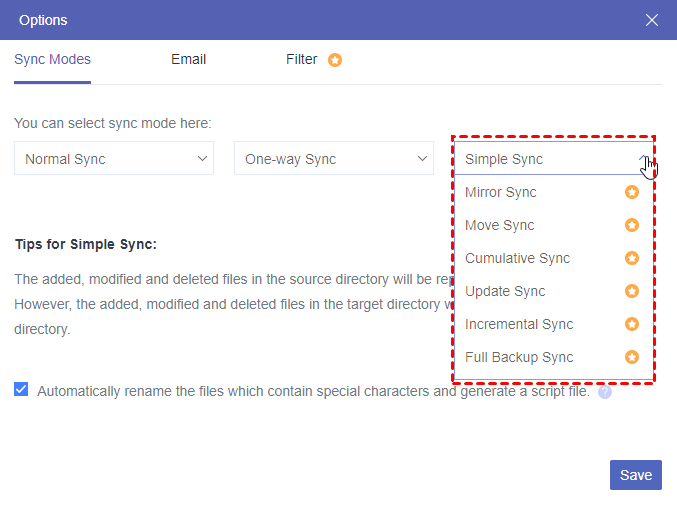
- Also, if you want MultCloud not to sync the repeated photos, choose "Incremental Sync" in Options. Then only the changed parts will be synced to Google Drive.
Conclusion
As it mentioned before, it is easy to sync iCloud to external hard drive and the above 4 tested methods are of great use. If you don’t want to be restricted by devices and the downloading number of files, you can choose the first one.
Besides, MultCloud is also recommended for you if you have more demands like backing up iCloud Photos to Dropbox or other clouds. Using MultCloud Cloud Backup can not only backup photos but also restore them with different versions if you backed them up before on MultCloud.
MultCloud Supports Clouds
-
Google Drive
-
Google Workspace
-
OneDrive
-
OneDrive for Business
-
SharePoint
-
Dropbox
-
Dropbox Business
-
MEGA
-
Google Photos
-
iCloud Photos
-
FTP
-
box
-
box for Business
-
pCloud
-
Baidu
-
Flickr
-
HiDrive
-
Yandex
-
NAS
-
WebDAV
-
MediaFire
-
iCloud Drive
-
WEB.DE
-
Evernote
-
Amazon S3
-
Wasabi
-
ownCloud
-
MySQL
-
Egnyte
-
Putio
-
ADrive
-
SugarSync
-
Backblaze
-
CloudMe
-
MyDrive
-
Cubby
