Quick Search:
Know About "Shared with me" and "My Drive" in Google Drive
Google Drive is a free cloud storage service provided by Google. Both individuals and companies can use this free platform to store all kinds of data. With Google Drive, companies can share work documents, excel, videos, etc. with employees so that employees can access these shared project resources anytime and anywhere and have real-time update facilities. In addition, students can also use a dedicated account to better complete their academic tasks.
Google Drive contains two file storage paths: "My Drive" and "Shared with me". "My Drive" refers to the files and folders that you have created or uploaded to your own Google Drive account. You have the ownership and full control. On the other hand, "Shared with me" is where you can access all data that have been shared with you by other users. This can include documents, spreadsheets, presentations, photos, videos, and other types of files.
When someone shares a file or folder with you in Google Drive, they can give you different levels of access, such as "view only" or "edit" access. This directly determines what you can do with the shared data, like viewing, commenting, or modifying. It provides a convenient place to get all files shared with you and collaborate on these files without searching through all your own files or asking others for permission.
How to Add "Shared with me" to "My Drive"? 3 Ways
Due to the difference between "My Drive" and "Shared with me", some users might need to add "Shared with me" to "My Drive" in order to put all files/folders in one place for centralized management. However, how to save or copy "Shared with me" to "My Drive". It confused lots of Google Drive users. Luckily, we have rounded up 3 practical methods, with detailed operation steps attached, in this article.
Method 1. Choose "Add shortcut to Drive" Option
One way that many users often use is the file move or copy option built into Google Drive: "Add shortcut to Drive". This method is mainly to create a copy of the shared file or folder. After the copy is created, the user can directly edit the content shared by other users in My Drive (if the "Editor" permission is granted to you).
Step 1: Log in to your Google Drive account and enter the "Shared with me" interface.
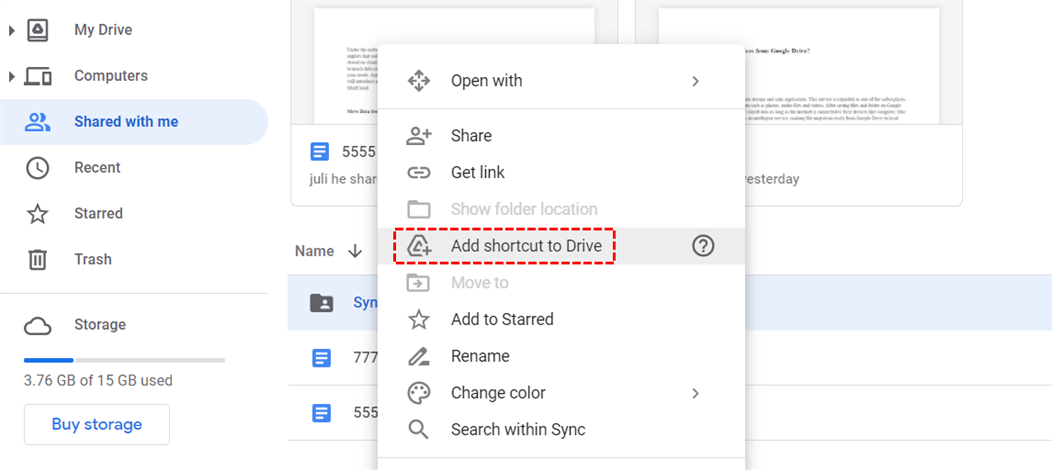
Step 2: Select the file or folder that needs to be copied, and then click the right mouse button.
Step 3: Select the "Add shortcut to Drive" option in the pop-up window, and then select "My Drive".
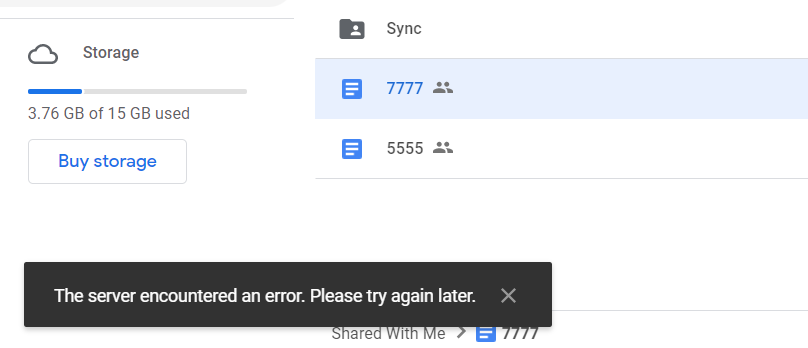
There is an alternative to this method, which is to use a shortcut: SHIFT+Z. But one thing you should note: the "Shift+Z" shortcut or "Add shortcut to Drive" option requires you have the advanced sharing option "Editor can change permissions and share". If this option is disabled, you will not be able to add a shared folder to my drive, and receive the following error message you encounter. E.g:
- The folder name has been added to "My Drive".
- The server encountered an error. Please try again later.
If you encounter the problem Google Drive add to My Drive missing, please make sure it's a file not a folder, or Google Drive does not provide the option to add it to your "My Drive".
Method 2. Add "Shared with me" to "My Drive" by Download & Upload
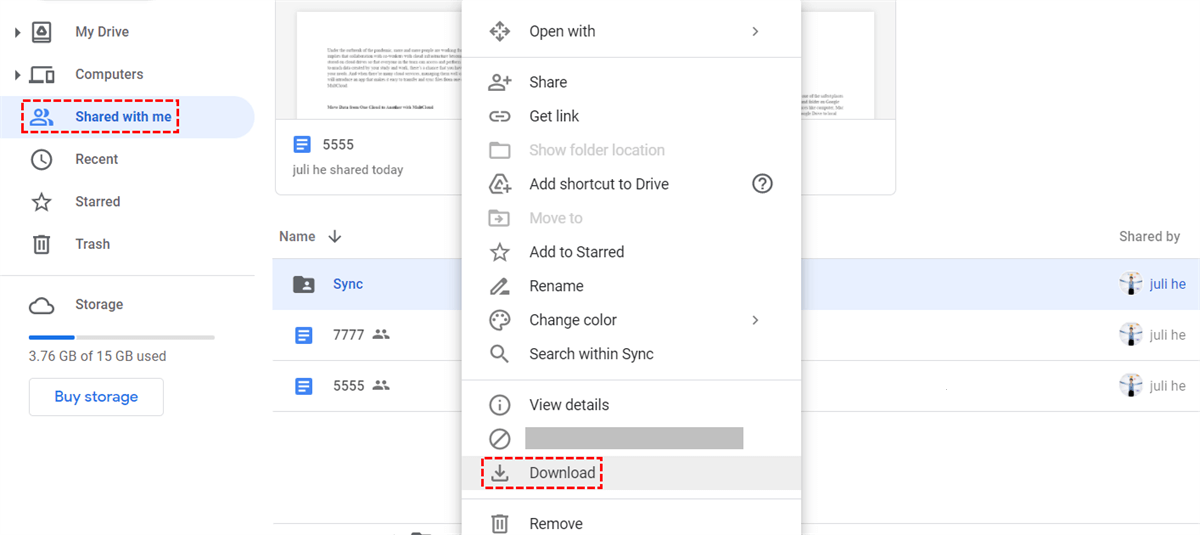
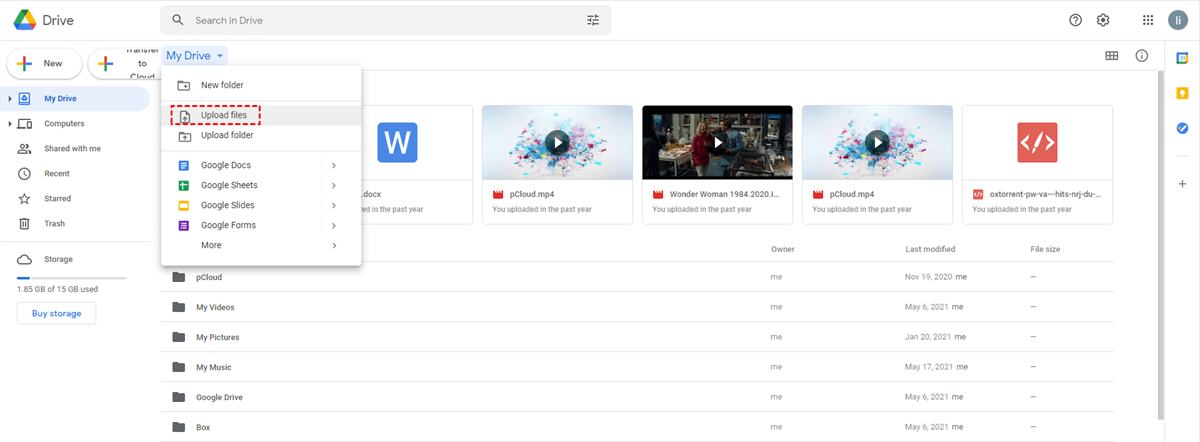
In order to get around the limitations caused by the accessibility level, you can also choose another traditional way, namely uploading and downloading. Download the data from "Shared with me" to the local storage drive, and then upload it to the "My Drive". The specific steps are as follows:
Step 1: Enter the main interface of Google Drive, and then click the "Shared with me" icon.
Step 2: Select the file or folder to be moved, then right-click the mouse and select "Download".
Step 3: Then go to the "My Drive" interface, and then select the "Upload Files" or "Upload Folder" button in the drop-down list to upload the data just downloaded.
When using this method, even if the file is deleted or the file owner changes the file permissions, you can still access the information at any time. But this method also has some limitations.
- When the network status is not good, you need to continue uploading and downloading operations for a long time, especially when you try to download and re-upload large amounts of data.
- If you encounter some system errors, the upload and download process may be suddenly terminated and you need to start from the beginning.
- It might take up a lot of storage space on your local storage drive before you upload them to the destination path.
- The entire process requires manual operation, and these data cannot be transferred to the corresponding location regularly.
So, is there a way to avoid all the above-mentioned problems and support executing the task of Google Drive "Shared with me" add to "My Drive" regularly? A multiple cloud storage manager introduced next may be able to help you.
Method 3. Regularly Add Shared Folder to "My Drive" (Not Shortcut)
As a web-based cloud file manager, MultCloud supports the regular transfer, sync, and backup of data across cloud drives, as well as other basic functions supported by cloud drives, such as: copy to, download, share, cut, paste, delete, preview, rename, copy, etc.
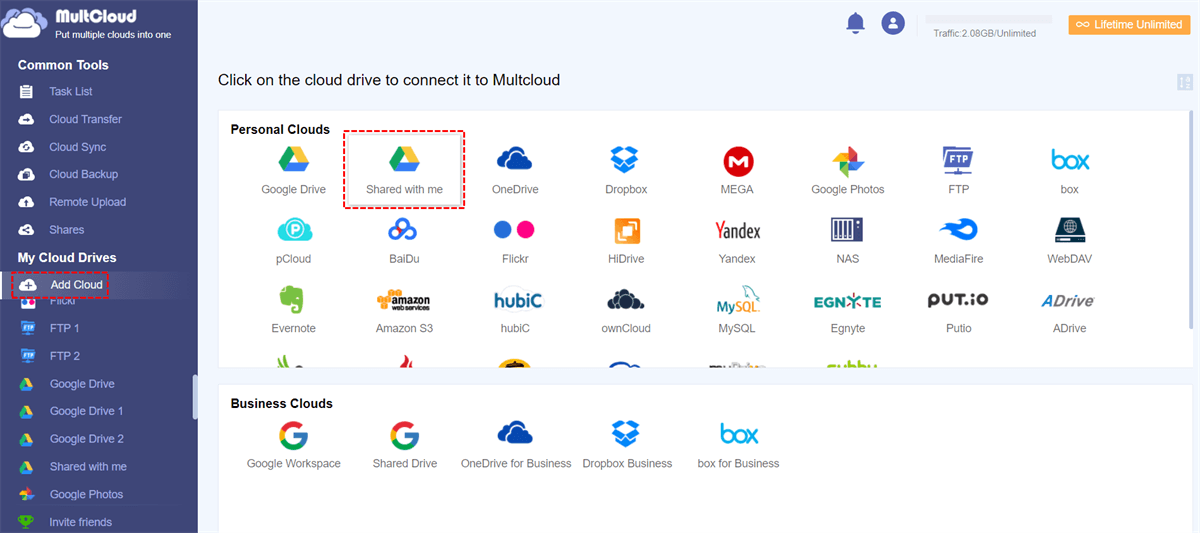
Currently, MultCloud supports adding more than 30 cloud storage services, Dropbox, Dropbox Business, Google Drive, Google Workspace, Google Photos, OneDrive, OneDrive for Business, SharePoint, MEGA, iCloud Drive, iCloud Photos, Icedrive, 4Shared, even adding Shared with me in Google Drive and Shared Drive in Google Workspace separately. With MultCloud, you can easily manage multiple cloud storage accounts.
In addition, MultCloud supports various core functions, such as Cloud Transfer, Cloud Sync, Cloud Backup, Team Transfer and Remote Upload. These options can save time, reduce the risk of data loss or corruption, and maintain data security during the data transfer process.
- ☘️Cloud Transfer: Directly transfer all data across cloud accounts.
- ☘️Team Transfer: Migrate tenant data across business accounts.
- ☘️Cloud Sync: Sync data between different accounts immediately.
- ☘️Cloud Backup: Back up and restore data at any time and anywhere.
- ☘️Image & Video Saver: Be free to save images and videos in full resolution.
- ☘️Remote Upload: Easily parse data from torrents to cloud accounts.
Then, how to add "Shared with me" to "My Drive" with MultCloud?
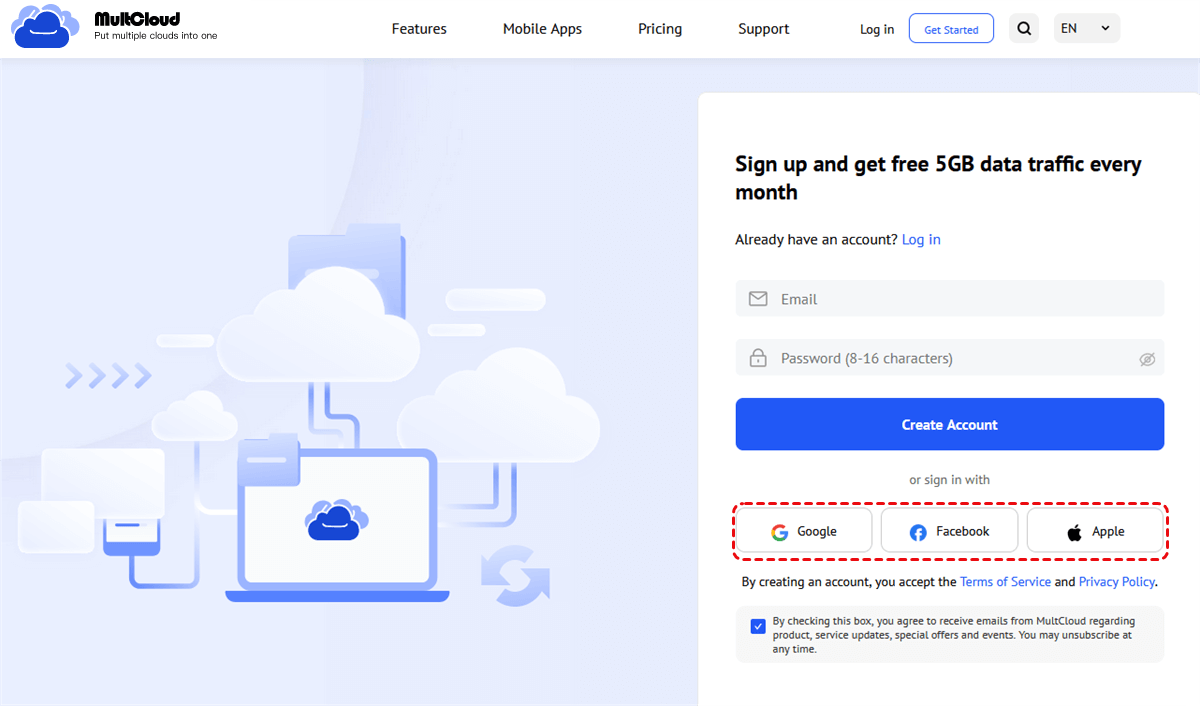
Step 1: Go to the MultCloud homepage and register an account with an email address.
Tips:
- If you add Google Drive to MultCloud, it will be add your "My Drive".
- After adding, Shared with Me and Google Drive (My Drive) will be listed from the left side under My Cloud Drives.
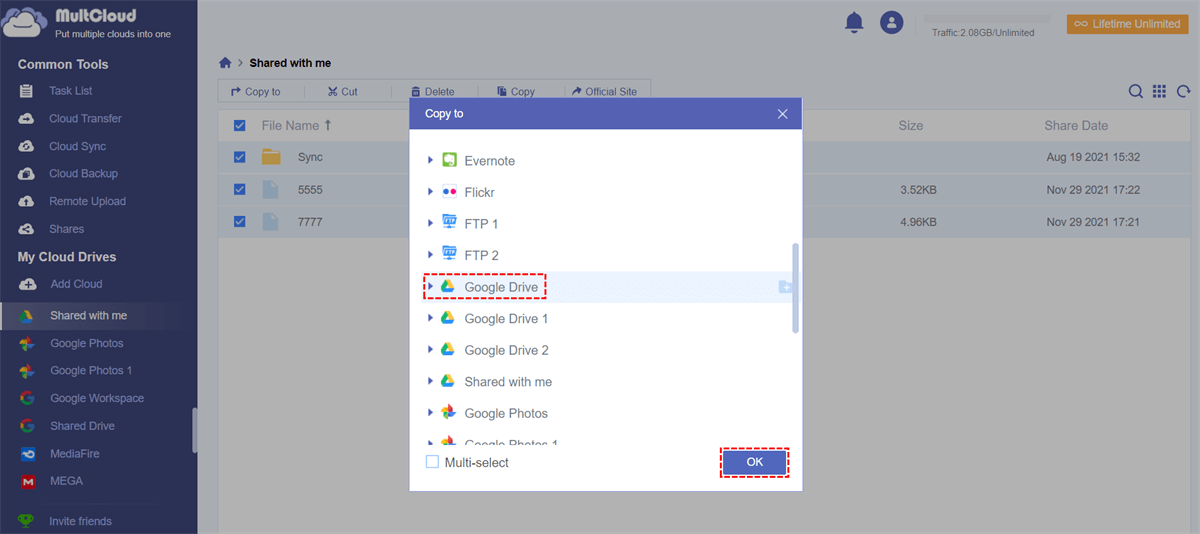
Step 3: When adding "Shared with me" to "My Drive", you have two options available, the first is Copy to, and the second is Cloud Transfer.
Option 1: When there are few files to be transferred, you can use the Copy to option. Select the file or folder that needs to be moved in Shared with Me, right-click the mouse and select "Copy to" (you can also select the options listed above), and finally select Google Drive as the destination path to add shared folder to My Drive not shortcut.
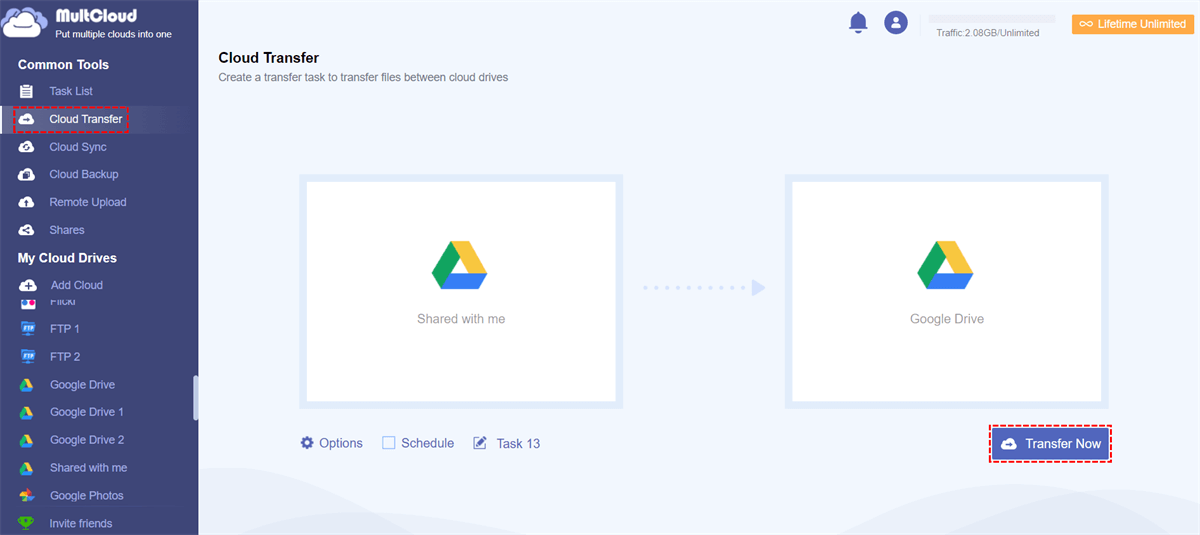
Option 2: When there are many files to be transferred, Cloud Transfer can help you a lot. Enter the "Cloud Transfer" interface, select "Shared with me" and Google Drive as the source path and target path respectively, and then click "Transfer now" to let Google Drive Shared with Me add to My Drive directly.
Warm Tips:
- If you want to add "Shared with me" to "My Drive" regularly, you need to set a specific time in the "Schedule". This option is only supported in the Cloud Transfer option.
- When using MultCloud to perform file movement operations, you can close the page or even the computer, because MultCloud supports offline transfer in the background.
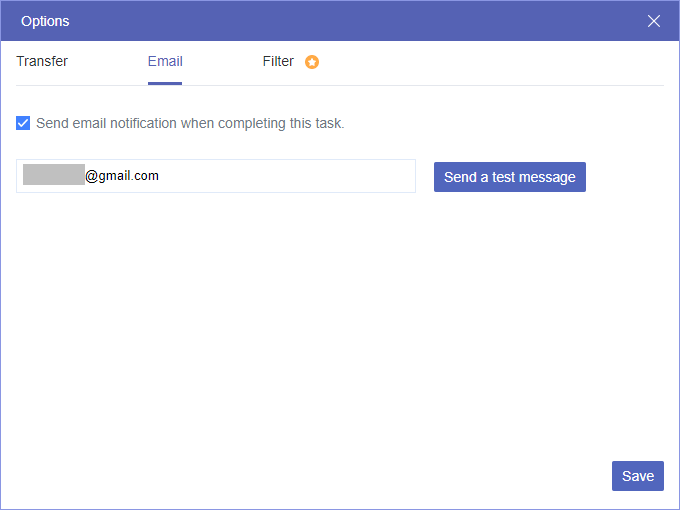
- MultCloud also supports email notification function, you can enable "Send email notification when completing this task" in "Options".
- Unlock to enjoy all functions, including schedule, filter, more data traffic, high-speed transfer, and more.
✨More About MultCloud
With the "Copy to" and "Cloud Transfer" provided by MultCloud, you can easily add "Shared with me" to "My Drive" instead of adding shortcut. After the file is moved, you can edit, move, delete and other operations on the file regardless of whether you have obtained the "Editor" permission. Besides, the following features offered by MutlCloud can also benefit you a lot in your cloud data management:
- Team Transfer: Migrate or move all accounts or domains between business clouds. It can automatically pair the accounts in two different business clouds and migrate data in side from one cloud to another.
- Cloud Sync: This function can help you sync files between multiple cloud storage services in real time, ensuring that your data is always up to date. There are also 9 sync modes to choose from: "Real Time Sync", "Two-way Sync", "Simple Sync", "Mirror Sync", "Move Sync", "Cumulative Sync", "Update Sync", "Incremental Sync", "Full Backup Sync".
- Cloud Backup: This function supports users to back up data to one or more cloud drives, such as backup website to Google Drive. When data is lost, you can use the "Restore" option to restore the files to the desired version.
- Remote Upload: "I have e-books and movies that I want to download, but the torrent file or magnet link needs a third-party tool to parse, what should I do?" With this function, you can directly download URLs, torrent files, or magnet links to the corresponding cloud account.
The End
After reading here, you might find the best free way to add Shared with Me to My Drive is MultCloud, because it allows you to add a shared folder to My Drive not a shortcut and you can add the shared folder to My Drive on Windows 10 desktop, or other computers. If you use Add Shortcut to My Drive, it only creates shortcuts, not the real file copy. Besides, downloading files from Shared with Me and uploading to My Drive is another option you can choose from.
MultCloud Supports Clouds
-
Google Drive
-
Google Workspace
-
OneDrive
-
OneDrive for Business
-
SharePoint
-
Dropbox
-
Dropbox Business
-
MEGA
-
Google Photos
-
iCloud Photos
-
FTP
-
box
-
box for Business
-
pCloud
-
Baidu
-
Flickr
-
HiDrive
-
Yandex
-
NAS
-
WebDAV
-
MediaFire
-
iCloud Drive
-
WEB.DE
-
Evernote
-
Amazon S3
-
Wasabi
-
ownCloud
-
MySQL
-
Egnyte
-
Putio
-
ADrive
-
SugarSync
-
Backblaze
-
CloudMe
-
MyDrive
-
Cubby
.png)
