

Quick Search
About cPanel Backup
The cPanel Backup feature provides a direct way to create a complete copy of your WordPress website, including all website files, databases, email accounts, and configuration settings. It is one of the most reliable methods for performing a full backup because it is handled at the hosting level rather than through WordPress itself.

The cPanel backup system offers a straightforward and reliable way to protect your WordPress site and ensure it can be restored whenever needed. Compared with backups created via WordPress plugins, it offers the following advantages:
- Broader backup coverage: cPanel full-account backups cover WordPress files, databases, emails and server settings for complete data protection.
- Operates independently of WordPress: Backups and restores run on the server even if WordPress breaks or its admin is unreachable, removing plugin dependency risks.
- Ideal for disaster recovery scenarios: Supports full-site restoration and migration to quickly rebuild your site after hacks or system damage.
- Minimal impact on site speed: Server-side backup consumes no WordPress resources, causing little slowdown to live website traffic.
- Higher migration efficiency: Packages your entire hosting account in one file for fast, streamlined site moves or full-site cloning.
How to Back up WordPress Site from cPanel [3 Ways]
This section introduces three methods to back up your website via cPanel. Whether you need partial or full backups, you can find a suitable solution to fully protect your site structure, files and database content.
Method 1: Backup WordPress Files via cPanel File Manager
This method focuses on manually backing up all WordPress core files stored on your hosting server. It is especially useful when you want direct control over themes, plugins, and media uploads. You can quickly create a downloadable archive of your entire WordPress installation without affecting the live site.
Step 1. Log in to cPanel and open File Manager.
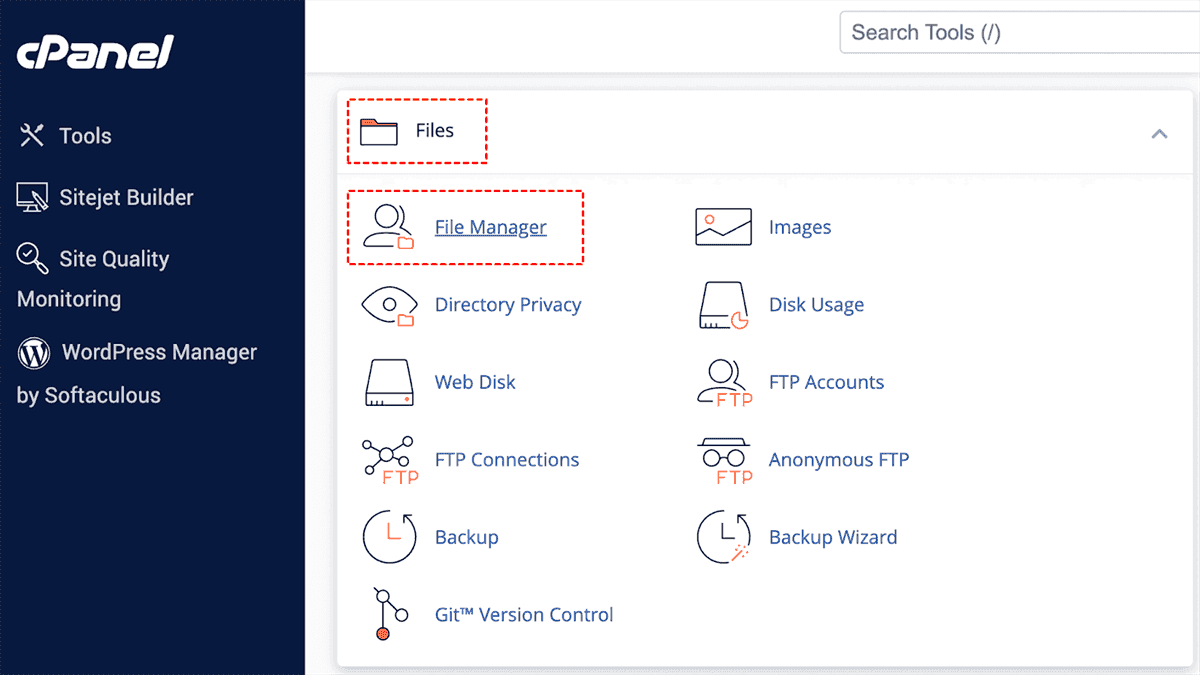
Step 2. Access the main directory where your WordPress site is installed, usually under public_html.
Step 3. Right-click the folder and choose the "Compress" option to create a ZIP or Tar backup file as you like.
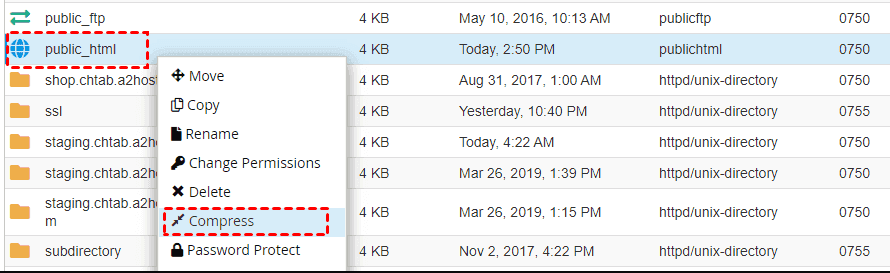
Step 4. Once the archive is created, download it to your local computer or external storage for safekeeping.
Method 2: Back up WordPress Database via phpMyAdmin
This method focuses on backing up the WordPress database, which stores critical site contents such as posts, pages, user data, and settings. It is essential because even if files are intact, missing database data can make the site unusable.
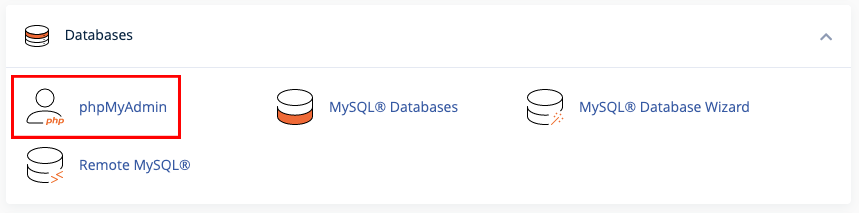
Step 1. Open phpMyAdmin from your cPanel dashboard. Locate and access the database associated with your WordPress installation.
Step 2. Choose your WordPress database from the left panel to ensure all site data is included.
Step 3. Click "Export" tab, select the "Quick" method, and download the ".SQL" file to your local device.
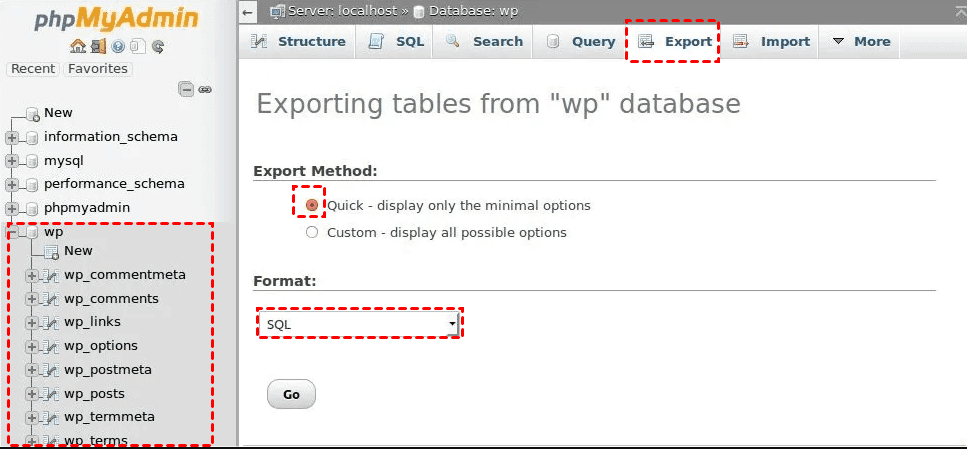
Step 4. Click "Go" to start the downloading process.
Method 3: Back up WordPress Site via cPanel Backup Wizard [Full Backup]
This method provides the most complete backup option by generating a full copy of your hosting account. It includes WordPress files, databases, email accounts, and configuration settings in one package. It is the most reliable option for full-site protection and migration purposes.
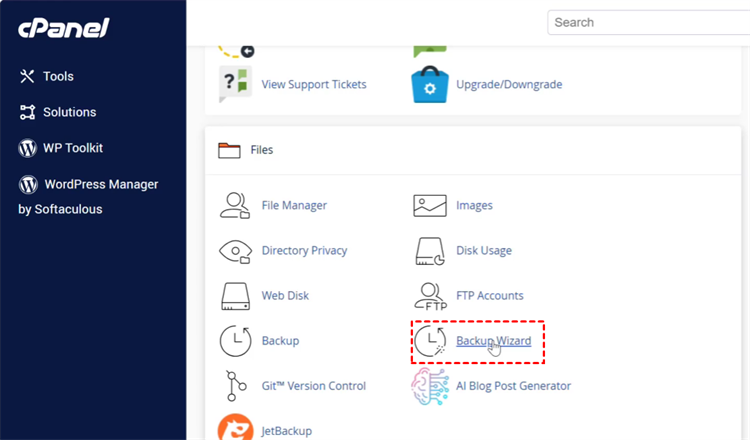
Step 1. Open the Backup Wizard section in cPanel.
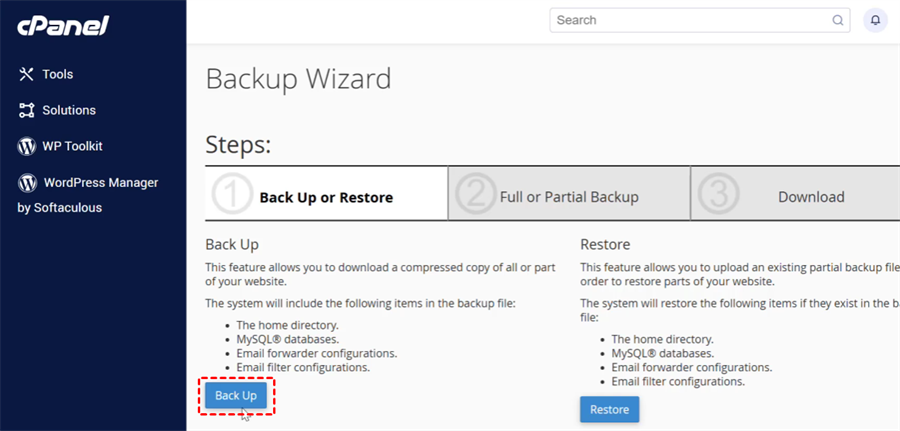
Step 2. Click "Back up" and select the option to generate a full or partial backup of your WordPress site.
Step 3. Select a backup destination where you want to keep this file and click "Generate Backup" to initial the backup process.
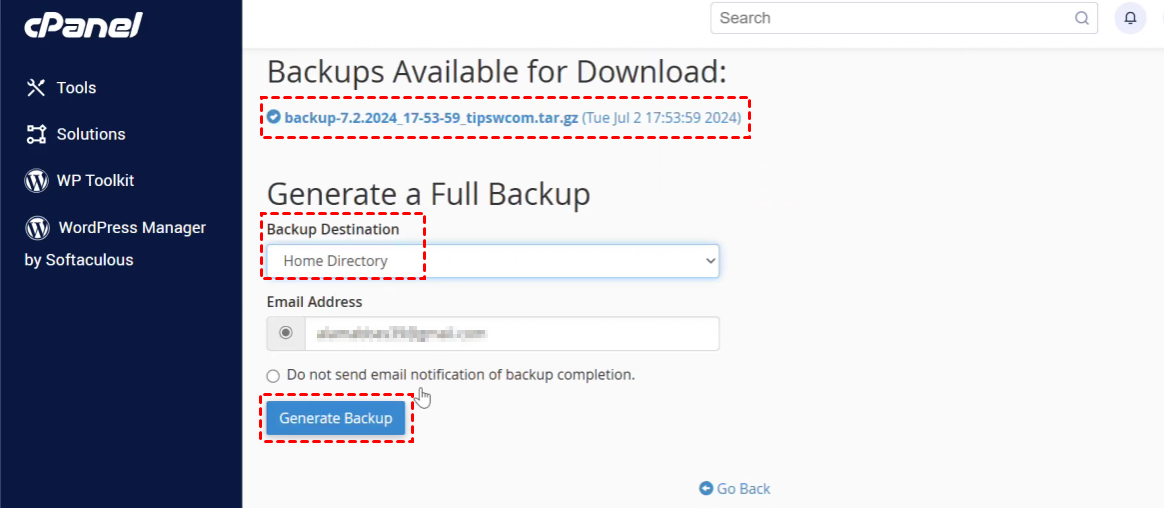
Once the backup process is complete, download the compressed file and store it securely outside your server.
How to Restore WordPress Site from cPanel Easily
After creating a backup using cPanel, the next critical step is knowing how to restore your WordPress site when issues occur such as data loss, broken updates, or server migration. cPanel provides multiple restore options depending on how your backup was created. Each method focuses on rebuilding a specific part of your WordPress site, and together they allow you to fully recover your website to a working state.
Restore WordPress Files via File Manager
If you have previously backed up your WordPress files as a compressed archive in File Manager, you can use this way to restore WordPress files. It focuses on restoring the website structure, including themes, plugins, and uploaded media. By uploading and extracting the backup file in File Manager, you can quickly rebuild the frontend part of your WordPress site and overwrite corrupted or missing files.
Step 1. Log in to cPanel and open File Manager. Navigate to the directory where WordPress site is installed, usually public_html.
Step 2. Click "Upload" on the top menu to send your previously downloaded backup ZIP or tar.gz. file. Place it in the root WordPress directory to ensure proper restoration.
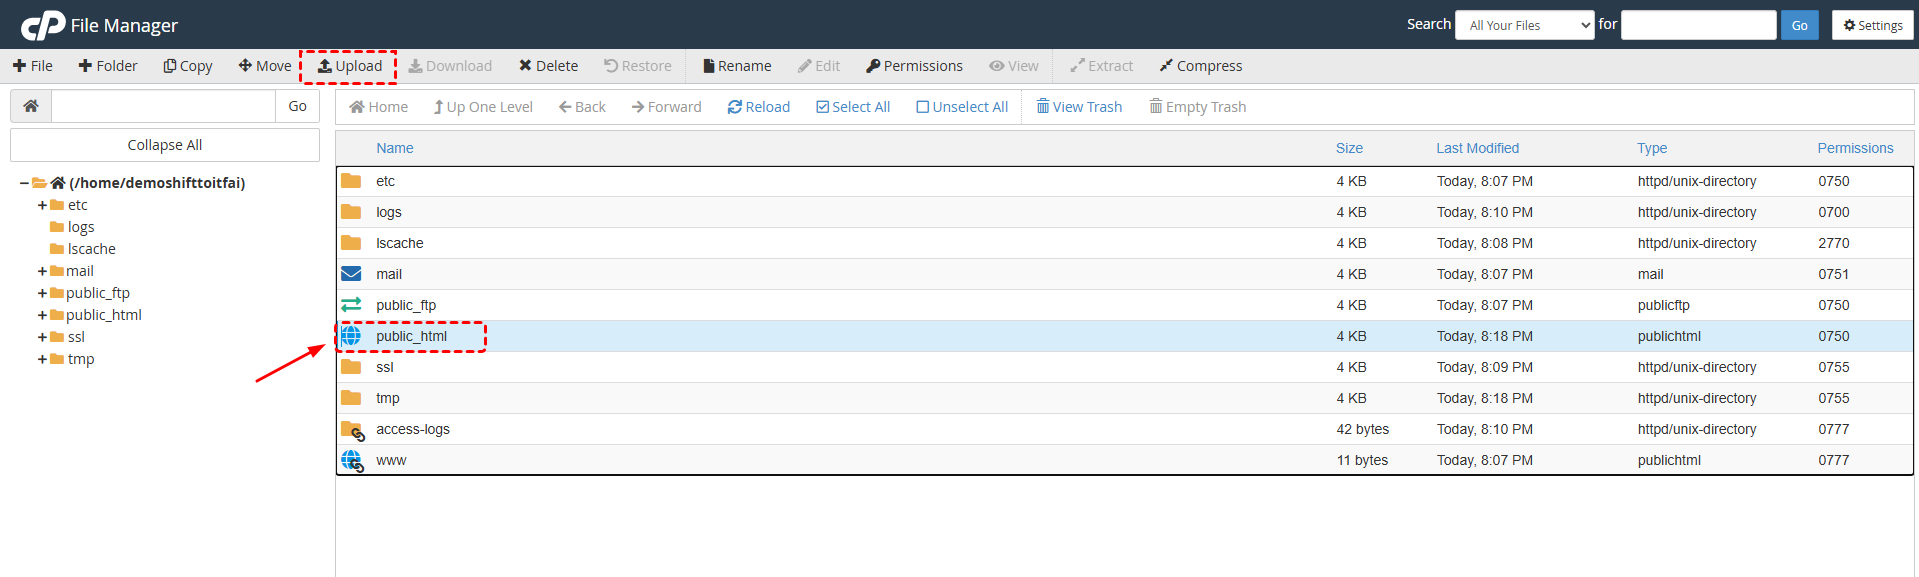
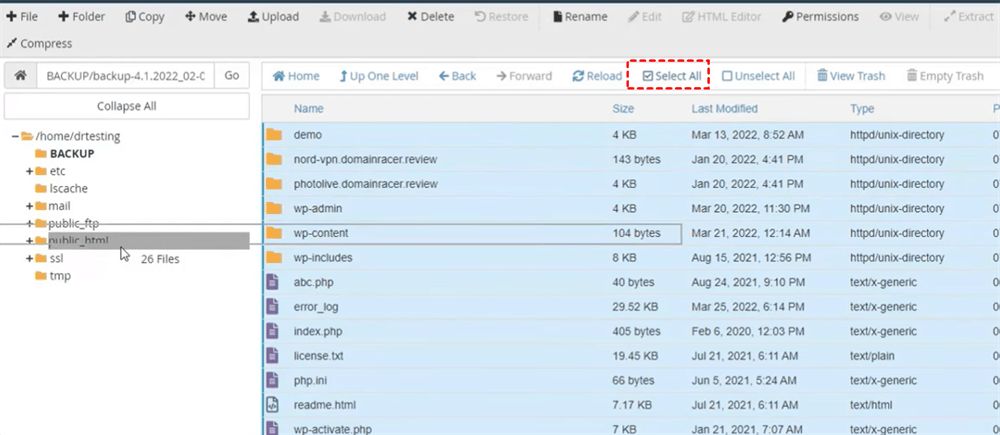
Step 3. Right-click the file and choose "Extract" to restore all website files to their original structure.
Step 4. Select all files inside the folder you want to restore, then drag and drop them into the corresponding directory.
Restore WordPress Database via phpMyAdmin
When only your WordPress content data is missing or corrupted, you can try this way to restore it. It focuses on restoring posts, pages, user accounts, and settings by importing the previously exported SQL database file. It is commonly used for fixing broken websites where files are intact but content is lost.
Step 1. Open phpMyAdmin from cPanel. Select the correct WordPress database from the left panel.
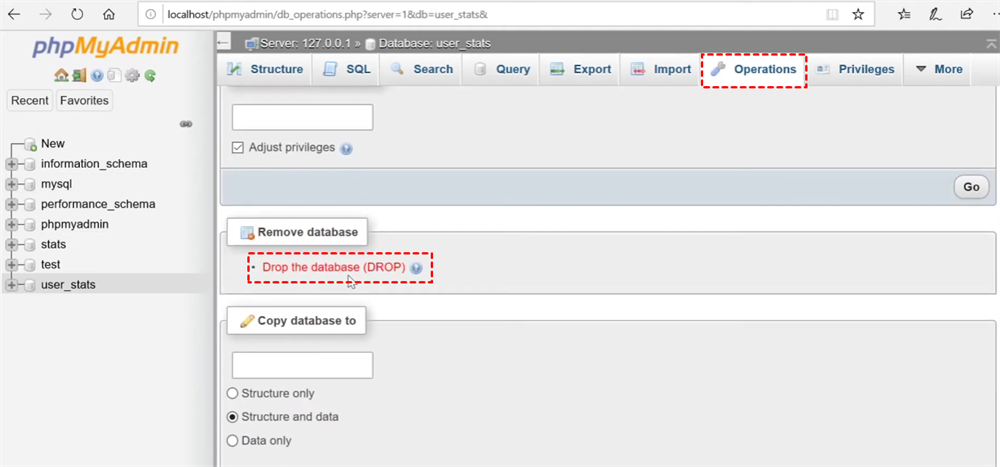
Step 2. Click "Operations" on the top menu and click "Drop the database (DROP)" to delete or empty existing tables. This ensures the new import does not conflict with old corrupted data.
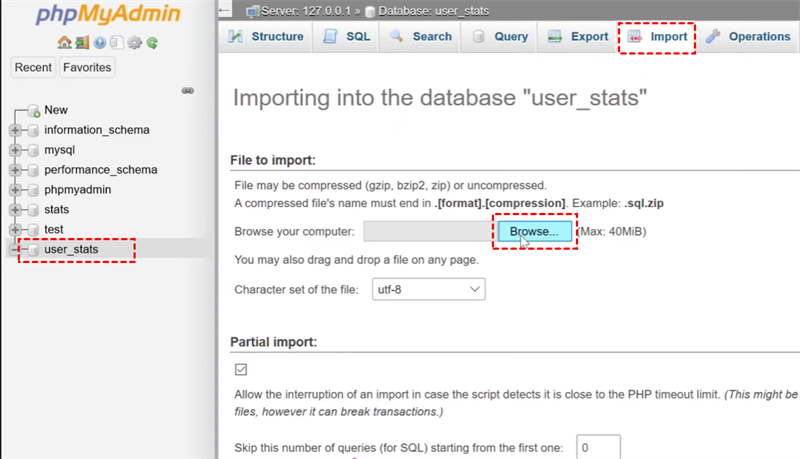
Step 3. Click the "Import" tab and "Browse" to upload your .SQL backup file. Then, click "Go" to start the import process to restore your WordPress database completely.
Restore WordPress Site via Backup Wizard
If you created a full backup using the cPanel Backup Wizard, this is the most complete restore option because it can recover the entire hosting environment, including files, databases, and configurations. This approach is ideal for major failures or full-site recovery scenarios.
Step 1. Open Backup Wizard in cPanel. Tap the "Restore" button to begin the recovery process.
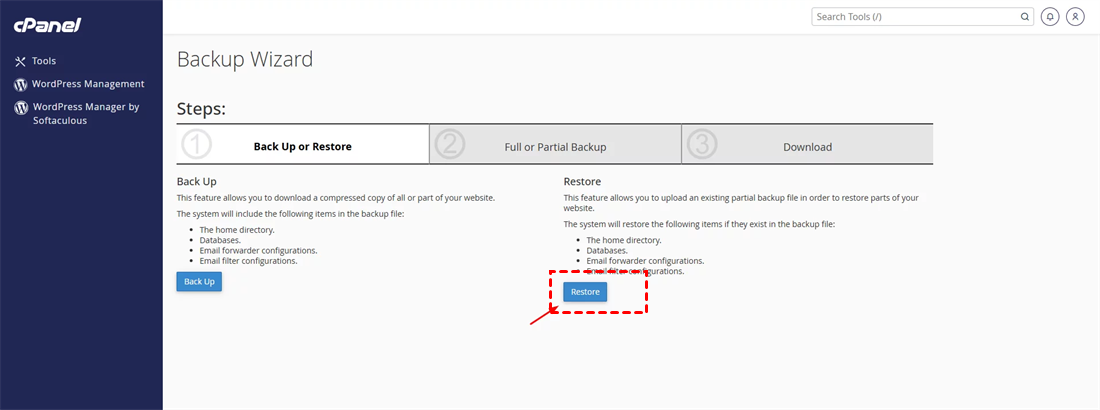
Step 2. Choose the type of backup to restore like MySQL database, Home Directory. Select either full backup or partial backup depending on what you previously created.
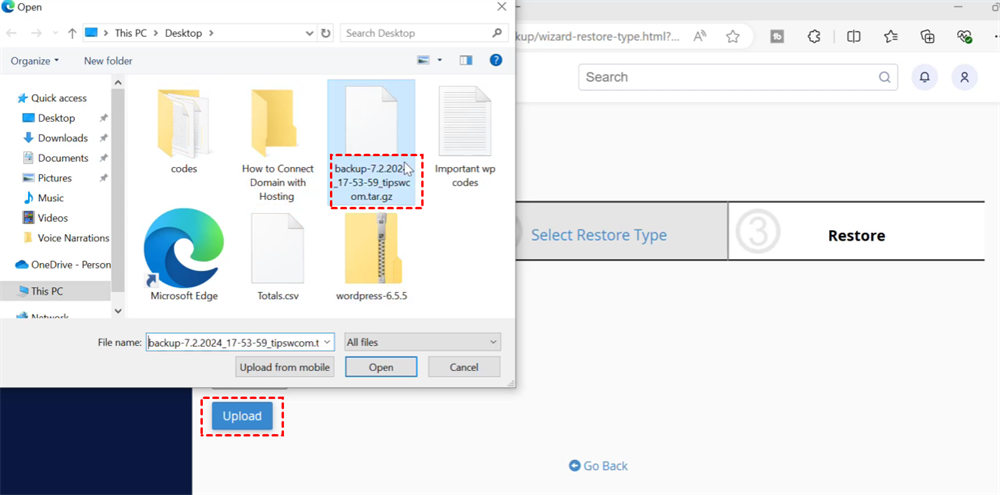
Step 3. Upload your backup file and start restoration. Once uploaded, cPanel will automatically restore your website environment.
How to Back up WordPress Site to Cloud Storage Automatically
While cPanel backup and restore methods are effective for manual control and full-site recovery, you still need to manually export or import backup files to back up and restore your WordPress site. To improve automation and reduce dependency on server storage, you can try MultCloud's Website Backup feature, which is designed to automatically back up WordPress websites directly to cloud storage services.
MultCloud is a cloud-based file management platform that allows you to connect your FTP server or hosting account with cloud drives such as Google Drive, Dropbox, and OneDrive. With its Website Backup feature, you can schedule automated backups of your WordPress site and store them securely in external cloud storage, ensuring better data protection and disaster recovery readiness.

- Automated scheduling: Set daily, weekly, or monthly backups without manual operation
- Off-site storage: Store backups in cloud drives instead of your hosting server
- Better disaster recovery: Backup data remains safe even if your hosting server fails
- Incremental backup support: Only new or modified files are backed up to save time and storage
- No server dependency: Backup tasks run in the cloud without affecting website performance
- Centralized management: Manage multiple FTP sites and cloud drives in one dashboard
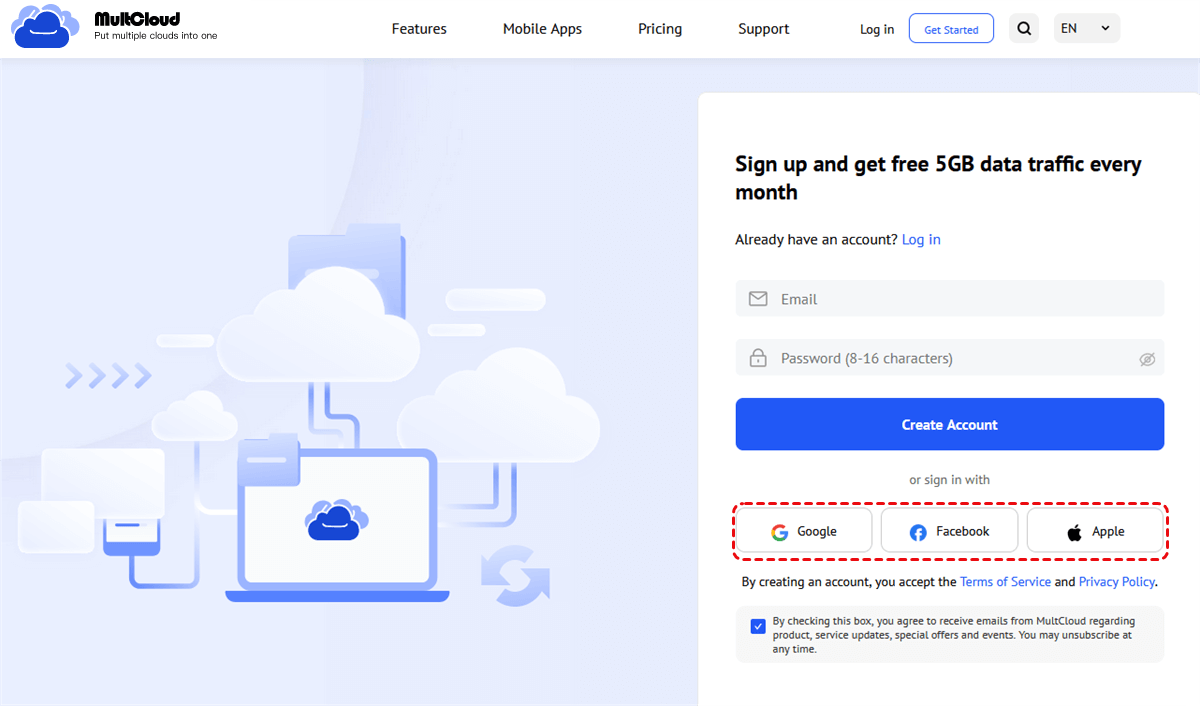
Step 1. Go to the official website of MultCloud and register an account, then sign in with your account.
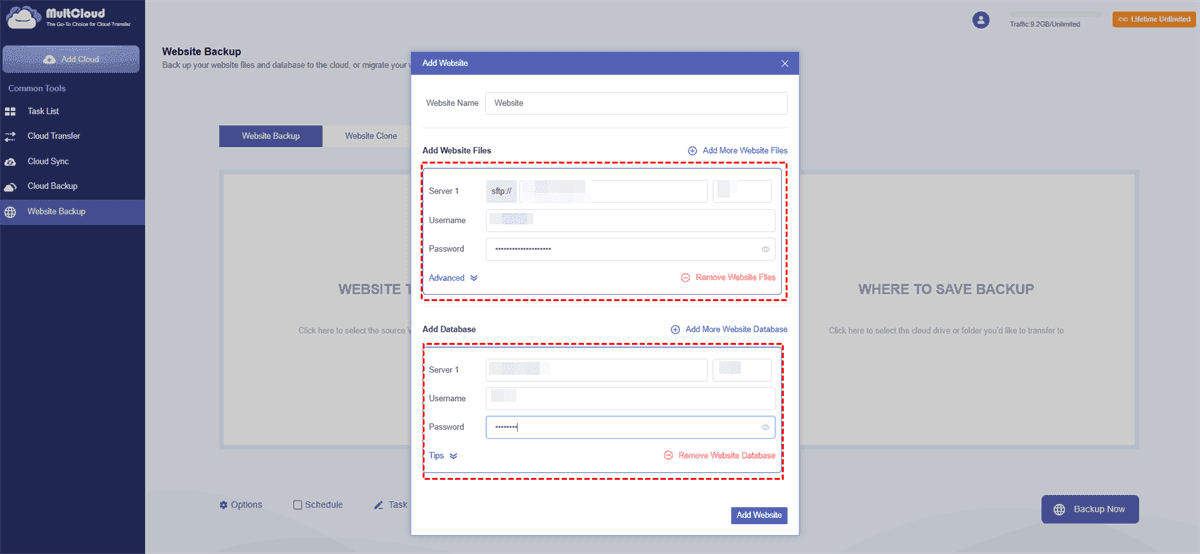
Step 2. Select "Website Backup" in the left sidebar and click "WEBSITE TO BACKUP" > "Add Website". Enter your WordPress site files and database credentials (host, username, password, and port) to connect your WordPress hosting server.
Step 3. Click "WHERE TO SAVE BACKUP" and select a cloud storage or another website as you like. Grant access to MultCloud to add it as destination drive. (Here, we take OneDrive as an example.)
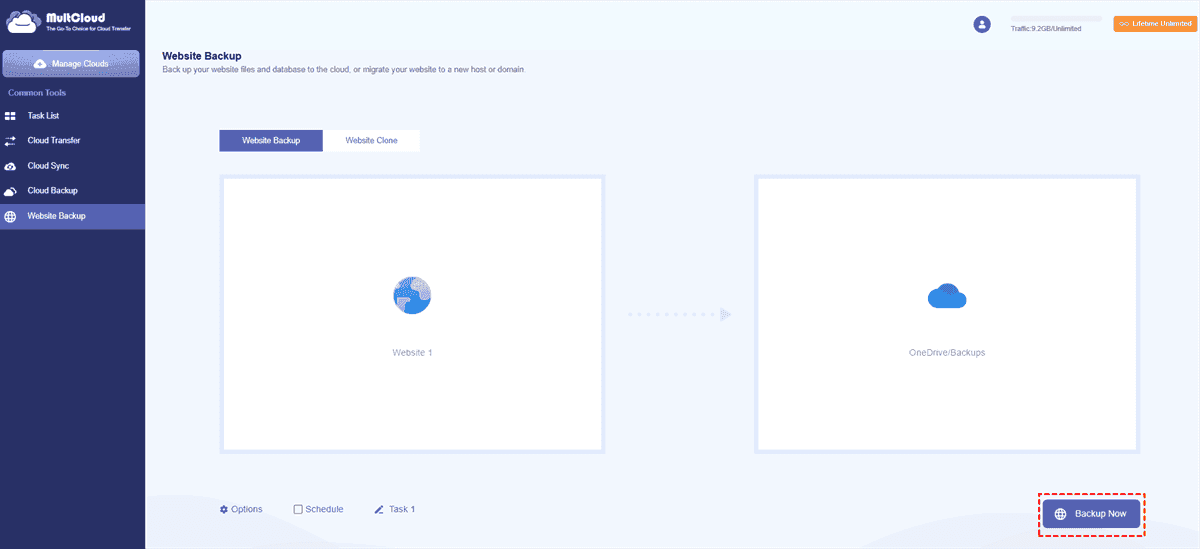
Step 4. Click "Backup Now" to begin the process. MultCloud will run the backup process in the cloud automatically, without requiring your computer or cPanel session to stay active. You can monitor progress, logs, and history anytime from the "Task List" tab.
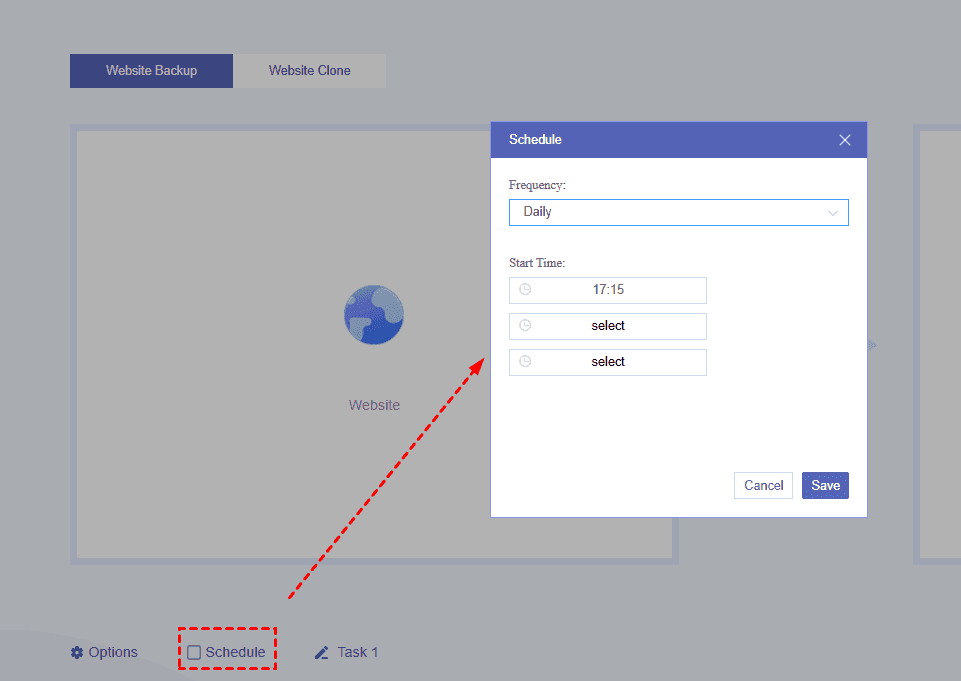
- ★Tips:
- Options: You can configure email notifications or file filters based on your needs.
- Schedule: You can run the backup task daily, weekly, or monthly automatically.
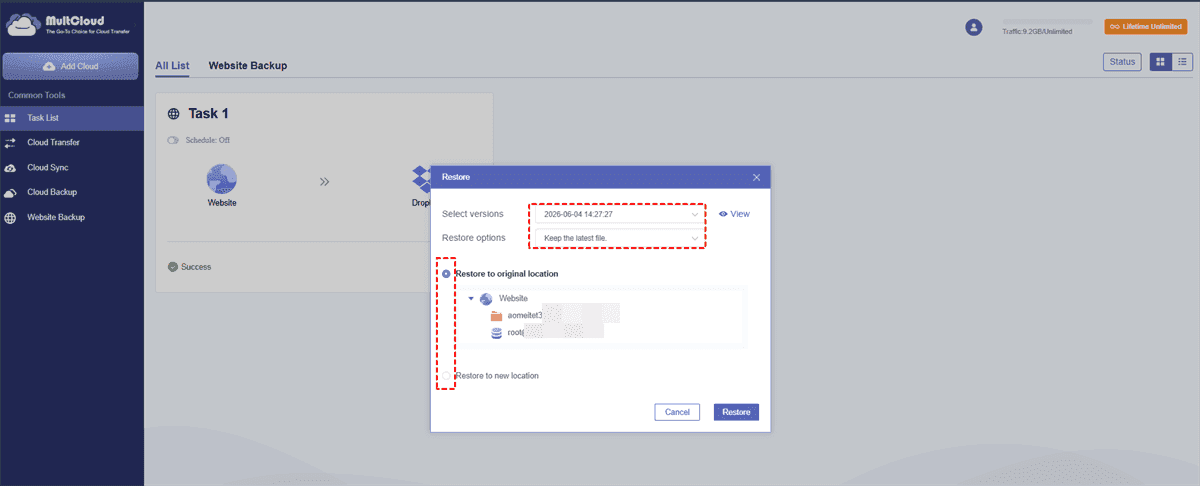
Once the backup process is finished, you can restore WordPress site from backup with just one click:
Go to "Task List" tab and locate your backup task. Click the three-dots button and "Restore" to select the versions and restore location, then click "Restore".
The End
By now you should have learned how to manually back up your WordPress site using cPanel. These built-in cPanel tools serve as a reliable option for site protection and emergency recovery. However, manual cPanel backups still require user intervention and are often stored within the same hosting environment, which can introduce risks in disaster scenarios.
To address this limitation, tools like MultCloud's Website Backup feature offer a more automated and secure alternative by enabling scheduled backups directly to cloud storage such as Google Drive or Dropbox. This ensures your WordPress data is continuously protected, easily accessible, and safely stored off-site.
FAQs
Q1: How do I fully back up a WordPress site with cPanel?
To fully back up a WordPress site in cPanel, use the Backup Wizard. Once you select full backup, it will generate a complete archive containing website files, databases, email accounts, and settings. Download the backup file and store it externally to ensure safe recovery in case of server failure or data loss.
Q2: How to back up WordPress files and database through cPanel?
You can use File Manager to compress and download WordPress files from public_html. Then open phpMyAdmin to export the WordPress database as an SQL file. Combining both ensures a complete backup of website structure and content, allowing full restoration if your site becomes corrupted or accidentally modified.
Q3: How to download and store WordPress cPanel backups securely?
After creating a backup in cPanel, download the compressed file to your local computer or external storage device. For better protection, store copies in cloud services like Google Drive or Dropbox. Avoid keeping backups only on the same hosting server to reduce data loss risks during server failure.
Q4: How can I restore a WordPress backup from cPanel?
To restore a backup, upload your backup file through File Manager and extract it into public_html. For database restoration, import the SQL file using phpMyAdmin. If using a full backup, the Backup Wizard can restore the entire site automatically, including files, database, and configurations.
Q5: How do I back up my entire WordPress site?
The easiest way to back up an entire WordPress site is using cPanel Backup Wizard. It captures all files, databases, emails, and server settings in one package. Download the backup file and store it securely offline or in cloud storage for complete site protection and disaster recovery readiness.
Q6: How to back up a WordPress site locally?
To back up locally, download WordPress files from File Manager and export the database from phpMyAdmin. Store both the compressed files and SQL database on your computer or external drive. This ensures you have a full offline backup that can be used to restore your website manually.
MultCloud Supports Clouds
-
Google Drive
-
Google Workspace
-
OneDrive
-
OneDrive for Business
-
SharePoint
-
Dropbox
-
Dropbox Business
-
MEGA
-
Google Photos
-
iCloud Photos
-
FTP
-
box
-
box for Business
-
pCloud
-
Baidu
-
Flickr
-
HiDrive
-
Yandex
-
NAS
-
WebDAV
-
MediaFire
-
iCloud Drive
-
WEB.DE
-
Evernote
-
Amazon S3
-
Wasabi
-
ownCloud
-
MySQL
-
Egnyte
-
Putio
-
ADrive
-
SugarSync
-
Backblaze
-
CloudMe
-
MyDrive
-
Cubby


Stay Updated With Our
Latest Tips
Add us as a preferred source on Google to never miss helpful guides.
 Add as preferred source >>