Quick Navigation:
About Enterprise Cloud Sync
Cloud sync, as its name suggests, is simply moving your data from local infrastructure (a server or your personal computer) to the cloud, or from one cloud to another cloud. The Enterprise cloud synchronization is all about syncing files or folders stored at the business level.
To sync enterprise cloud storage, one of the topmost reasons might be protecting confidential business data. Besides, it is also an effective way to keep the data of two organizations or businesses updated.
Sync Enterprise Files between Local and Cloud
To finish enterprise cloud sync from personal computers to clouds, or vice versa, you can choose a desktop application that can be synced with a specific disk partition or cloud-based folder. To make it clear, here we will take the Microsoft OneDrive app as an example.
Part 1. Enterprise Cloud Sync from Local to Cloud
Download, install, and log into your Microsoft OneDrive account on your computer. If you are running Windows 10 operating system, you do not have to download and install Microsoft OneDrive since it has already been pre-installed on your computer. Its local folder location is C:\users\ username\OneDrive (Windows installs it on the C drive by default).
To sync from your local drive to OneDrive cloud storage, you can directly drag and drop target files or folders into the OneDrive local Folder in Windows File Explorer. After that, the Microsoft OneDrive tool will automatically synchronize them from local to the cloud.

Besides, you can turn to its "Backup" feature, which is designed to back up Desktop, Documents, and Pictures to the OneDrive folder.
Step 1. Click on the "OneDrive" icon in your system tray.
Step 2. Click the "Help & Settings" icon > "Settings", and select "Sync and backup" > "Manage back up" behind Back up important PC folders to OneDrive.
Step 3. Choose the local folders you would like to backup and sync to your OneDrive folder. Then select, "Save Changes".
When the selected data are backed up or synced to OneDrive, you can access them from anywhere in Documents, Desktop, or Pictures. Each time you change, add, or remove a file or folder; this application will automatically copy the changesinto OneDrive consistently.
Part 2. Business Cloud Sync from Cloud to Local
To make enterprise files in the OneDrive cloud available in the local partition as well, refer to the following steps:
Step 1. Open the "Settings" window of the OneDrive application.
Step 2. Go to the "Account" tab, and click the "Choose folders" section.
Step 3. Select the OneDrive folders in OneDrive that you want to use on your local computer and hit OK. These files will be available on demand. Unselected folders will be hidden from the File Explorer.
Notes:
You can also tick Make all files available to download all files in OneDrive to your computer.
Besides, you're able to go to the "Sync and backup" tab and expand the "Advanced settings" section. Scroll down to find Files On-Demand, and hit Download all files to make everything in OneDrive available on your computer.
Enterprise Cloud Sync from Cloud to Cloud
If you want to carry out the cloud file sync for business across different cloud storage services, then it is better to find a professional cloud sync tool like the famous MultCloud. This is a powerful and versatile multiple cloud manager, supporting 30+ mainstream cloud drives that include Google Drive, OneDrive, Dropbox, Dropbox Business, OneDrive for business, Google Workspace, SharePoint, Box, Box for Business, Mega, Google Photos, iCloud Drive, iCloud Photos, etc.
- Cloud Sync: sync data from one cloud to another cloud consistently.
- Cloud Transfer: migrate data from one cloud to another without downloading and re-uploading.
- Cloud Backup: back up one cloud data to another cloud for a quick and easy recovery.
- Schedule: set a specific time to run the cloud sync, transfer, backup automatically.
- Offline: migrate cloud data without going through your local computer.
In fact, MultCloud allows you to perform enterprise cloud sync in 2 ways, Cloud Sync, and Team Transfer. Let's find out how they work.
Part 1. Enterprise Cloud Sync with Cloud Sync
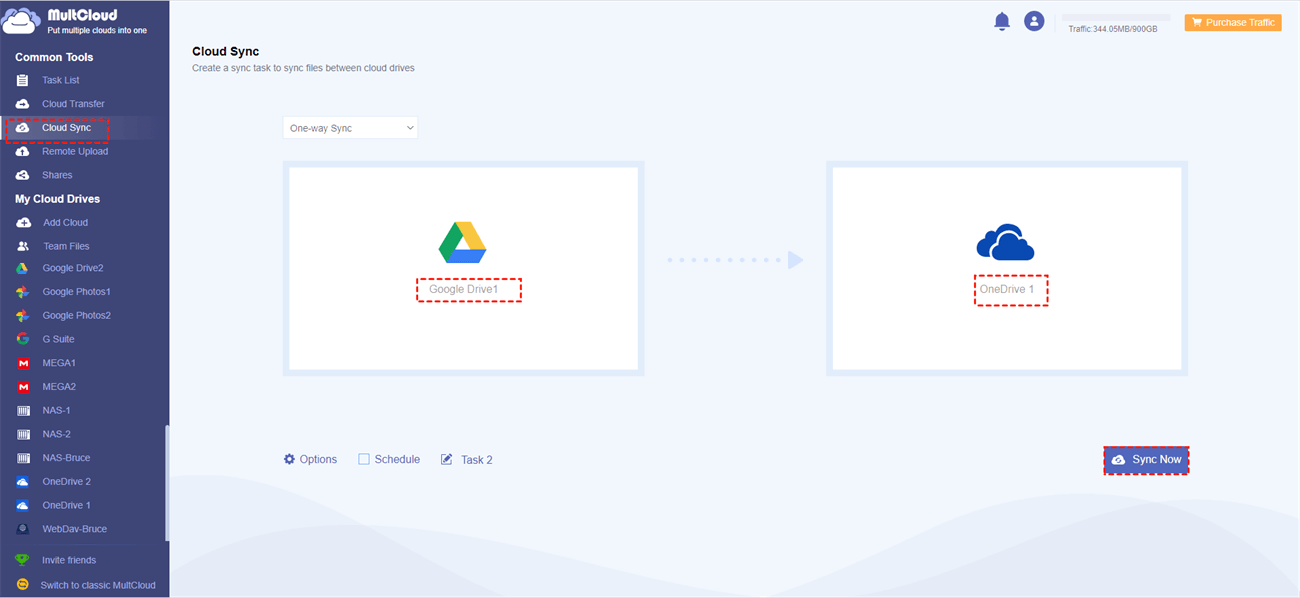
Here, we will show you how to sync Google Drive with OneDrive via "Cloud Sync".
Step 1. Click the above button to sign up.
Step 2. Log in to MultCloud and Click the "Add Cloud" to choose Google Drive to add. Authorize Google Drive by following the steps. Add OneDrive in the same way.
Step 3. Click on "Cloud Sync" and select Google Drive as the source and OneDrive as the destination. Then click on "Sync Now" to sync from Google Drive to OneDrive.
Tips:
1. If you want to make it run in interval times automatically, click on "Schedule" and set a specific time in daily, weekly, or monthly.
2. Besides that, you can also make a choice between “Normal Sync” and "Real Time Sync". What attracts most users is the “Real Time Sync” that can immediately reflect any changes happening in the source directory into the destination directory, so you don’t need to start a synchronization manually. In addition, you can have 7 advanced sync methods to choose from for requirements and unlock them all to enjoy.
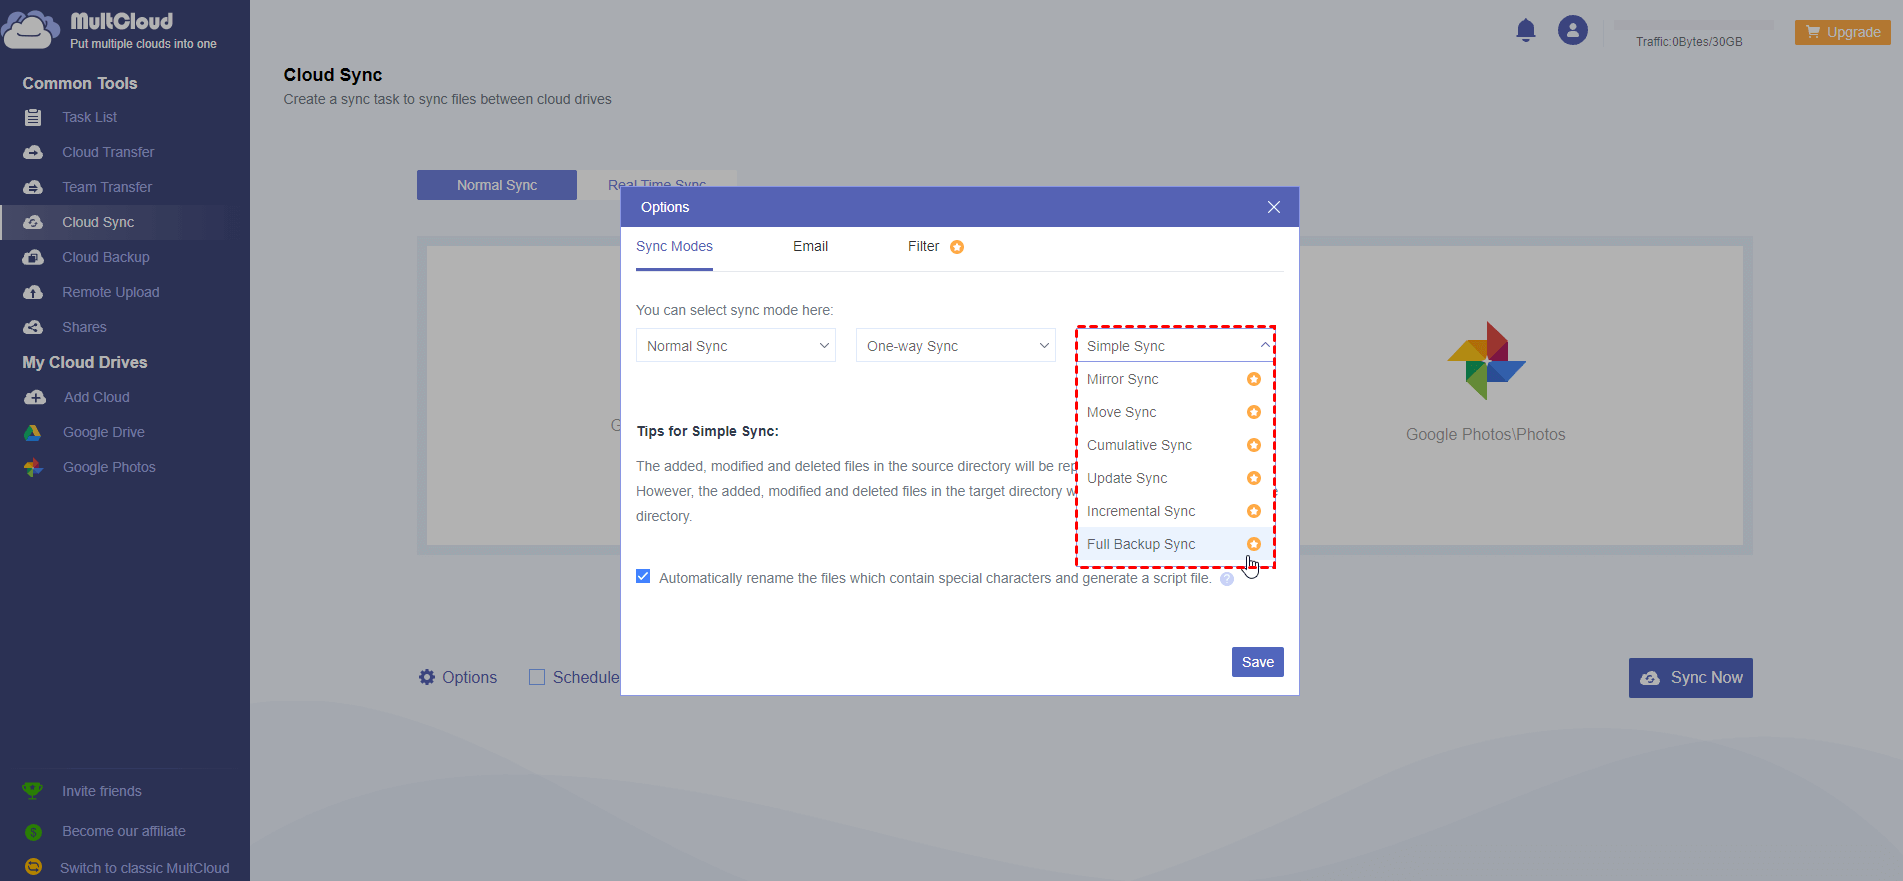
- Mirror Sync: Files in both source and target directories are always the same (extra files will be deleted in the target directory).
- Move Sync: All synced files in the source directory will be deleted once the sync process is completed.
- Cumulative Sync: The same files won’t be deleted in the target directory when they are deleted in the source.
- Update Sync: Before added and modified files in the source directory are moved to the target directory, all files in the target directory will be deleted first.
- Incremental Sync: Each time you sync files, a subdirectory will be created in the target directory so that the added and modified files in the source directory will be transferred to it.
- Full Backup Sync: Each time you sync files, a subdirectory will be created in the target directory so that all files in the source directory will be transferred to it.
- Smart Share: Share cloud files via public, private, or source mode.
- One-key Move: Quick data transfer, sync, and backup among clouds.
- Email Archive: Protect emails to other clouds or local disks.
- Remote upload: Effectively save web files to clouds via URL.
- Save Webpages as PDF/PNG: Keep them locally or online.
- Safe: Full-time 256-bit AES and OAuth authorization protections.
- Easy: Access and manage all clouds in one place with one login.
- Extensive: 30+ clouds and on-premise services are supported.
Part 2. Business Cloud Sync via Team Transfer
To move files between business clouds, MultCloud also provides Team Transfer to move all business files from one account to another directly smoothly and make it easy to operate. Let's learn how it works (transfer Google Workspace to OneDrive for Business for example):
1. Please log in to your MultCloud account, then tap Add Cloud, choose Google Workspace, and follow the guide to add. Then add OneDrive for Business accordingly.
2. Select Team Transfer from the left panel, then hit Add Source Cloud > Google Workspace, and hit Add Target Cloud > OneDrive for Business.
3. Tap Batch Match > Auto-Match, and then all the subaccounts under Google Workspace and OneDrive for Business will automatically matched.
4. Click the Transfer Now button to move business files between Google Workspace and OneDrive for Business smoothly.
Tips before transferring:
- Options: You can configure email notification and filter, as well as the transfer methods. If you just want to migrate certain file types, use Filter, and input the file extension to choose these files, very quick and useful.
- Schedule: You can enjoy automatic cloud-to-cloud migration without manual operations.
- For free users, you can migrate 3 subaccounts from one business cloud to another, to migrate more subaccounts and enjoy all other premium features, please upgrade to a MultCloud Plan to unlock.
Summary
So, there are all the enterprise file sync cloud solutions we recommended. Choose one according to your situation and requirements. If you need to sync business files from cloud to cloud, then MultCloud is a wise choice. Apart from the above features, it also provides "Team Transfer", helping business cloud owners to transfer all accounts from one business cloud to another easily.
MultCloud Supports Clouds
-
Google Drive
-
Google Workspace
-
OneDrive
-
OneDrive for Business
-
SharePoint
-
Dropbox
-
Dropbox Business
-
MEGA
-
Google Photos
-
iCloud Photos
-
FTP
-
box
-
box for Business
-
pCloud
-
Baidu
-
Flickr
-
HiDrive
-
Yandex
-
NAS
-
WebDAV
-
MediaFire
-
iCloud Drive
-
WEB.DE
-
Evernote
-
Amazon S3
-
Wasabi
-
ownCloud
-
MySQL
-
Egnyte
-
Putio
-
ADrive
-
SugarSync
-
Backblaze
-
CloudMe
-
MyDrive
-
Cubby

Stay Updated With Our
Latest Tips
Add us as a preferred source on Google to never miss helpful guides.