Migrate files across different cloud drives without manually downloading and re-uploading.

Sync two clouds or directories in two different cloud drives via one-way or two-way sync.

Backup one cloud data to another cloud for an extra protection and easy recovery.
The cloud backup feature allows you to back up your data from one cloud to another to prevent data loss. If data is unfortunately lost, you can restore the original data from the target cloud easily.
Step 1: Create an account in the official website of MultCloud.

Step 2: Add the cloud services that you need to transfer data by clicking " Add Cloud ", select them and follow the guidance to add them into MultCloud account one by one.
Step 3: Click " Cloud Backup " tab, then you will see the below interface. Select the directory/directories in source cloud that you want to backup, then select the target directory on target cloud to save the backup.
Tips : You can rename the transfer task by using the " Task 10 " field to help you distinguish it from other tasks.
Step 4: Click " Backup Now " to run the task.
After clicking the " Backup Now " button, you may click Task List button to see the details of the backup process.
After the backup is completed, “ MultCloud Cloud Backup ” folder will appear under the target directory you select. Then, under the folder, it will create “ Task name_backup date ” folder to save backup data.
Step 1: Please go to the Task List, click the three-line button on the task, then select “ Restore ”.
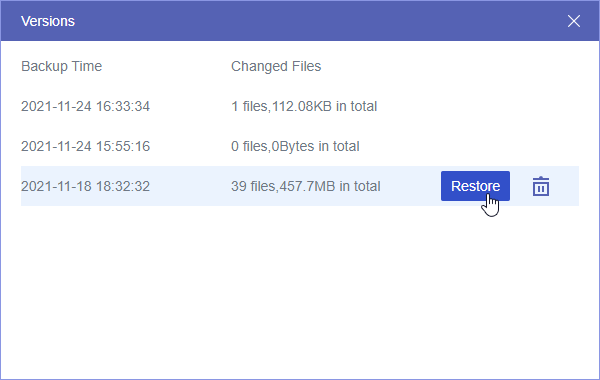
Step 2: Select a version you want to restore.
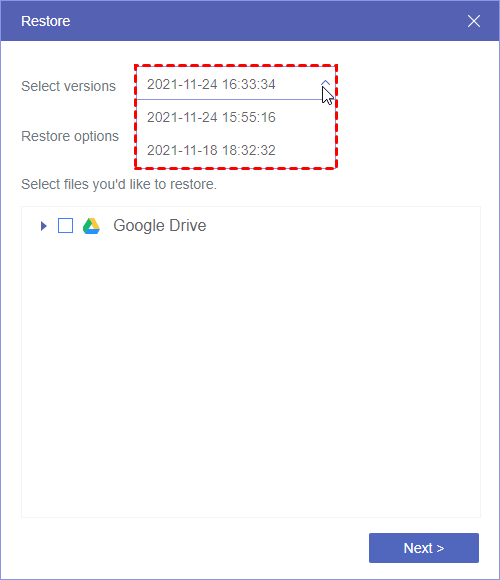
Or, you can select " Versions " under three-line button, then select a version to restore.
Step 3. Select the files/folders you would like to restore from the version, then click “ Next ”.
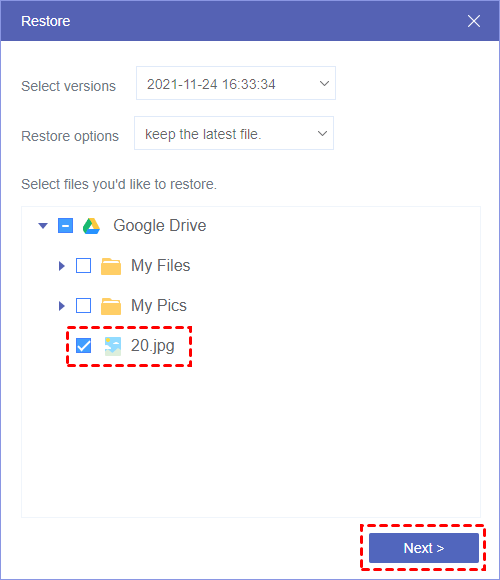
When the restore target location has the same file, you can select files/folder restore way under “ Restore Option ”:
1. “ Keep the latest file ” : Keeps the latest version by comparing the modification time of the restored target file with the creation time of that version of the backup task.
2. “ Overwrite the file ”: Always overwrite the file.
3. “ Skip the file ”: Always skip the file.
4. “ Keep two files ”: Keep two files with the same name, the other one will be renamed.
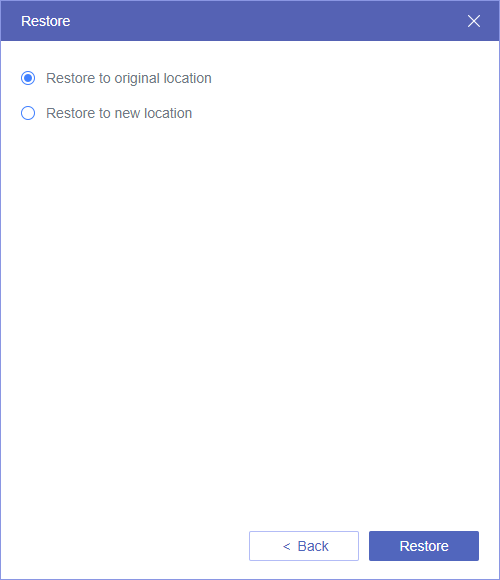
Step 4: Next, in the select restore location window, you can choose below options:
Restore to original location : The file will be restored to the source file path.
Restore to new location : You can choose a different path or another cloud drive to save the restored file.
For example, we deleted the 20.jpg file by accident. So we restore the 20.jpg file to the original location. After restore completely, go to the original location to check it:
If you want to back up the source directory regularly, you can also enable " Schedule " feature so that you can back up your important data in time.
When you create a new backup task, you will see the " Schedule " option. Or if you have create the backup task but you have not enable the " Schedule " option, you can enable it under Task List, click the three-line button of the corresponding task then select “ Schedule ”.
When you tick " Schedule ", you could see the following three modes. You could choose the one that you need.
Daily : Run only once: Set a time point in the future to perform the transfer task only once. Run Everyday: Set a time point to perform the transfer task once a day. You can set three different times to run the transfer task three times a day.
Weekly : Choose a specific day for the transfer task from Monday to Sunday. Set a time point and the program will automatically perform the transfer at this time on the chosen day(s) every week.
Monthly : Choose a time point on a specific day of each month to perform the transfer task. Choose a time point on a specific day from the calendar to perform the transfer task every month and you can select multiple days on the calendar.
You could specify some additional settings for the backup task under " Options ".
Email Notification :
You could enable " Email Notification " so you will know whether the task is complete or not. In unattended operations, a notification can be emailed containing the result of the task.
Filter :
You could also filter files with certain file format during migration by configure " Filter ". If you want to filter some specific type of files on source directory, you can enable this option to include or exclude files of a particular type.
Specify the files that you need to ignore/exclude. For example, enter a file extension mp4, then add it.
Tips :
1. If when you select the source folders, then click “ OK ”, then see the below prompt. It is recommended to re-add the cloud drive and re-create the backup. You can also click cancel, but which may cause backup problems if the cloud drive becomes invalid afterwards.
2. Only supports one backup/restore task run simultaneously.
3. Google Photos, Flickr can’t be selected as backup destination.
Cloud backup functionality enables file transfers between cloud storage services while preserving the source directory structure. This means the entire source directory is replicated to the destination location during transfer, with a dedicated folder created to store the files. Multiple backups generate a history of backup versions, allowing you to restore any previous backup version as needed.
Google Drive
Google Workspace
OneDrive
OneDrive for Business
SharePoint
Dropbox
Dropbox Business
MEGA
Google Photos
iCloud Photos
FTP
box
box for Business
pCloud
Baidu
Flickr
HiDrive
Yandex
NAS
WebDAV
MediaFire
iCloud Drive
WEB.DE
Evernote
Amazon S3
Wasabi
ownCloud
MySQL
Egnyte
Putio
ADrive
SugarSync
Backblaze
CloudMe
MyDrive
Cubby