Quick Search:
User Case: How to Transfer Dropbox to External Hard Drive
"I want to copy my entire Dropbox to an external drive, is that possible? If so, how? I'm using a Mac."
Dropbox is a great place to store files and folders so you can access them wherever and whenever you want. By default, Dropbox comes with 2GB of storage for free, and you can upgrade to more if you want by costing a few dollars. Business accounts are now available on the Dropbox platform for larger organizations. However, you have to pay a specific fee to get a professional account and more storage.
When using the Dropbox application, many users use the C drive as the installation path for Dropbox by default. But as more and more data needs to be stored in Dropbox, there is not enough space on the C drive. At this point, you can migrate the entire Dropbox to another external hard drive for the normal operation of your computer. The following is the solution.
2 Ways to Transfer Dropbox to External Hard Drive
Are you looking for a way to change the default Dropbox folder location on your Mac or PC to an external hard drive? It's a little tricky, but not impossible. Just make sure the external hard drive or USB drive is working. Here's how to move files from Dropbox to an external drive.
Solution 1: Transfer Files from Dropbox to External Hard Drive on Mac
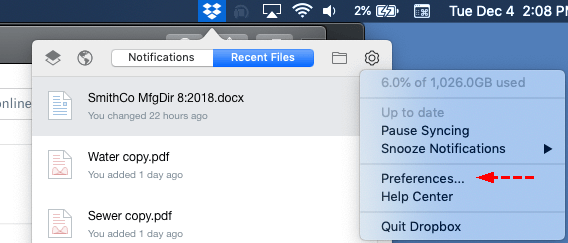
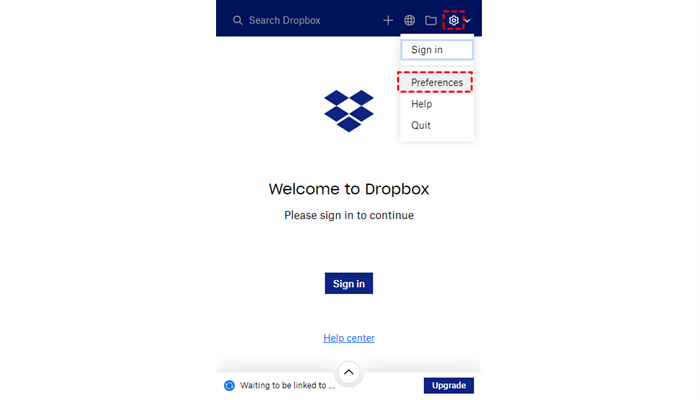
Step 1: Launch the Dropbox app on your Mac, click the Dropbox shortcut icon from the top Mac menu bar.
Step 2: Select the profile icon. Next, click on the "Preferences…" option.
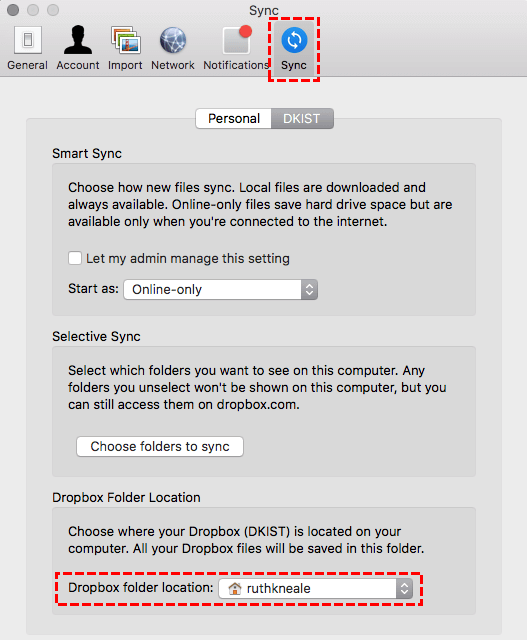
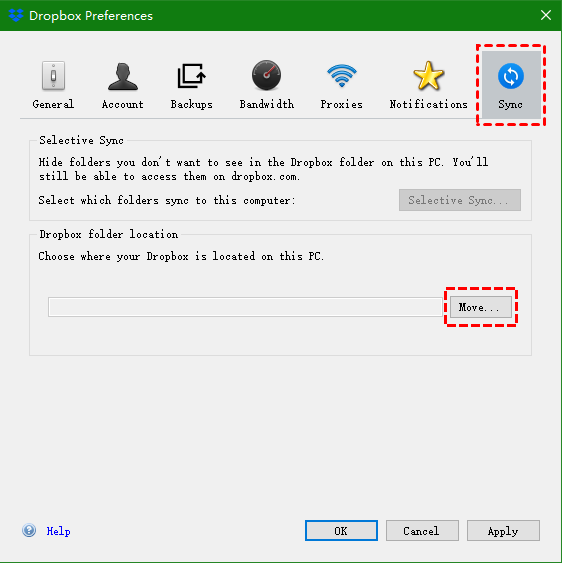
Step 3: Now, click on the "Sync" tab, and under "Dropbox Folder Location", select your external drive or another folder to change the Dropbox folder location.
Step 4: After the path is selected, click "Move" in the pop-up window, and your Dropbox files and folders will be automatically moved to the external drive.
Step 5: Now, the default Dropbox folder is moved to the external drive. Keep an external drive connected on Mac to get Dropbox files offline on Mac.
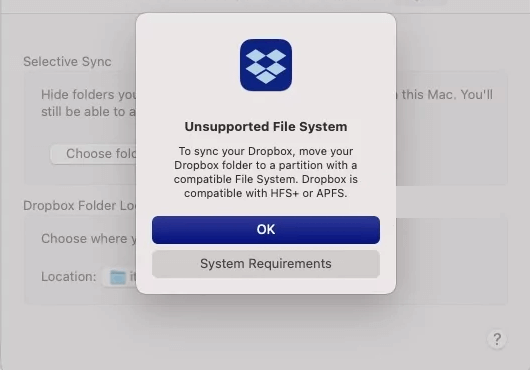
One thing to note is that if you cannot select a folder or get the error "Unsupported file system (To sync your Dropbox, move your Dropbox folder to a partition with a compatible File System. Dropbox is compatible with HFS+ or APFS)" when selecting the external drive for the Dropbox folder.
To solve this problem, you need to do the following to select the desired external drive folder normally.
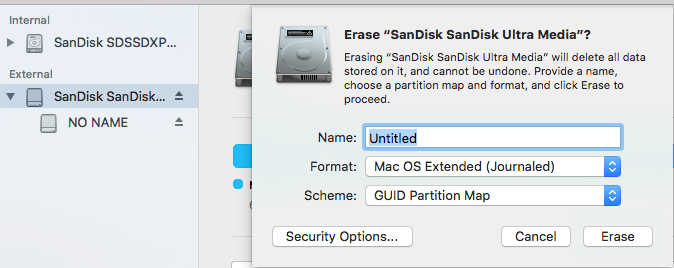
Step 1: Open "Disk Utility" on your Mac from Spotlight Search or Launchpad.
Step 2: Select an external drive from the left side of the window. and click the "Erase" option at the top.
Step 3: Select the format type "Mac OS Extended (Journaled)" and erase.
Step 4: Format the external drive to APFS. Select the APFS file format on your Mac and wait for the whole process to succeed.
Solution 2: Move Files from Dropbox to External Hard Drive on Windows
To ensure error-free moving of Dropbox files to external hard drive in Windows, you need to do the following settings on your external hard drive:
Step 1: First, connect a compatible external hard drive to the PC where you want to move your Dropbox files to the hard drive.
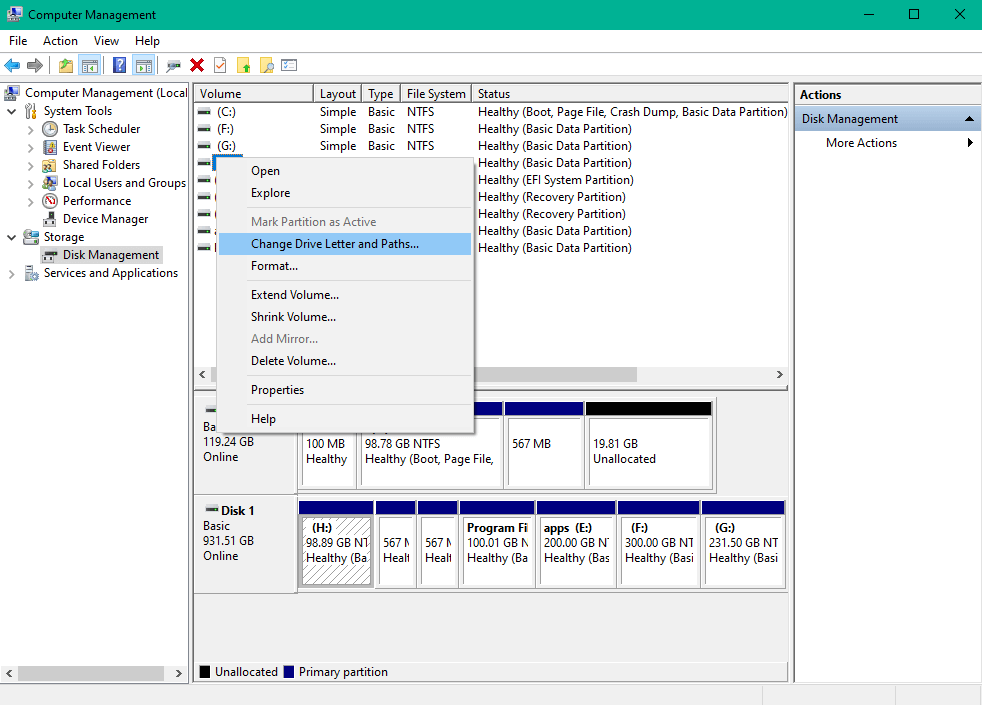
Step 2: Right-click the "This PC" icon on your computer desktop, and select "Manage".
Step 3: Select "Disk Management" under "Storage" in the sidebar.
Step 4: Right-click on the external drive and select "Change Drive Letter and Paths...", after making changes select "Add...".
Step 5: Then on the right side of the "Mount in the following empty NTFS folder" part, click the "Browse" button. Click on C:\ and select "New Folder...".
Step 6: Name the folder whatever you want (e.g. Dropbox) and click "OK". Now you can access the external drive via the mounted path (C:Dropbox).
Step 7: The last thing to do is to move the Dropbox folder location to a removable drive (C:Dropbox) as described in the next section.
After changing the Dropbox folder location to a removable drive, you will be able to perform the following steps normally.
Step 1: Launch Dropbox on your PC.
Step 2: Click the profile drop-down menu and select "Preferences". If you don't find this option, click "Settings" and select "Preferences".
Step 3: Click the "Sync" tab.
Step 4: Then, click on "Move" and select external drive as the destination.
The above step-by-step guide will help you move or change the Dropbox folder and file location on your Mac or PC to an internal USB drive or external hard drive/HDD/SSD.
Solution 3: Download Files from Dropbox to External Hard Drive on Any Device
As a professional cloud file manager, MultCloud can not only help you complete cloud-to-cloud transfer, synchronization or backup, but also directly download cloud data to any device, external hard drive or USB through the "Download" feature.
Compared with the above mentioned methods, MultCloud provides different advantages:
- ✅No Restrictions: You can use it on multiple platforms.
- ✅Simple: The whole operation process is simple.
The specific operation method is as follows:
Step 1: Register a MultCloud account using your email. You can also use your Google, Facebook or Apple ID to directly authorize login.
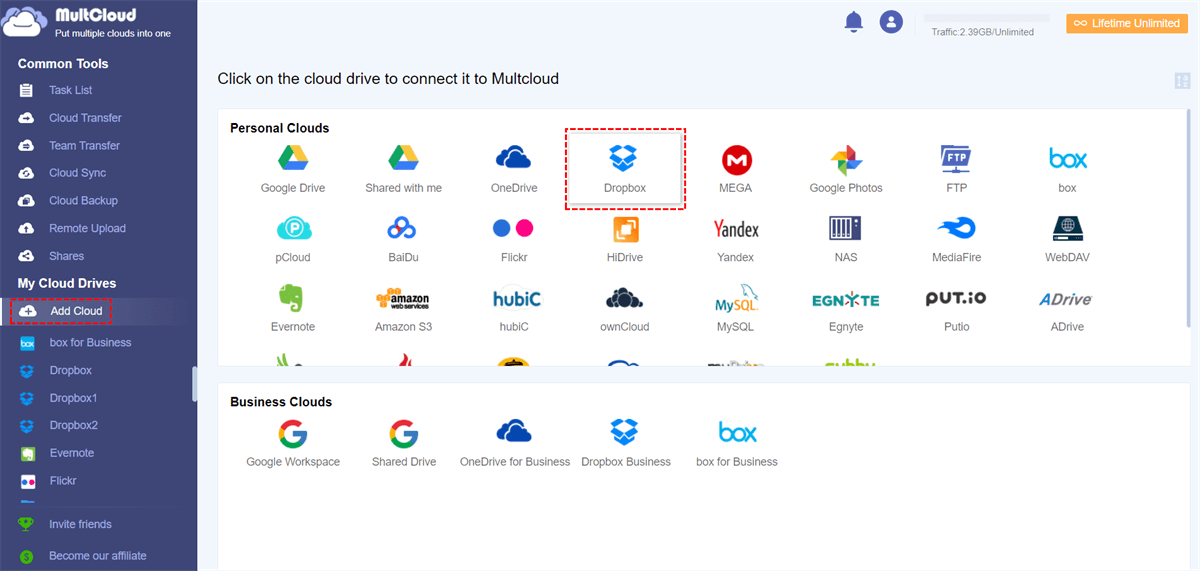
Step 2: Log in to MultCloud, click "Add Cloud", and then add your Dropbox account.
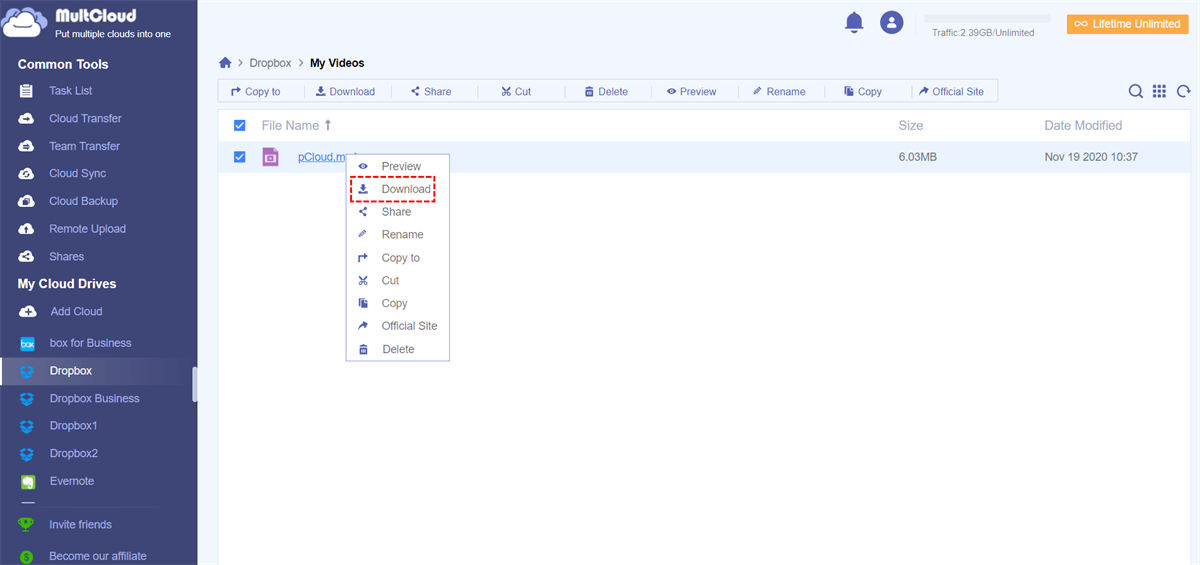
Step 3: Go to Dropbox, find the files that need to be transferred to the external hard drive, select them and click the "Download" button.
Note: Before downloading, you need to set the browser's default save location to your external hard drive or USB. In this way, the downloaded files will be automatically saved to the corresponding location.
Bonus Tip: Best Way to Transfer Dropbox to Another Cloud Easily
Dropbox is a top-notch sync and file-sharing cloud server. Dropbox users can access files and folders anytime from desktop, web and mobile clients, or through apps connected to Dropbox. All of these clients connect to a secure server to provide access to files, allow files to be shared with others, and update linked devices when files are added, changed, or deleted.
But Dropbox only provides 2GB of storage for regular users. To get more storage capacity, users either pay for a more advanced version, or choose to register multiple cloud accounts, such as Google Drive, Box, and OneDrive. In order to save costs and enjoy the advanced functions brought by other cloud drives, many users choose to use multiple cloud drive accounts at the same time.
When you have to transfer data between multiple cloud accounts, you can use "Cloud Transfer" provided by MultCloud to easily do it.
- ✅Direct: Transfer data between multiple cloud accounts without downloading.
- ✅Automatic: The system automatically runs the task at the set time.
- ✅Fast: The system provides you with faster transfer speed.
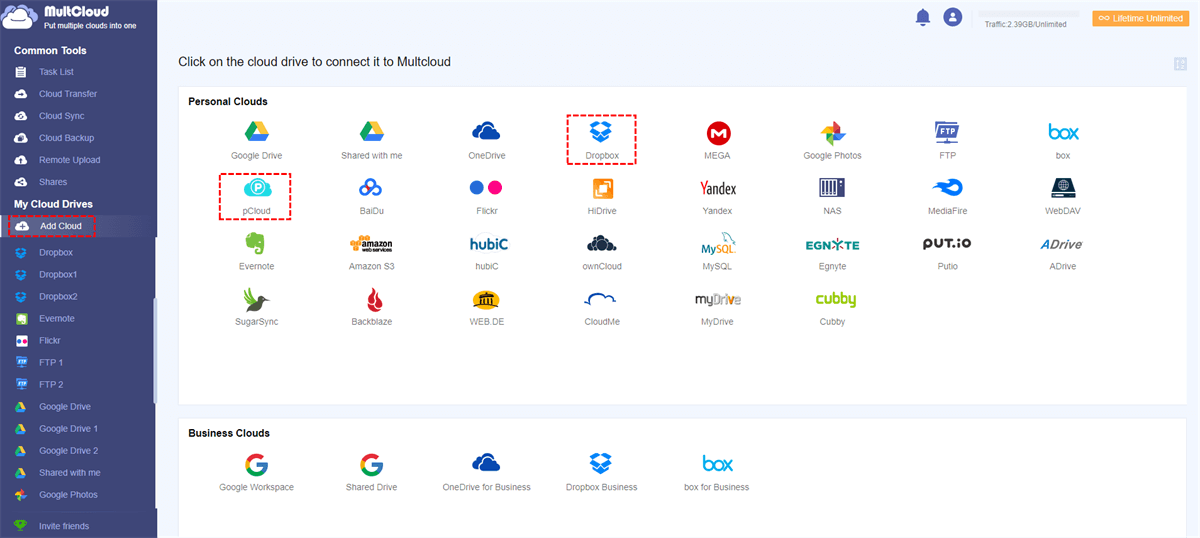
Step 1: Add your Dropbox and another account. Let's take pCloud as an example.
Notes:
- MultCloud currently supports more than 30 cloud drives, such as Dropbox, Dropbox Business, Google Drive, Google Workspace, Google Photos, iCloud Photos, iCloud Drive, OneDrive, SharePoint Online, OneDrive for Business, MEGA, Flickr, Box, Box for Business, pCloud, Amazon S3, Wasabi, SugarSync, 4shared, Icedrive, Evernote, CloudMe, Cubby, MyDrive, WEB.DE, Yandex, HiDrive, MySQL, Egnyte, Putio, Backblaze, MediaFire, ownCloud, ADrive, Baidu, even NAS, WebDAV, FTP/SFTP, Shared with me and Shared Drive.
- You can also add different accounts of the same cloud to MultCloud. You need to give the added accounts a different name to distinguish them.
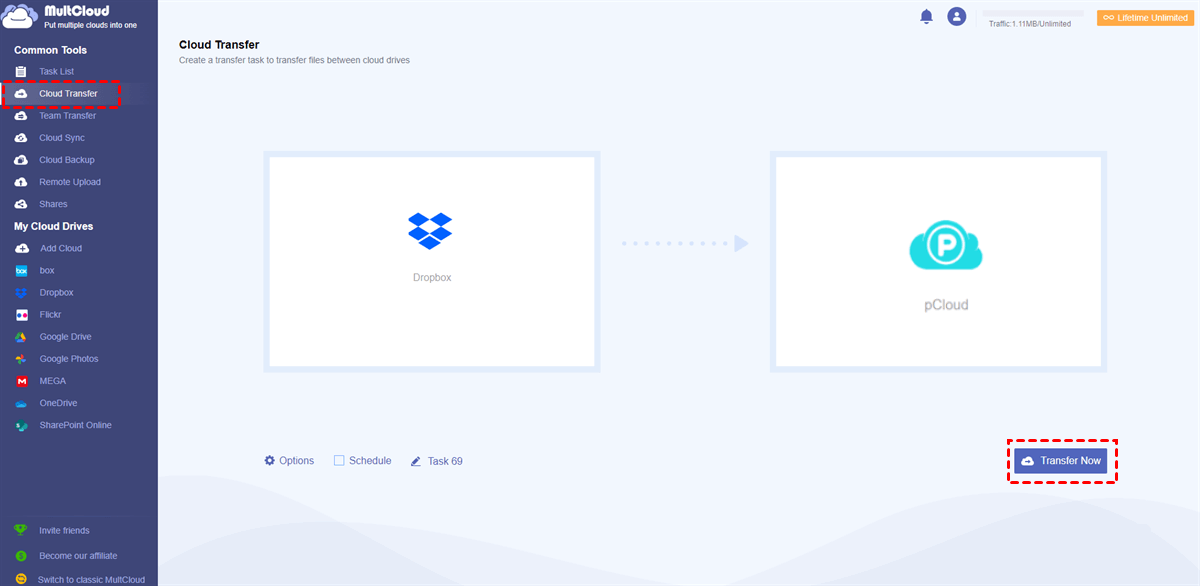
Step 3: When all the cloud drive accounts you need are added to MultCloud, you can transfer files from Dropbox to pCloud. Click "Cloud Transfer", then choose files or folders in Dropbox as the source and folders in pCloud as the destination, and finally click "Transfer Now".
Note: You can set a time in "Schedule" to let MultCloud run your task automatically.
In addition to the above basic functions, MultCloud also has the following core functions for helping you manage cloud files better.
- Team Transfer: Migrate multiple business accounts from one cloud platform to another (Google Workspace, OneDrive for Business, Dropbox Business, Box for Business).
- Cloud Sync: Allow you to sync data across cloud drives in real time, e.g. Sync Dropbox with NAS. When data is lost due to some reasons, you can retrieve the data backed up on other cloud drives.
- Cloud Backup: Can not only help you back up important files to other cloud drives (such as backup Google Photos to Dropbox), but also help you manage your files better. After the backup task is created, you can view all versions of the file in the task list, and even restore the file to the previous version.
- Image Saver: Directly save pictures and videos with full-resolution from Instagram, Pinterest or Google Image Search.
- Remote Upload: Download files from torrent files or magnet links to the corresponding cloud drive. So, you can download classic movies, music or other types of files through this feature.
- Email Migration: Easily save all your emails and attachments from Gmail and Outlook to cloud accounts. You can also use the download option to save email data to external hard drives or USB.
Conclusion
With the above methods and steps, you can easily transfer Dropbox to external hard drive. According to the device used by the user, this article provides 2 solutions, so you can choose according to your needs.
If you currently use multiple cloud drive accounts and it is cumbersome to manage, you can try the cloud file management tools mentioned in this article to help you better achieve cloud to cloud transfer, sync and backup.
MultCloud Supports Clouds
-
Google Drive
-
Google Workspace
-
OneDrive
-
OneDrive for Business
-
SharePoint
-
Dropbox
-
Dropbox Business
-
MEGA
-
Google Photos
-
iCloud Photos
-
FTP
-
box
-
box for Business
-
pCloud
-
Baidu
-
Flickr
-
HiDrive
-
Yandex
-
NAS
-
WebDAV
-
MediaFire
-
iCloud Drive
-
WEB.DE
-
Evernote
-
Amazon S3
-
Wasabi
-
ownCloud
-
MySQL
-
Egnyte
-
Putio
-
ADrive
-
SugarSync
-
Backblaze
-
CloudMe
-
MyDrive
-
Cubby
.png)

