What is SharePoint Migration Manager?
SharePoint Migration Manager is designed by Microsoft for migrating data. It supports transferring data from on-premises file share content, Stream, and other cloud drives. What's more, using Migration Manager, you can download aggregated summary and task-level reports. If you want to use it to share files, the files should be limited to 250 GB in size.
SharePoint Migration Tool vs Migration Manager
Since we are going to compare SharePoint Migration Tool with Migration Manager, there is also a brief introduction of what does SharePoint Migration Tool do.
SharePoint Migration Tool (SPMT) is also developed by Microsoft. It can be used to migrate data to SharePoint Online, OneDrive for Business, or Microsoft Teams. For example, it can migrate SharePoint content to Microsoft 365 like lists, libraries, and sites. Besides, SharePoint Migration Tool migrates files with all their metadata intact, which ensures a high-fidelity migration experience.
To be clearer, the differences between these 2 tools will be listed in the following 3 points.
- Form: Migration Manager can be used on SharePoint Online. While SharePoint Migration Tool is used as a desktop app or on PowerShell.
- User and Group Mapping: Both of these 2 tools can map users and groups during migration. However, the SharePoint Migration Tool has more detailed mapping options, such as mapping users and groups with custom claims.
- Incremental Migration: SharePoint Migration Manager doesn’t support incremental migration, while SharePoint Migration Tool does. Incremental migration means the processes will only migrate the parts which are changed compared to the last migration.
How Do I Install and Use SharePoint Migration Manager
The Migration Manager of SharePoint serves to migrate data to different migration agents. Therefore, you have to set up the agents before you begin the migration process. Besides, there are some requirements that you should notice:
1. Make sure your computer is compatible with Migration Manager and you can check the official prerequisites.
2. Migration Manager requires endpoints to run the task so the endpoints should be open on your computer.
3. If you plan to migrate with a government cloud, please correctly configure it before using Migration Manager.
4. You have to be a Global admin or a SharePoint admin on the Microsoft 365 tenant where you want to migrate your content.
5. Don't forget to set up agents before migrating. You can set up as many agents as you want.
6. The maximum size of an individual file is 250 GB per session.
Install Migration Manager Agent
Step 1: Download the agent setup file and place it on the file server hosting the shared folder. This file will be used for a migration agent and if your environment requires it, you can install multiple instances of the agent.
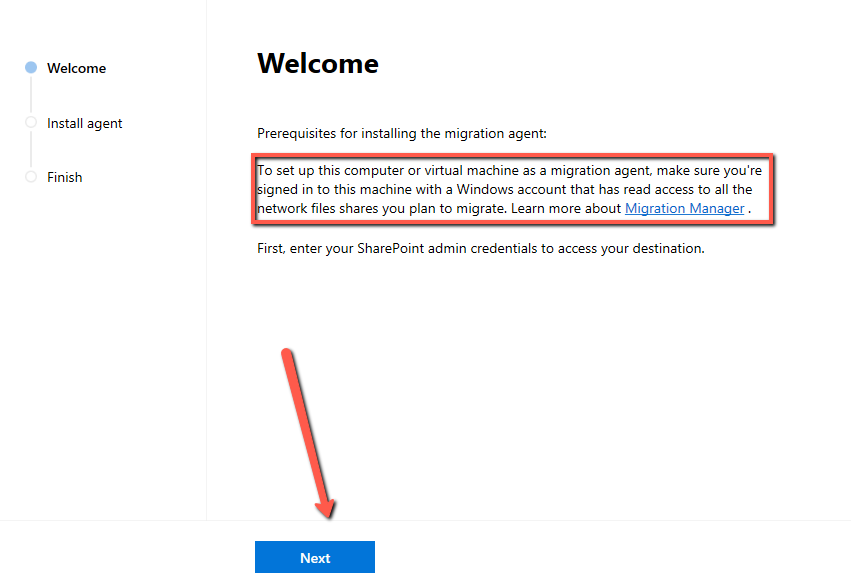
Step 2: Click "Next" on the Welcome page.
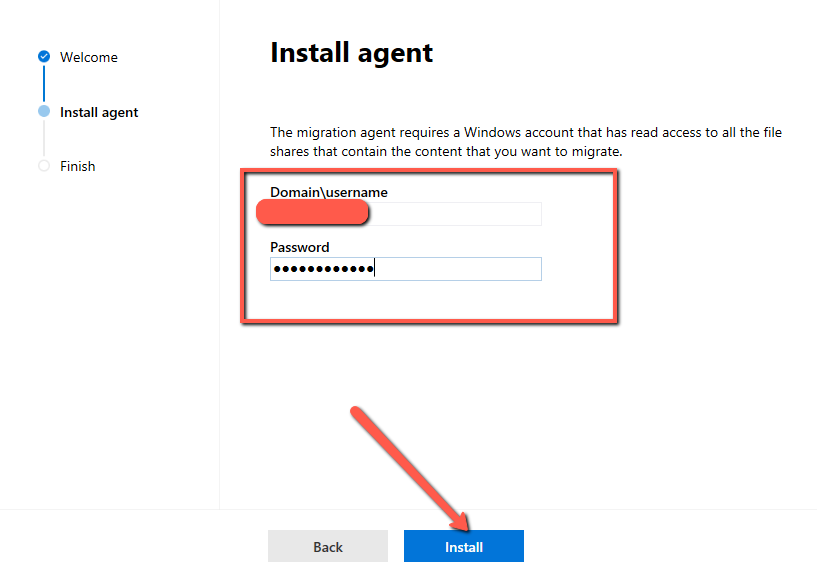
Step 3: Enter your SharePoint Domin or username and the password. Then click "Next".
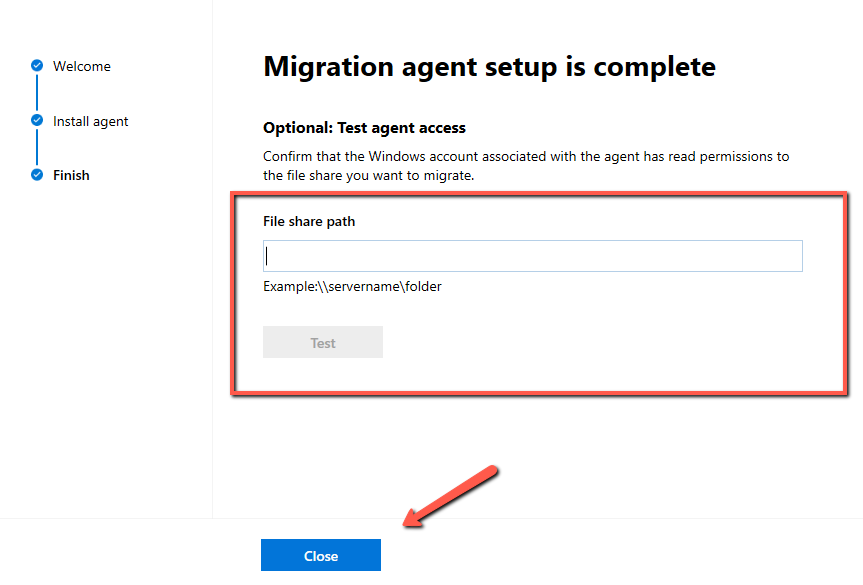
Step 4: Enter a file share path in the box and click "Close". By now, your migration agent is set up.
Steps for Using SharePoint Migration Manager
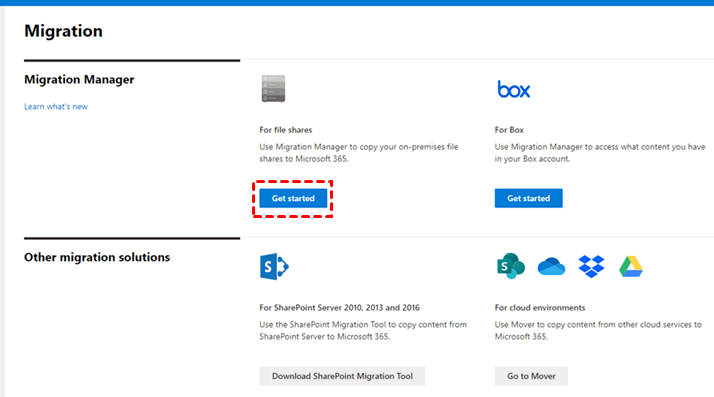
Step 1: Enter the Migration Manager task-creating page.
Enter SharePoint Admin Center and click “Get started” under File Shares.
Step 2: Add agents and check whether they are enabled.
Click “Agents” in the taskbar and check if your agent is added or connected.
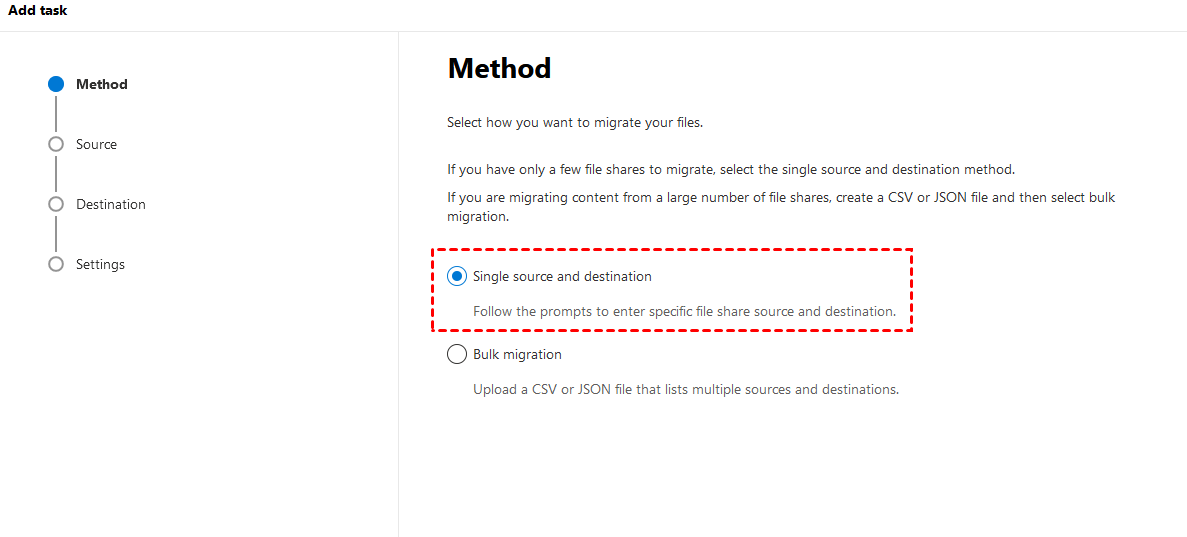
Step 3: Choose a Migration Method.
Turn to “Migrations”, choose “Single source and destination”, and click “Next”.
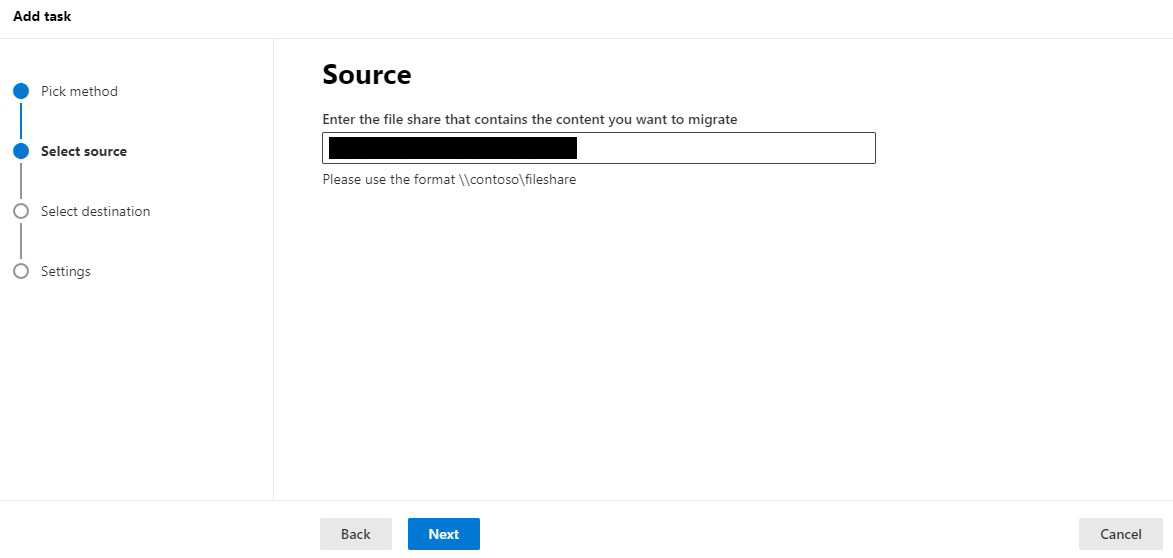
Step 4: Select the files you want to migrate by Migration Manager.
Select the files that you want to migrate and enter the file share with the format “\\contoso\fileshare”. Then click “Next” to select the destination for the migrating files.
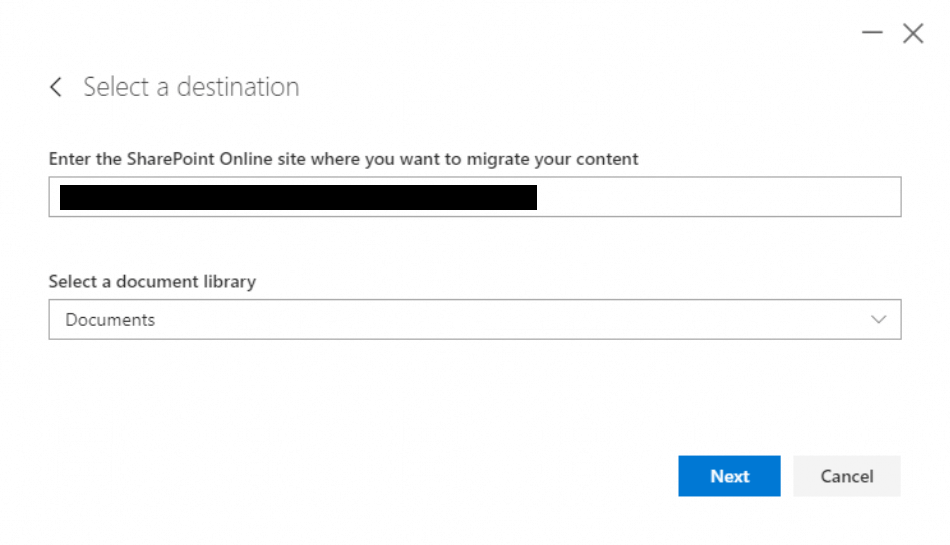
Step 5: Choose a SharePoint destination for the migration.
Choose where you want to migrate to by clicking the icon. Here we choose SharePoint Online. Also, you should select the location under SharePoint Online.
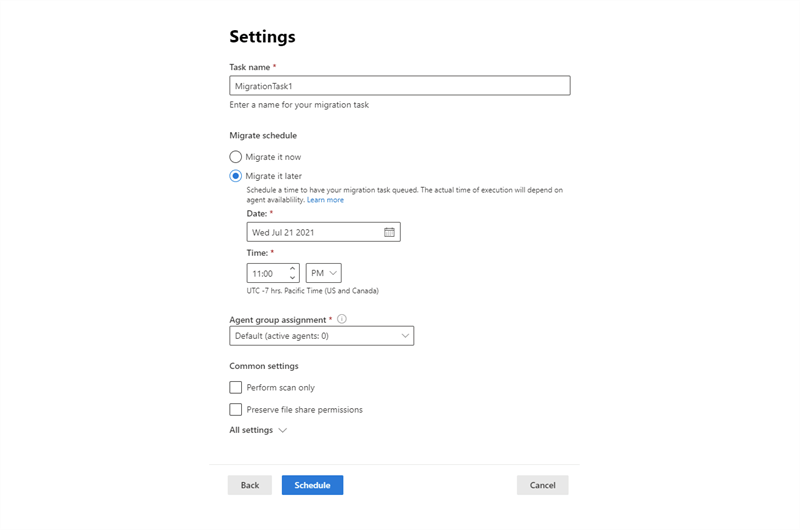
Step 6: Check the migration settings and start the task.
Check “Settings” to see if there is anything that you want to change. If not, just click “Run now” and the task is complete.
What is the Limitation of SharePoint Migration Manager?
Migration Manager does have some limitations. Here are 3 notable ones:
-
Complex Operations: The steps for using Migration Manager to migrate files are quite complex. It requires you to download agent setup files and there are many blanks to fill.
-
Limited Source Options: Migration Manager primarily supports migrating from on-premises SharePoint servers to SharePoint Online. Migrating from other sources or cloud platforms may require alternative migration methods.
-
Limited Scheduling Options: The Migration Manager does not provide advanced scheduling capabilities for migrations. You may need to rely on additional tools or manual coordination to manage migration schedules.
How to Move Files to SharePoint More Easily - MultCloud
As you can see, the steps for using SharePoint Online Migration Manager are complex and not easy to understand. So, you may find an alternative to it - MultCloud, a super easy tool for migrating files from other cloud drives to SharePoint Online.
- ★Why MultCloud is the Best Alternative to SharePoint Migration Manager:
- MultCloud is a popular cloud storage manager which can manage 30+ cloud drives in one place.
- MultCloud is easy for a novice user and does not need any professional knowledge.
- MultCloud offers fast and stable transfer speed and supports offline transfer.
- There are various customizable options and features on MultCloud.
You can use MultCloud Cloud Transfer to move files from Google Drive, Google Workspace, Dropbox, Dropbox Business, OneDrive, OneDrive for Business, Amazon S3, FTP, NAS, etc. to SharePoint Online. Also, you can use it to move files between different SharePoint tenants and the steps are shown below.
Step 1: Enter MultCloud and click “Get started for free”. Then you will turn to another interface to create a new MultCloud account.
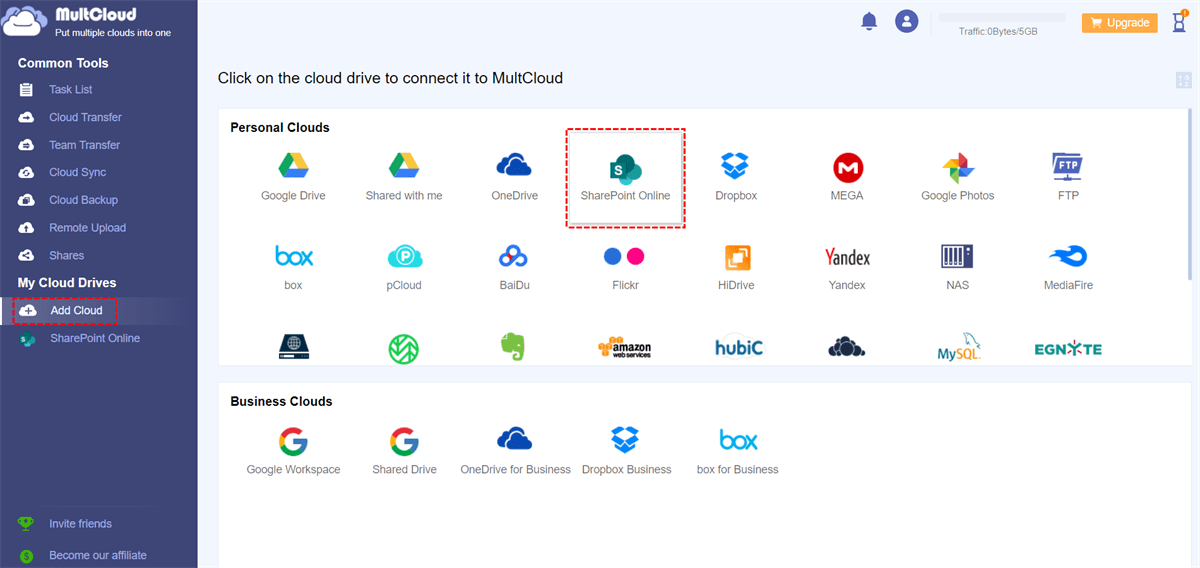
Step 2: Click “Add Cloud” and tap the SharePoint Online icon. Here you will log in to one of your SharePoint Online accounts in the pop-up windows. The same way to connect another SharePoint Online account to MultCloud.
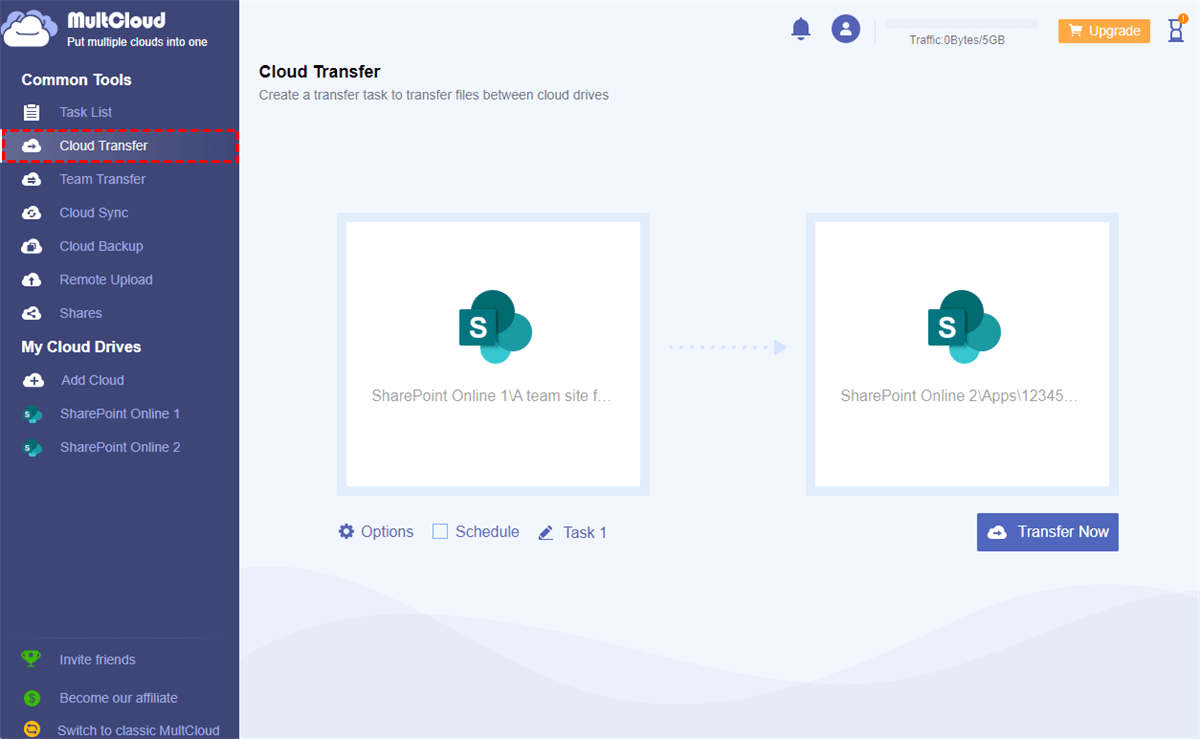
Step 3: Choose “Cloud Transfer” in the left sidebar and select the files or clouds which you want to transfer from/to. Then, click “Transfer Now” and all your operations are done.
Notes:
- Filter: If you want to ignore or only transfer some files, you can use Filter to select them with file extensions.
- Schedule: If you want to make the transfer task regular, you can set a preferred frequency in "Schedule" at a fixed time in a day/week/month.
- VIP Service: If you want to make the transfer faster, you can upgrade to a MultCloud premium user. By doing so, you can have 8 more threads for transferring different files at the same time. Besides, this upgrading can give you more data traffic to move files rather than the free 5 GB.
Conclusion
Looking through the whole post, you must know the differences between SharePoint Migration Manager and SharePoint Migration Tool. Also, if you want to use Migration Manager to transfer files, you can try the steps listed in the second part. But the best alternative MultCloud is more recommended to move files since it is easier to use and supports migrating files from more than 30+ clouds to SharePoint Online.
Besides, MultCloud has not only the Cloud Transfer function but others like Cloud Sync, Cloud Backup, and Team Transfer. When you’d like to transfer files between business clouds, you can try MultCloud Team Transfer. The steps are as easy as transferring personal clouds. If you want to migrate Dropbox for Business to Box for Business, then use MultCloud.
MultCloud Supports Clouds
-
Google Drive
-
Google Workspace
-
OneDrive
-
OneDrive for Business
-
SharePoint
-
Dropbox
-
Dropbox Business
-
MEGA
-
Google Photos
-
iCloud Photos
-
FTP
-
box
-
box for Business
-
pCloud
-
Baidu
-
Flickr
-
HiDrive
-
Yandex
-
NAS
-
WebDAV
-
MediaFire
-
iCloud Drive
-
WEB.DE
-
Evernote
-
Amazon S3
-
Wasabi
-
ownCloud
-
MySQL
-
Egnyte
-
Putio
-
ADrive
-
SugarSync
-
Backblaze
-
CloudMe
-
MyDrive
-
Cubby


