Quick Search:
Why Choose to Open SharePoint 365 in Windows Explorer
How do I open SharePoint 365 in windows explorer? Seems like a lot of users are asking this question. For many users, Windows File Explorer is the most familiar interface because users can directly open, click, and search for the files they need (Everything from centralized sites and remote work environments to real-time document management and collaboration).
Therefore, in order to obtain files in SharePoint and real-time document management more conveniently, many users choose to open files in SharePoint in explorer. Through user questions in forums and communities, we found that the main reasons are as follows:
- Quick Access: Accessing your files and folders through a local file explorer requires fewer clicks than opening a browser and searching multiple SharePoint sites.
- Easy Navigation: Using File Explorer means folders and files are in simpler URLs with folder names, rather than random character paths that SharePoint can create.
- Sharing Features: Right-clicking a file in File Explorer gives you instant access to SharePoint's sharing features.
- User-friendly: Using File Explorer provides an instantly recognizable screen for users who are less familiar with how SharePoint works.
- Easy Sync: Changes made in Windows File Explorer are automatically synced to SharePoint when your device is connected to the Internet.
- Version History: You can view all file history versions just like in SharePoint.
How to Open SharePoint in Explorer
So, how to open SharePoint in windows explorer? This article provides the following 2 ways.
Option 1: View in File Explorer
The temporary method is useful if you just want to open SharePoint in File Explorer to move or copy files. After closing the SharePoint folder, it will be lost. That is, it doesn't stay on your hard drive. Every time you want to access SharePoint, you must restart the connection. This method is useful without using your own computer.
Note: You need Internet Explorer for this to work. Mainly because this feature uses ActiveX controls. Also, this will only work if you are using Internet Explorer 10 or Internet Explorer 11.
Steps 1. Open SharePoint in Internet Explorer.
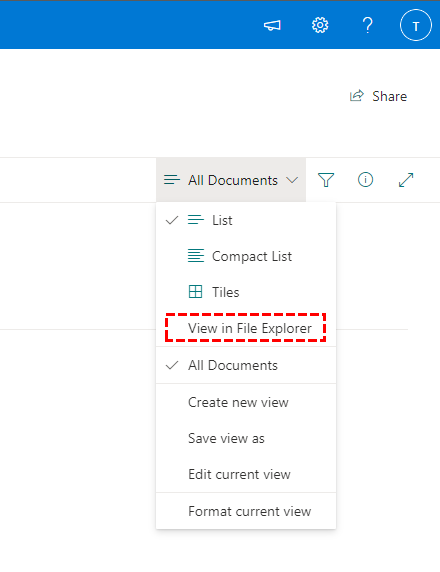
Step 2. Now, go to the SharePoint library you want to open in File Explorer. Next, click the "All Documents" drop-down menu and select the "View in File Explorer" option.
Step 3. After clicking the option, the target SharePoint library will open in File Explorer. From there, you can move, copy or modify the desired files and folders.
Note that SharePoint folders opened this way are temporary. That is, once you close the folder, it will be automatically deleted from your system. Also, if you're using an older version of SharePoint in the ribbon interface, you'll need to go to the "Libraries" tab and click the "Open with Explorer" option.
Option 2: How to Open SharePoint in Explorer via "Sync"
In addition to the above methods, you can also use the "Sync" option in SharePoint Online to sync local SharePoint files to File Explorer. Whether it's for faster navigation, organizing or moving files, or just a personal preference, follow the steps below to get it done.
Step 1. Navigate to the SharePoint document library that you want to sync locally.
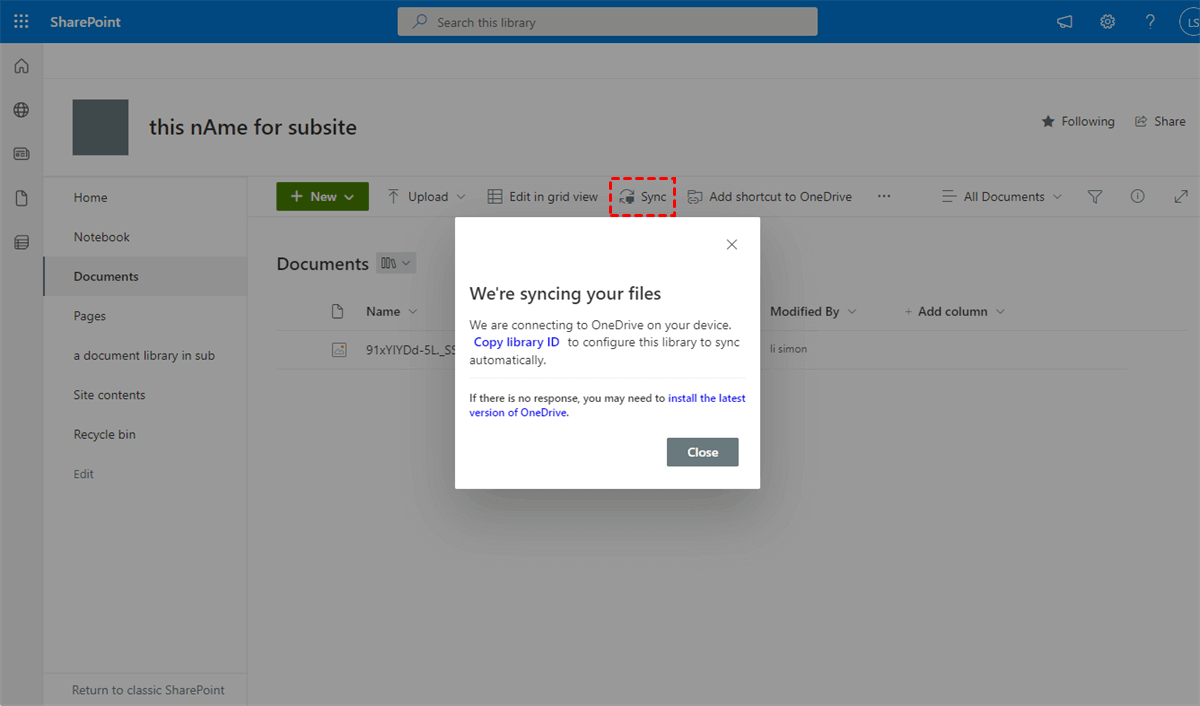
Step 2. Open the library you want to sync, and then select the "Sync" button.
Step 3. This will prompt to open OneDrive, click "Open Microsoft OneDrive". If OneDrive isn't already installed on your computer, you'll be prompted to install it and sign in.
Step 4. After that, you will receive a notification from the OneDrive app that the desired folders are now being synced.
Step 5. To find this folder locally, open File Explorer and you should see it on the left.
Bonus Tip: How to Move SharePoint Files Easily
Too many files in SharePoint to manage and move? You can manage and migrate your SharePoint with a cloud file manager --- MultCloud. Currently, MultCloud supports adding file directories in SharePoint. Besides adding SharePoint, you can also add other supported cloud drives such as Dropbox, Dropbox Business, Google Workspace, Google Photos, Wasabi, OneDrive for Business, Amazon S3, NAS and WebDav, FTP/SFTP, etc. This way, you can use MultCloud to manage multiple cloud drives without having to switch accounts frequently.
In addition, MultCloud also provides popular functions such as Cloud Transfer, Team Transfer, Cloud Sync, Cloud Backup, and Remote Upload. You can easily complete cloud-to-cloud transfer, sync and backup, and even upload files to cloud drives remotely. In the process of using MultCloud, Cloud Transfer can also help you easily move SharePoint files to other cloud drives.
Step 1. Go to the MultCloud homepage and sign up for an account.
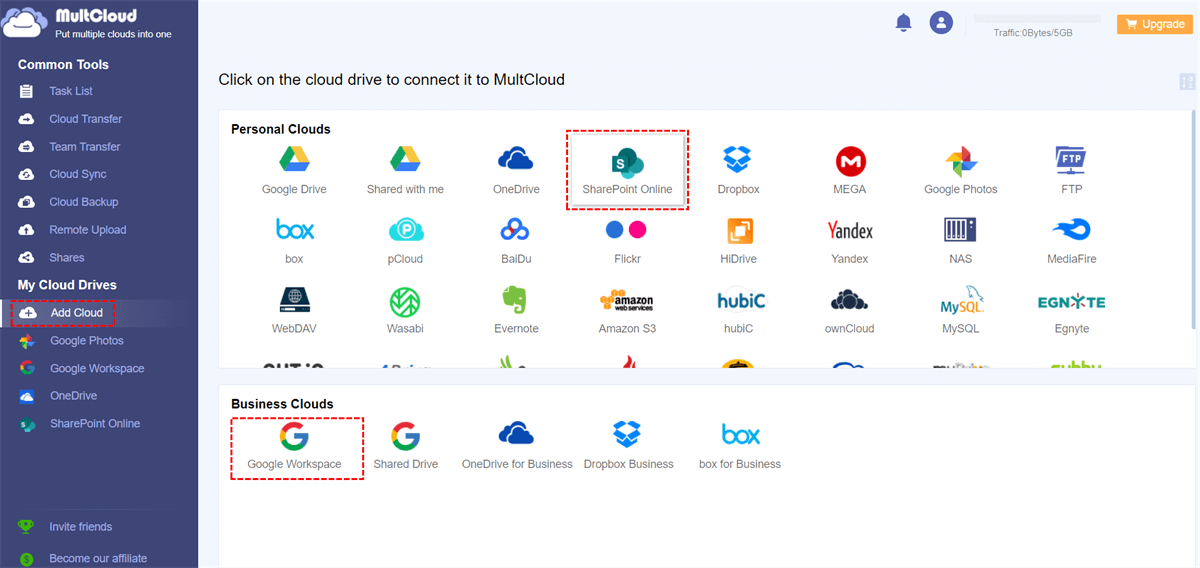
Step 2. Log in to MultCloud, click "Add Cloud", select SharePoint and other cloud drive (such as Google Workspace) to add to MultCloud.
Note: MultCloud supports adding the My Drive folder in the Google Workspace account separately. If you also want to manage the Shared Drive folder for this G Suite account in MultCloud, add G Suite and Shared Drive separately to MultCloud.
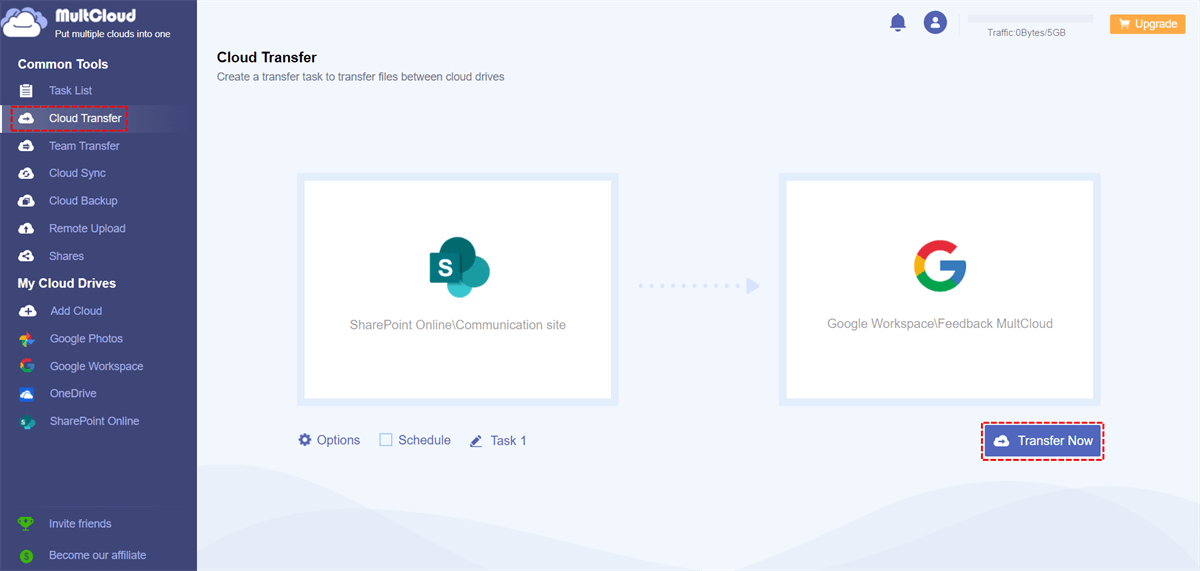
Step 3. Switch to the "Cloud Transfer" page from the left sidebar, select the file or folder in SharePoint as the source directory, and select the folder in the Google Workspace account as the destination directory. Then click "Transfer Now".
Notes:
- In "Options", you can have MultCloud handle source and destination files differently, or send you an email notification when a cloud transfer task is complete.
- In "Schedule", you can set up daily, weekly, or monthly scheduled cloud file transfer tasks to automate SharePoint to G Suite migrations.
- If you need to migrate large amounts of data between cloud accounts, you may want to upgrade to a premium MultCloud account with a monthly, quarterly, annual or lifetime plan. Then you get blazing fast transfer speeds and unlimited lifetime data of 100 GB per month, depending on your subscription.
In addition, when using MultCloud to manage SharePoint directly, you only need to open SharePoint in MultCloud and edit the files in it. Also worth mentioning, there are other hidden features you can enjoy when managing SharePoint with MultCloud:
- Access the official SharePoint site directly from MultCloud without logging into SharePoint again.
- Directly sync files from other cloud drives to SharePoint in real time without switching cloud drive accounts.
- Back up important files in SharePoint to other cloud drives, so that when the owner deletes the shared file, you can directly find the file you need.
- URLs, torrent files, and magnet link content often need to be parsed by third-party tools. Using MultCloud, you can download such content directly to SharePoint.
Summary
Now you know how to open SharePoint in explorer. For better access to files in SharePoint, you can use the 2 methods that this article gives you to accomplish the task. Additionally, managing or moving SharePoint and the files within it should be cumbersome for many users. To make it easier and faster for you to manage and migrate the data in the cloud drive, you can try the multiple cloud storage manager MultCloud mentioned in this article.
MultCloud Supports Clouds
-
Google Drive
-
Google Workspace
-
OneDrive
-
OneDrive for Business
-
SharePoint
-
Dropbox
-
Dropbox Business
-
MEGA
-
Google Photos
-
iCloud Photos
-
FTP
-
box
-
box for Business
-
pCloud
-
Baidu
-
Flickr
-
HiDrive
-
Yandex
-
NAS
-
WebDAV
-
MediaFire
-
iCloud Drive
-
WEB.DE
-
Evernote
-
Amazon S3
-
Wasabi
-
ownCloud
-
MySQL
-
Egnyte
-
Putio
-
ADrive
-
SugarSync
-
Backblaze
-
CloudMe
-
MyDrive
-
Cubby


