Why are Photos Taking up Space on Mac When I Have iCloud?
iCloud is a popular cloud storage service. It allows users to store and sync content such as photos, music, and documents. When you are using iCloud to save your Mac photos, you may find the photos still occupy your local storage. That is because iCloud cannot be used as an individual storage service. It is always syncing with your Apple devices. Although you can use the "Optimize Storage" feature to save the original quality of photos to iCloud, the compressed photocopies will be also kept on your Mac.
However, if you find that your photos occupy much space on your Mac even when you turn on iCloud, this situation may be caused by several reasons, such as:
- Set up iCloud Photos Wrong: Your iCloud Photos may be turned off or be incorrectly set up. Therefore, the photos can't be uploaded to iCloud but only kept on your Mac.
- Optimize Storage is not Enabled: When you enable iCloud Photos on the Mac, you have to select the option to "Optimize Storage". If not, your original, full-resolution photos will take up the space on your Mac.
- Import Photos Recently: If you import new photos to your Mac recently, you may need to wait for some time for iCloud to sync these photos.
- Keep Local Caches: After you access the photos, it may have local caches which take up a lot of your computer space.
- Share Albums: When you share albums with others, the photos in the albums will be downloaded, which occupies the local storage.
You can check with the above 5 reasons to see if these cause your iCloud not to work well. Some new iCloud users may have the question “How Do I Move Photos from Mac to iCloud”. The next parts will show 3 ways to solve this question.
How to Move Photos from Mac to iCloud via Apple Solutions
There are 2 common ways to move photos from Mac to iCloud. The first one is enabling iCloud Photos on your Mac. In this way, you can choose to save the original or compressed photos on your Mac. Another way is uploading on iCloud.com which is just an uploading process without any other options.
Way 1. Save Photos from Mac to iCloud via Settings
Step 1: Open "System Settings" by clicking the Apple icon in the desktop's top left corner.
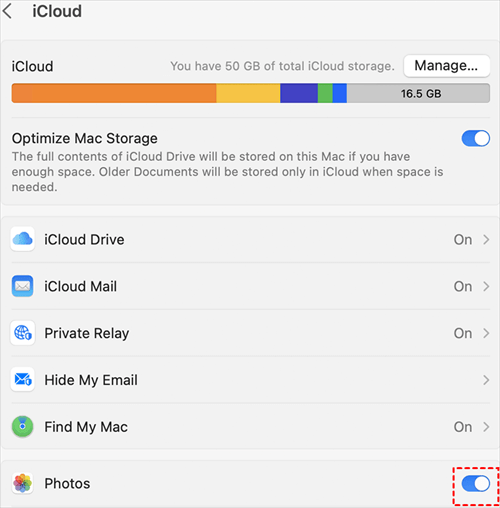
Step 2: Sign in with your Apple ID and open iCloud in the right part of the interface.
Step 3: Turn on the button beside "Photos" in the iCloud list. Now, you have already signed in to iCloud.
Step 4: Open the Photos app on your desktop and click "Photos" and "Preference" in the upper-left corner.
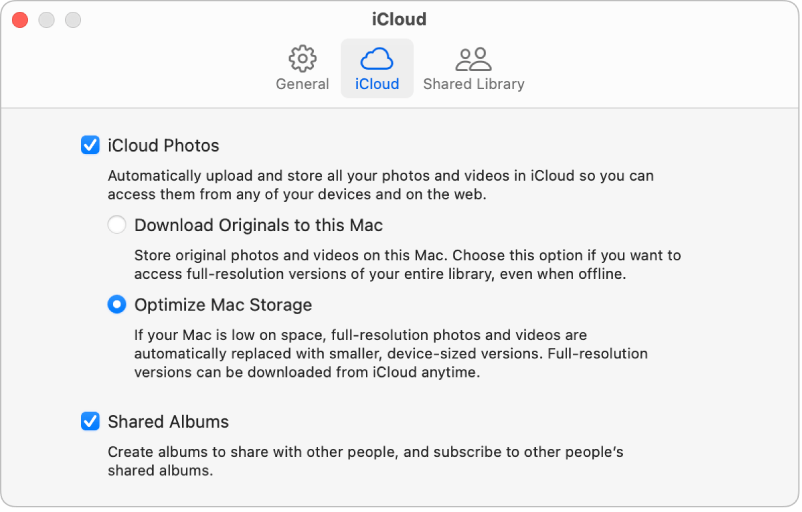
Step 5: Choose iCloud and tick the box of iCloud Photos. Then, choose "Download Originals to this Mac" or “Optimize Mac Storage”. And the photos on your Mac will be automatically moved to iCloud.
Note:
-
Download Originals to this Mac: Both iCloud and your Mac will keep the full-size photos.
-
Optimize Mac Storage: Save the original full-sized photos on iCloud and the compressed smaller-sized photos will be saved to Mac.
Way 2. Upload Photos from Mac via iCloud.com
Step 1: Enter iCloud.com and log in to your iCloud account.
Step 2: Click "Photos” in the interface and tap the upload icon.
Step 3: Select photos on your computer and click “Open”. Then your photos are uploaded to iCloud.
How to Move Photos from Mac to iCloud via MultCloud
MultCloud is a free cloud management service and it provides you with several functions to manage your cloud drives on one platform, including uploading files. To use MultCloud for photo uploading instead of iCloud.com is because the MultCloud uploading speed is quite fast (use data traffic to transfer files). Using data traffic to upload photos can bring another benefit: offline transfer. You don't have to open the task window and focus on the processes since the uploading process can still proceed even when you shut down your Mac. What's more, once you begin to use MultCloud, you can use other functions to make the cloud-transfer tasks easier.

- Cloud Transfer: Easily transfer one cloud to another cloud without downloading.
- Cloud Sync: Sync files between clouds automatically with 7 sync modes.
- Cloud Backup: Backup one cloud to another cloud as well as restore the files back.
- Share: Share files from clouds and record the shared content.
- Remote Upload: Transfer files from links, torrents, and magnet links to cloud drives.
Upload Photos from Mac to iCloud by MultCloud Upload
Step 1: Enter the MultCloud website and get a MultCloud account by clicking on "Get started for free".
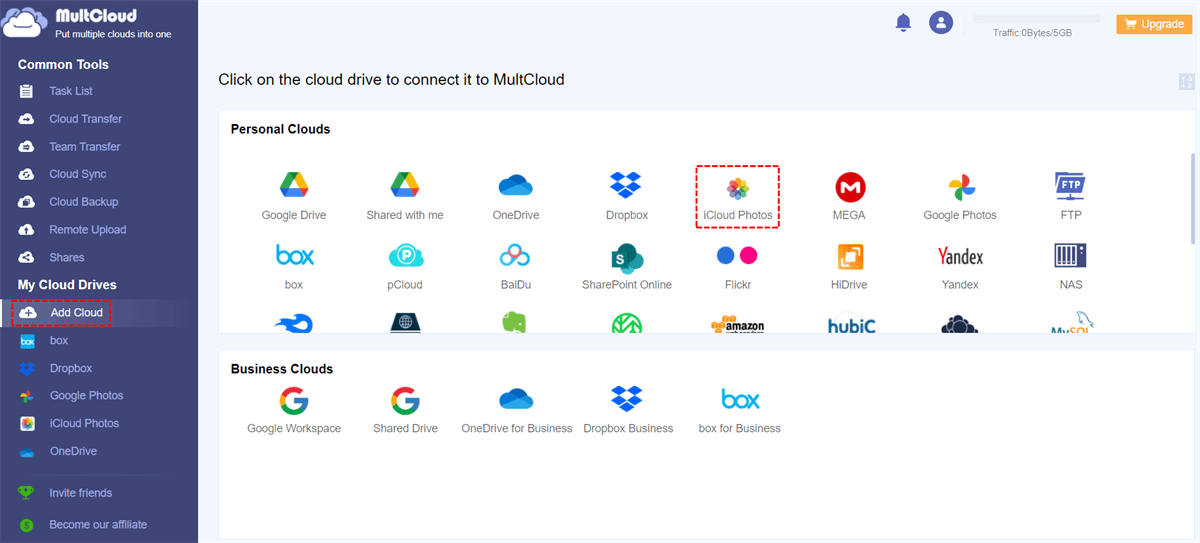
Step 2: Click "Add Cloud" and the icon of iCloud Photos. Then, a pop-up window will show up for logging in to your iCloud Photos account. Here you may have to go through the two-factor authentication.
Step 3: Open iCloud Photos in the left sidebar and click "Upload File". Then, select photos that you want to move from your Mac to iCloud and click the button "Open". After that, the photos you selected will be saved in iCloud Photos.
Note: You can upgrade your MultCloud plan to get more than 5 GB of free traffic to move all your Mac photos to iCloud at once.
Bonus Tip: Transfer iCloud Photos to Google Photos by Cloud Backup
If your iCloud storage is about to be used up, you can move some photos from iCloud Photos to another cloud storage, such as Google Photos which offers 15 GB of free storage. To automate the photo transfer task, MultCloud Cloud Transfer deserves a try. It can directly move all your iCloud Photos to Google Photos without downloading and uploading. Besides, Cloud Transfer can help you automatically delete the transferred photos in iCloud Photos.
Step 1: Add iCloud Photos and Google Photos to MultCloud.
Step 2: Open "Cloud Transfer", choose iCloud Photos as the transfer source and Google Photos as the destination, and tap "Transfer Now" to run the backup task.
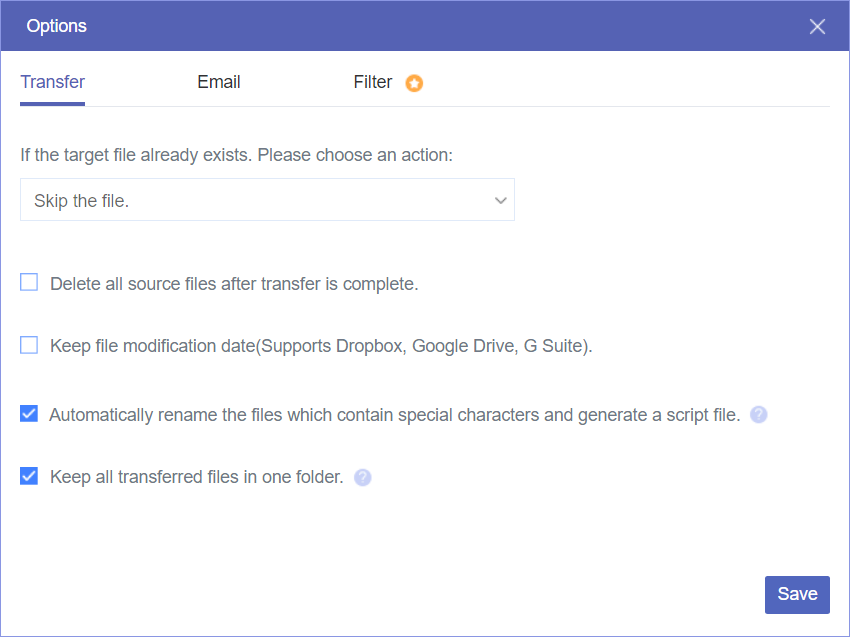
Step 3: If you want to let MultCloud delete the transferred photos in iCloud Photos, you can open "Options" and select "Delete all source files after transfer is complete".
Notes:
- If you have another preferred cloud than Google Photos, you can also add another cloud and run the task between this cloud and iCloud Photos.
- If you want to regularly start this task, you can set a fixed frequency in "Schedule". When the appointed time arrives, the task will auto-start.
Conclusion
When you finish reading this post, there is no doubt that you have learned more things about iCloud. You can learn 5 reasons on the question why your photos take up the Mac storage although you have iCloud. Also, you can learn 3 easy solutions on how to move photos from Mac to iCloud - moving through System Settings, iCloud.com, and MultCloud.
Additionally, if you need to transfer iCloud Photos to another cloud drive, it is a good opportunity to start using MultCloud. It can not only be used to move photos from local positions to iCloud but also perform well in cloud-to-cloud transfer. For example, if you need to backup iCloud Photos to Google Photos automatically, MultCloud can be your best helper.
FAQs
How do I remove photos from my Mac but keep them in iCloud?
To remove photos from your Mac while retaining them in iCloud, enable iCloud Photos and choose "Optimize Mac Storage" in Photos settings. This stores full-resolution images in iCloud while using smaller versions on your Mac to save space.
Will deleting photos from Mac delete from iPhone?
No, deleting photos from your Mac won't delete them from your iPhone if iCloud Photos is enabled. iCloud syncs changes, so deleting on one device removes them from iCloud but not other linked devices like your iPhone.
How do I Unsync my photos from my Mac?
To unsync photos from your Mac, open Photos, go to Preferences > iCloud, uncheck "iCloud Photos," and select "Remove from Mac." This prevents further syncing while keeping your existing photos on iCloud and other devices.
Why aren't my photos uploading to iCloud?
Photos might not upload to iCloud due to slow internet, insufficient iCloud storage, disabled iCloud Photos in settings, or software glitches. Check your network, storage, settings, and restart your device to troubleshoot the issue.
MultCloud Supports Clouds
-
Google Drive
-
Google Workspace
-
OneDrive
-
OneDrive for Business
-
SharePoint
-
Dropbox
-
Dropbox Business
-
MEGA
-
Google Photos
-
iCloud Photos
-
FTP
-
box
-
box for Business
-
pCloud
-
Baidu
-
Flickr
-
HiDrive
-
Yandex
-
NAS
-
WebDAV
-
MediaFire
-
iCloud Drive
-
WEB.DE
-
Evernote
-
Amazon S3
-
Wasabi
-
ownCloud
-
MySQL
-
Egnyte
-
Putio
-
ADrive
-
SugarSync
-
Backblaze
-
CloudMe
-
MyDrive
-
Cubby


