Can I Backup My iPhone Photos without iCloud?
iCloud is a storage service on which you can store your photos, files, memos, passwords, and other data. After enabling the iCloud syncing feature, the iCloud files can be accessed on all your Apple devices, even Windows (with the iCloud for Windows app). Besides, iCloud can be used to easily share files with your family or friends, along with options like who can edit your shared data and who can only read it.
Although iCloud is quite useful, some iPhone users may not be in favor of it and want to know how to backup photos from iPhone without iCloud. The reasons why they backup iPhone photos without iCloud can be concluded from the following 4 perspectives.
- Backup Speed: Some users find it slow for iCloud to back up the photos from their iPhone. When they have many photos to back up, they have to wait for a long time for the task to finish. It is undoubtedly less efficient, so they find other ways to back up.
- Price & Storage: Although users can get 5GB of iCloud free storage, with the photos becoming more, it may not be enough. If users don’t want to pay for iCloud+ to get more iCloud storage, they will use other cloud services.
- Network Connection: When you are in a place where the network connection is unstable, iCloud backup may not work because it is an online storage service. In this case, if you back up the photos to the local position before, it will be easier and quicker to use these photos.
- Other Collaboration: Some users want their backed-up photos to collaborate with other services like Google Photos or Microsoft Office 365 more directly. Therefore, they may back up their photos from the iPhone to other cloud drives instead of iCloud.
It is reasonable that some users don’t want to back up photos from their iPhone to iCloud. The following parts will show you 4 methods where you can choose the best way to backup iPhone photos without iCloud.
How to Backup Photos from iPhone without iCloud: 3 Computer Solutions
It is a good idea to back up the photos to your computer instead of iCloud. You can access the photos more quickly and conveniently. However, saving your photos to a local drive may occupy much storage if you have quantities of photos. This part will tell you how to backup iPhone to PC or Mac.
Method 1: Backup iPhone Photos via File Explorer (PC)
If you are a Windows user, you can back up your iPhone Photos to your PC with this method. What you need is to use a cable to connect your iPhone with the computer.
Step 1: Connect the iPhone and the computer with a cable.
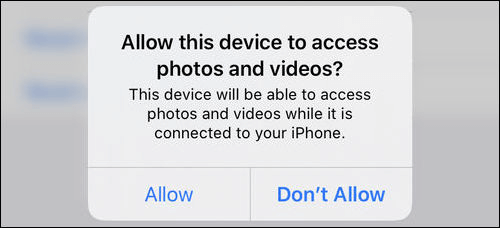
Step 2: Allow the computer to access your iPhone photos by clicking "Allow" on your iPhone.
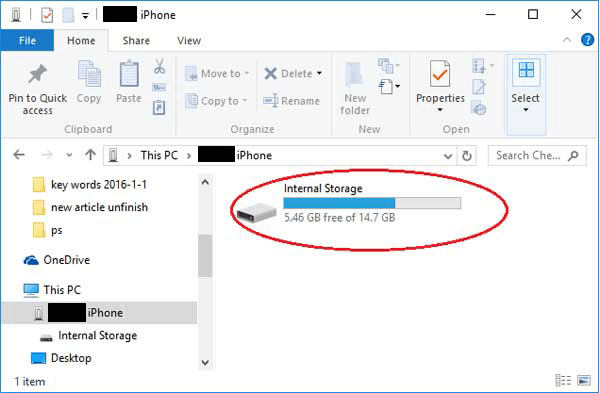
Step 3: Open Apple iPhone in File Explorer and click "Internal Storage".
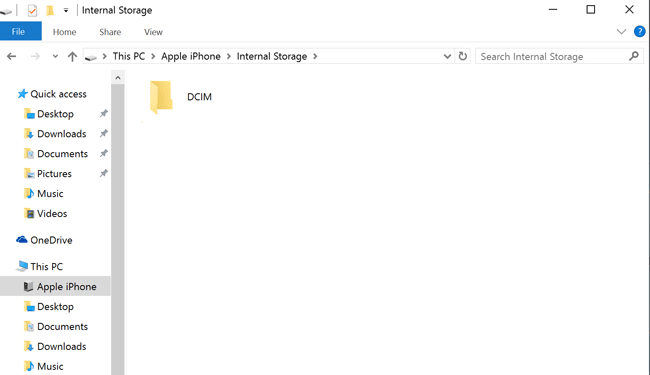
Step 4: Open the DCIM folder and select the photos that you want to backup. Then copy the photos and paste them to another folder on your computer. You have to wait for some minutes before the backup process succeeds.
Method 2: Backup Photos from iPhone via Finder (Mac)
If you are a Mac user, you can choose to back up the photos from your iPhone to a local drive on a Mac. This method is also very easy to follow. You can just realize the backup through Finder.
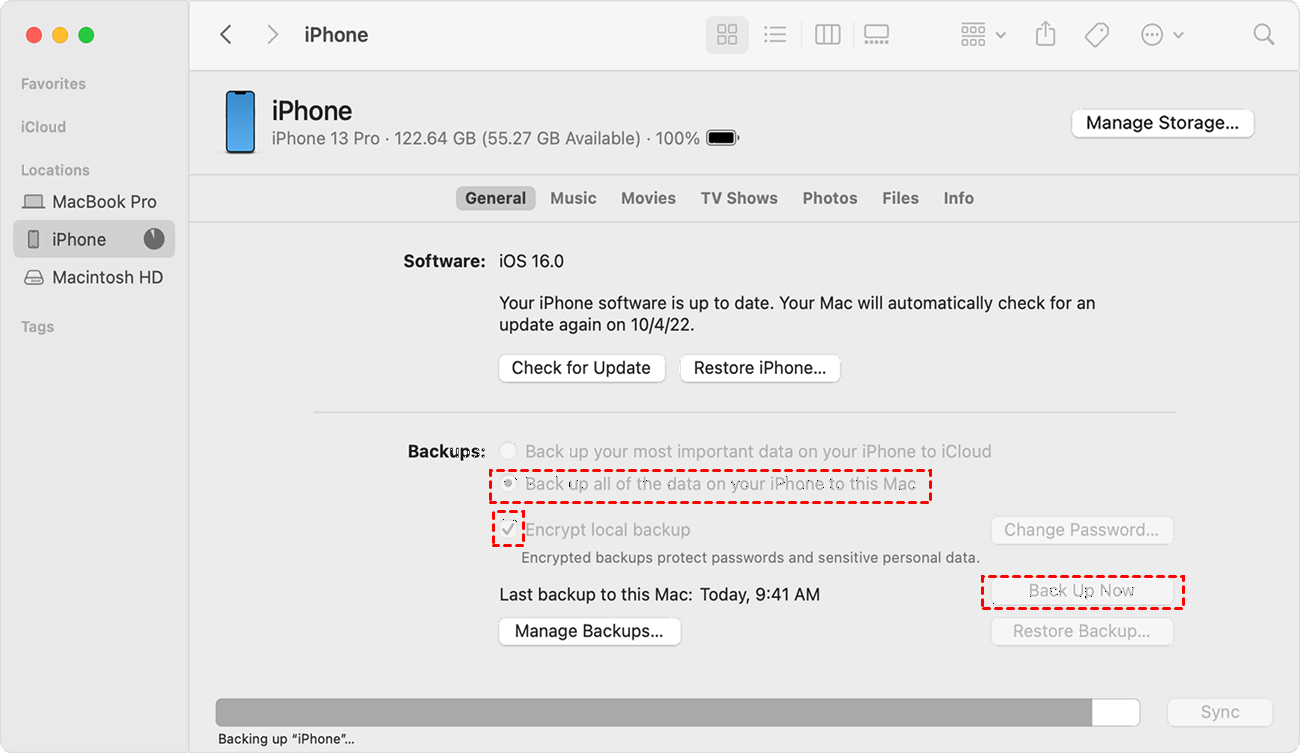
Step 1: Use a cable to make a connection between your iPhone and the computer. Then open Finder.
Step 2: Trust the computer on your phone. Then find your iPhone in the left sidebar and open it.
Step 3: Choose "Backup all of the data of your iPhone to this Mac". If you want to be more secure, you can tick the "Encrypt local backup" and set a password. If you don't, just click "Backup Now". Then the photos will be backed up to your Mac.
Method 3: Backup iPhone Pictures via iTunes (Windows & Mac)
This method can be used on both macOS and Windows computers. But if you don't have iTunes on your computer before, you have to download it to the local position.
Step 1: Connect the computer and your iPhone.
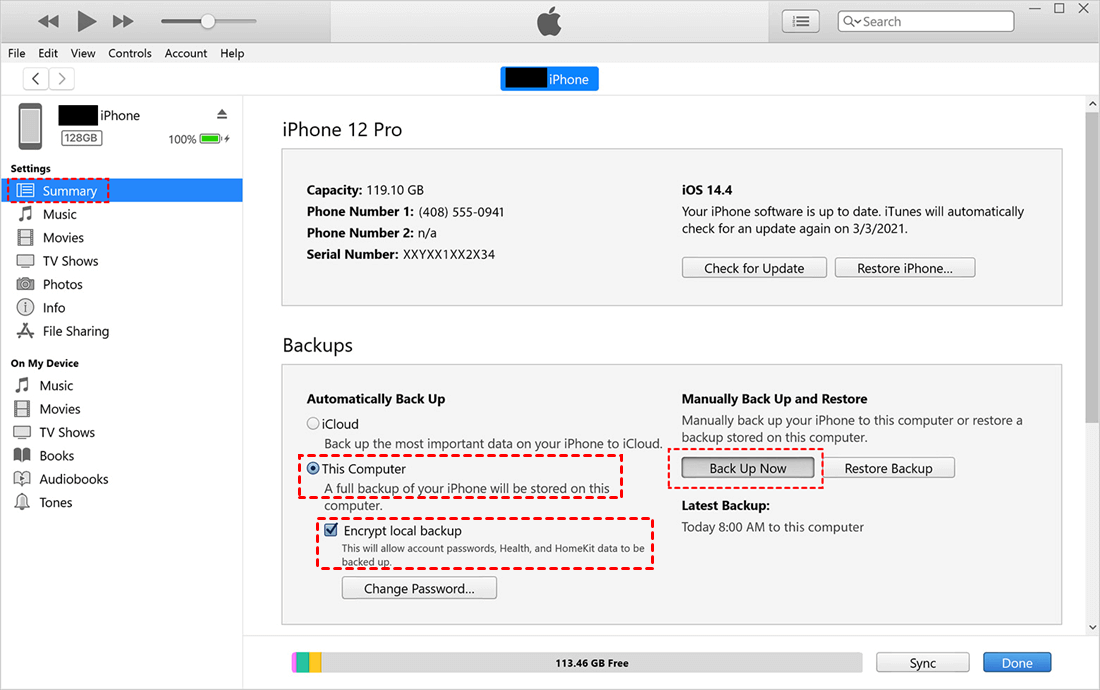
Step 2: Open iTunes on your computer and click the phone icon.
Step 3: Choose "Summary" in the left sidebar. Tap "This Computer" and click "Back Up Now" in the right part of the interface. Then wait for the task to be complete. You can also tick Encrypt local backup to make the backup more secure.
How to Backup Photos from iPhone without iCloud: 1 Cloud Solution
If you want to back up photos from your iPhone to cloud drives, Google Drive will be a good choice. Google Drive offers 15 GB of free storage which is more than the 5 GB given by iCloud. By using Google Drive to back up iPhone Photos, you can better integrate your photos with Google products like Google Photos and Gmail. Moreover, if you also save photos in Google Drive, you can centralize all of your photos and manage them only in one cloud drive.
Step 1: Download Google Drive to your iPhone and log in to your Google Drive account.
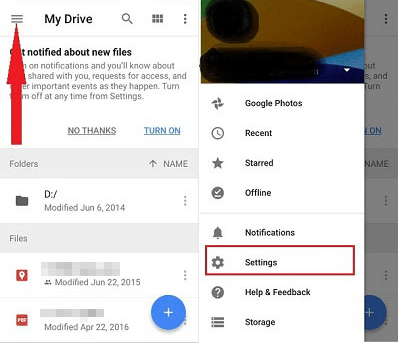
Step 2: Click the icon in the upper menu bar and choose "Settings".
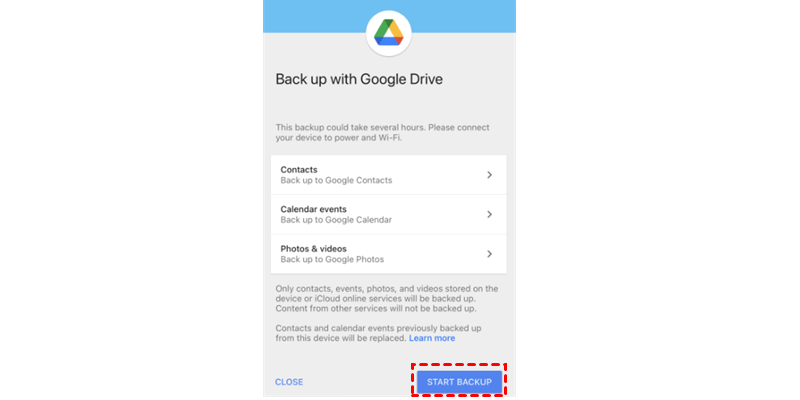
Step 3: Choose "Backup" and "Photos & videos". Then click "START BACKUP" and the photos are backed up to Google Drive.
Bonus Tip: Transfer Photos from iCloud Photos to Google Drive
If you are determined to quit iCloud Photos and want to transfer the photos on it to another place like Google Drive, you can use MultCloud to easily make it. MultCloud is a cloud-management service that supports multiple cloud drives for cloud file transfer. MultCloud offers multiple functions that you can use to transfer photos from iCloud Photos to Google Drive, Google Photos, Flickr, Dropbox, OneDrive, or other clouds.
- Cloud Transfer: Automatically move photos from iCloud Photos to another cloud without downloading.
- Cloud Sync: Real-time sync iCloud Photos to Google Photos or another cloud without creating multiple tasks.
- Cloud Backup: Regularly backup iCloud Photos to another cloud and restore with different photo versions.
The steps for using these 3 functions are similar. Here is an example of the steps for using Cloud Transfer to transfer iCloud Photos to Google Drive.
Step 1: Enter MultCloud and sign up to get a new MultCloud account.
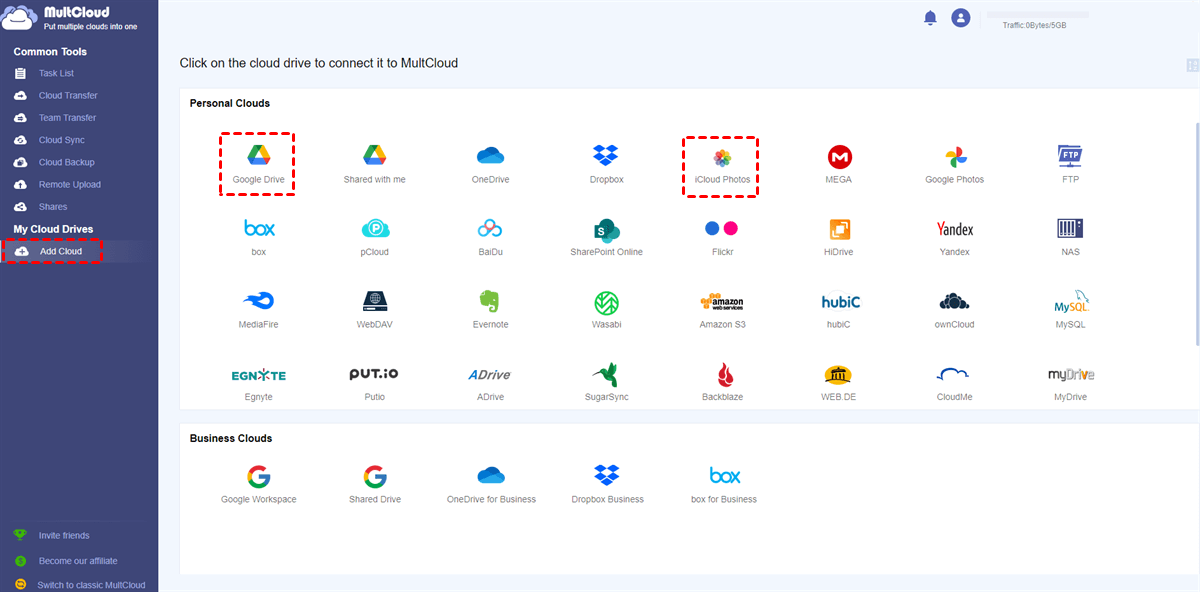
Step 2: Click "Add Cloud" and the iCloud Photos/Google Drive icon to add these 2 clouds to MultCloud. When you log in to your iCloud Photos, you need to go through two-factor authentication.
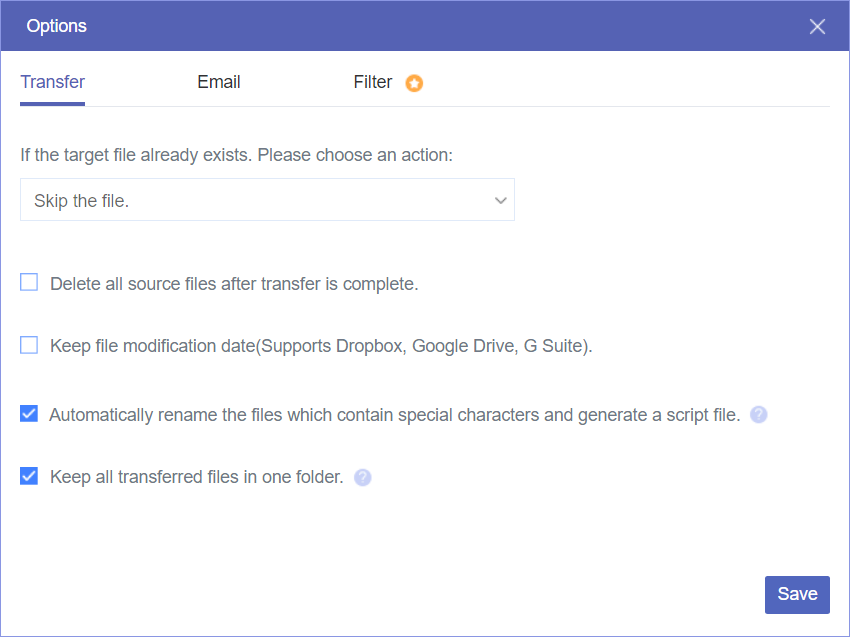
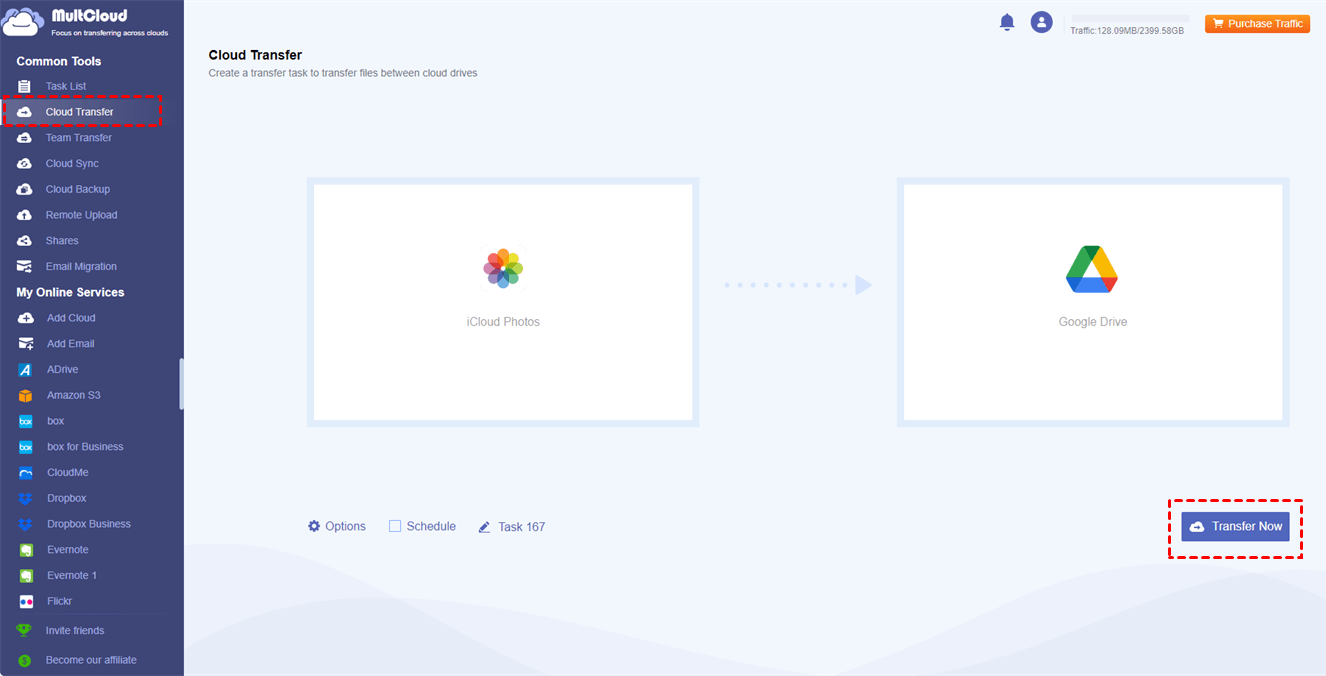
Step 3: Click "Cloud Transfer" and select Google Drive and iCloud Photos as the source and destination. Then, check the "Options" to see if there is any transfer setting that needs to be changed. If you want to delete the photos in iCloud Photos after the transfer, you can check the option "Delete all source files after transfer is complete".
Step 4: Click "Transfer Now" to start transferring iCloud Photos to Google Drive.
Notes:
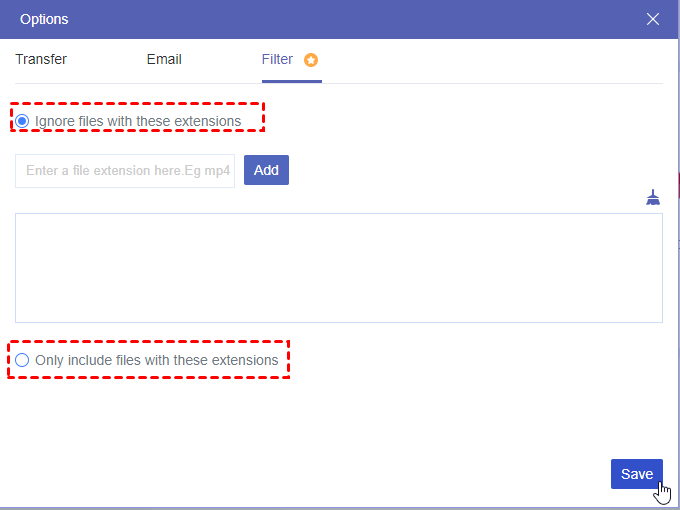
- If you only want to transfer photos or videos, you can use "Filter" in "Options" to select your desired files with their file extensions.
- Multcloud offers 5 GB of free traffic every month for file transfer/sync/backup. If you have more photos and videos to transfer to Google Drive, you can subscribe to a paid plan to get more traffic and transfer with faster speed.
Conclusion
This post offers 4 tested solutions on how to backup photos from iPhone without iCloud. The 3 computer solutions can be used to back up your iPhone photos to a Windows PC or Mac. Or, you can use another cloud storage like Google Drive or OneDrive to automatically back up your iPhone photos. All the methods are easy to follow, so try them now!
What's more, if you are willing to transfer iCloud Photos to another cloud, you can use MultCloud, a free and professional cloud file transfer service. Its Cloud Transfer function can directly transfer files from iCloud to your desired cloud without downloading and uploading. Except for Cloud Transfer, there are other functions like Cloud Sync or Cloud Backup that can sync iCloud Photos with OneDrive, or back up iCloud Photos to Dropbox with the Restore feature.

- Cloud Transfer: Transfer iCloud Drive or iCloud Photos to another cloud without downloading and uploading.
- Cloud Sync: Real-Time sync iCloud with OneDrive or other clouds to update the added or modified content constantly.
- Cloud Backup: Directly back up documents or photos from iCloud to other clouds. When you want to restore the backups, you can choose different versions to make it.
- Offline Transfer: MultCloud tasks can run offline. Therefore, after creating a transfer/sync/backup task, you can just close the task window or your device and let the task run in the background.
- Schedule: If you want a task to run daily/weekly/monthly at a fixed time, you can schedule the task.
MultCloud Supports Clouds
-
Google Drive
-
Google Workspace
-
OneDrive
-
OneDrive for Business
-
SharePoint
-
Dropbox
-
Dropbox Business
-
MEGA
-
Google Photos
-
iCloud Photos
-
FTP
-
box
-
box for Business
-
pCloud
-
Baidu
-
Flickr
-
HiDrive
-
Yandex
-
NAS
-
WebDAV
-
MediaFire
-
iCloud Drive
-
WEB.DE
-
Evernote
-
Amazon S3
-
Wasabi
-
ownCloud
-
MySQL
-
Egnyte
-
Putio
-
ADrive
-
SugarSync
-
Backblaze
-
CloudMe
-
MyDrive
-
Cubby
