Quick Search:
User Case: How Can I Create an iCloud Link to a Shared Album?
"I want to share photos on iCloud with friends or family, how to create a link for Shared Album? Thank you very much!"
"I have created a Shared Album, but I don't know how to create a link for this Shared Album. I want to send the shared link to my friends directly. Do you have detailed steps?"
If you also encounter the above problems, don’t worry, this article will provide different solutions for different users. You can create a Shared Album link in the following ways.
Solution 1: Create iCloud Link for Shared Albums for Apple Users
Note that there are two types of "Shared Albums" in iOS 12 Photos. One is for the temporary sharing of photos among friends, and the links to those albums only lasted a month before disappearing. The second type is shared albums, which will be there as long as you have iCloud (as long as Apple doesn't delete it, we see no reason for that to happen.) Of course, the second is a great way to share photos.
Before creating a shared album link, you need to do the following preparations:
1. Sign in to iCloud.
2. iCloud Photos and Shared Albums are enabled on your device. Go to: Settings > Photos > a) turn on iCloud Photos; b) turn on Shared Albums.
When the preparations are done, you can create a shared album and generate a share link with peace of mind. iCloud Shared Albums combine individual photos and videos into an album, which can then be shared and viewed item by item. iCloud Shared Albums are generally stored in iCloud, but will not take up your iCloud storage quota.
1. Create iCloud Link for Shared Albums on iMac or Macbook
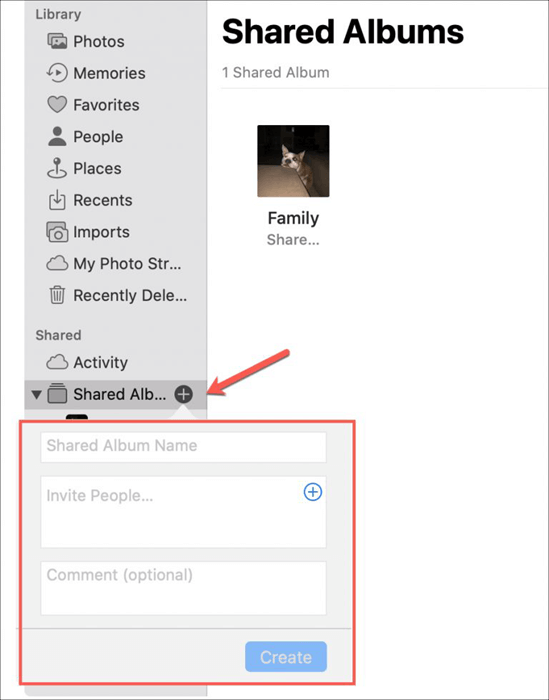
Step 1. Launch "Photos", click the "Shared Albums" (left column) and tap the "+" sign on the right.
Step 2. Enter a title for the shared album (no other information required), then select "Create".
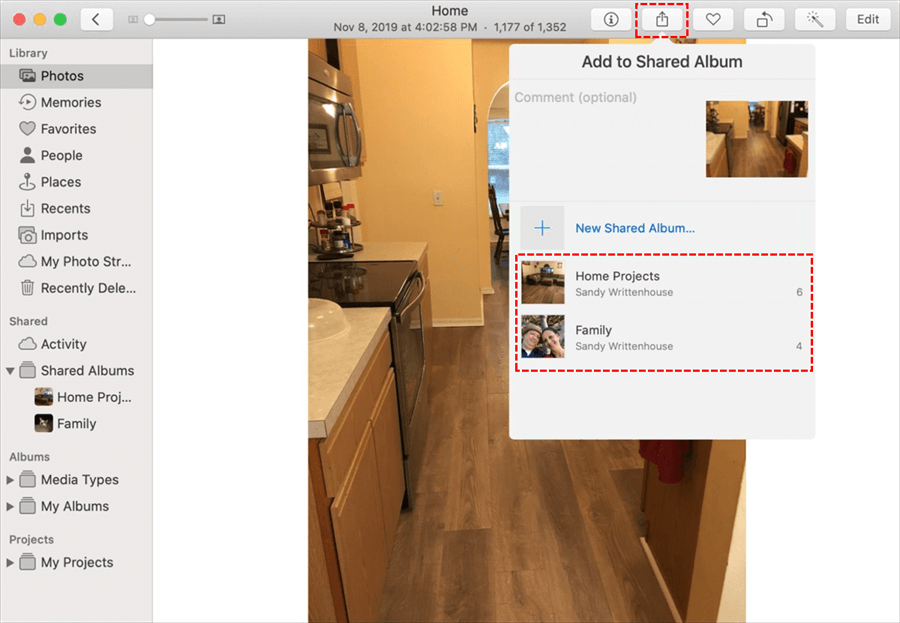
Step 3. Select the photos and videos you want to add to this album and add them. (Photos in your new album may take some time to appear.)
Step 5. At the top of the screen, click the circled person icon and open the "Public Website".
Step 6. Now drag the cursor to copy ([command]+[C]) the share link. You now have a link to this new shared album stored in iCloud, which you can copy to your friends or family.
2. Create iCloud Link for Shared Albums on iPhone
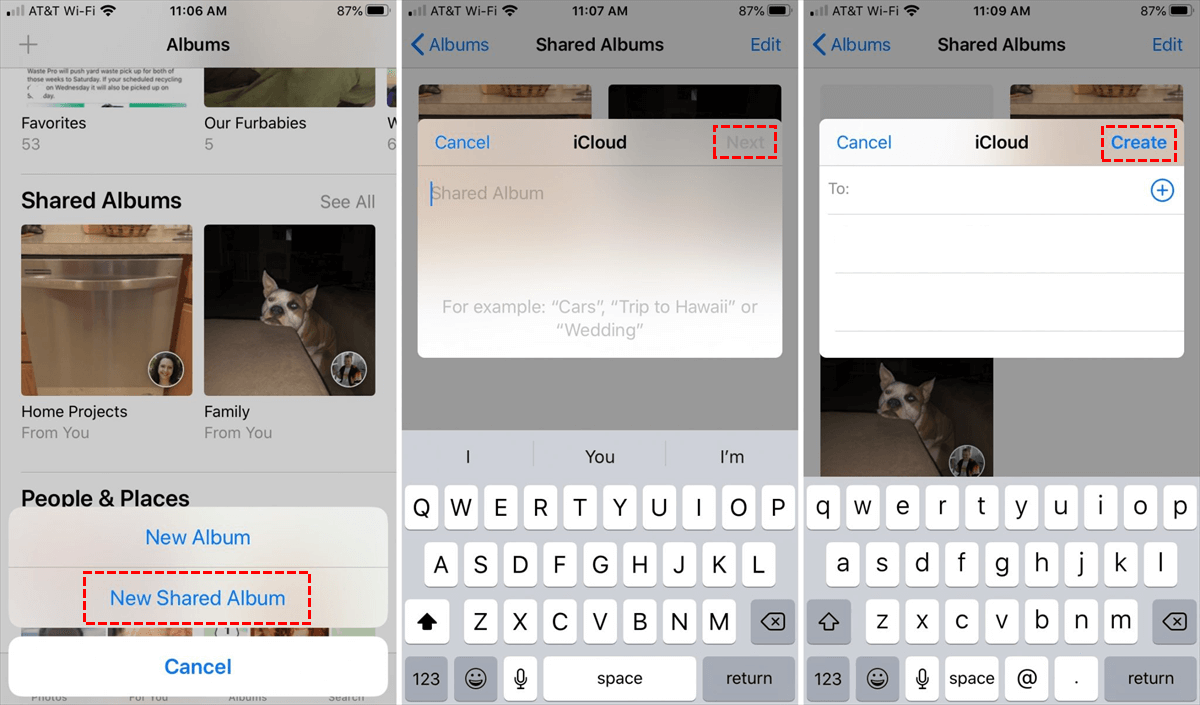
Step 1. Launch "Photos", and tap the "Albums" tab at the bottom of the screen.
Step 2. Click the "+" sign in the upper left corner of the screen and select "New Shared Album".
Step 3. Enter a title for the shared album., then select "Next".
Step 4. Select "Create" (no need to enter person/address for "To:").
Step 5. Add photos or videos to that shared album.
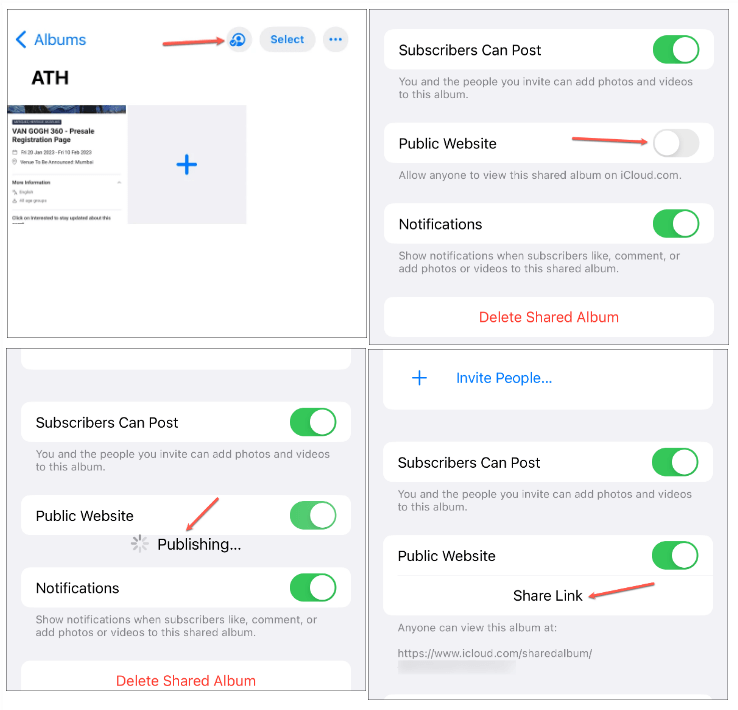
Step 6. Select the shared album, click the people tab, and open the "Public Website". A share link will appear shortly after the app finishes "Publishing...". (This sometimes takes a while, you can come back to the shared album later and get the link). From this screen, you can also invite others to contribute to the shared album.
Step 7. Select "Share Link" and "Copy" options. You now have a link to this new shared album stored in iCloud. To copy the link, you can simply click copy and you will have the link, or you can email it to yourself or someone else.
Solution 2: Create iCloud Link for Shared Albums for Windows Users
With iCloud Shared Albums for Windows, you can share photos and videos with specific people (subscribers) you invite. They can then view, like, comment and download your photos and videos, and add their photos and videos to your photo album.
Step 1. Download iCloud for Windows and turn on "Photos" on iCloud.
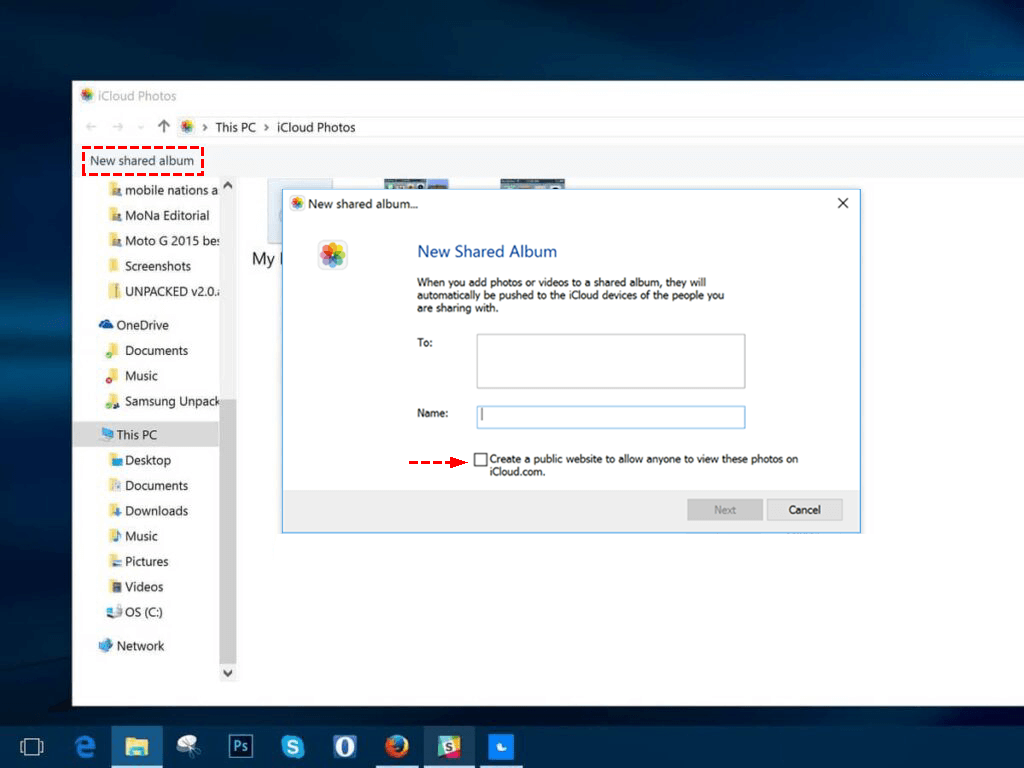
Step 2. Click "New shared album" in the top banner. A dialog opens where you need to add at least one email address and name, then click "Create a public website to allow anyone to view these photos on iCloud.com".
Step 3. After that, choose to add photos or videos to that shared album.
Step 4. You have now created a shared album. To get shareable links:
a) Your email will contain a share link if you send it to yourself;
b) Alternatively, you need to click on iCloud Photos in Explorer, click on the Shared Albums box, right-click on the album you want to get the share link to, and click "Open Public Web View". Finally, copy the URL link and paste it elsewhere.
Bonus Tip: How Do I Share iCloud Photos Easily and Safely?
When sharing private photos and videos saved in iCloud Photos, many users want to share more conveniently and securely. At this point, you can use a professional cloud file manager---MultCloud. Currently, MultCloud provides 2 unique modes for you to share photos from iCloud Photos. One is "Public Share", where anyone can view the photo through the share link, and the other is "Private Share", where only recipients with a password can view the photo through the share link.
So, how to securely share iCloud photos via MultCloud's "Private Share"?
Step 1. Sign up with your name and email. Then click "Create Account". You can also authorize logins directly with your Google and Facebook accounts.
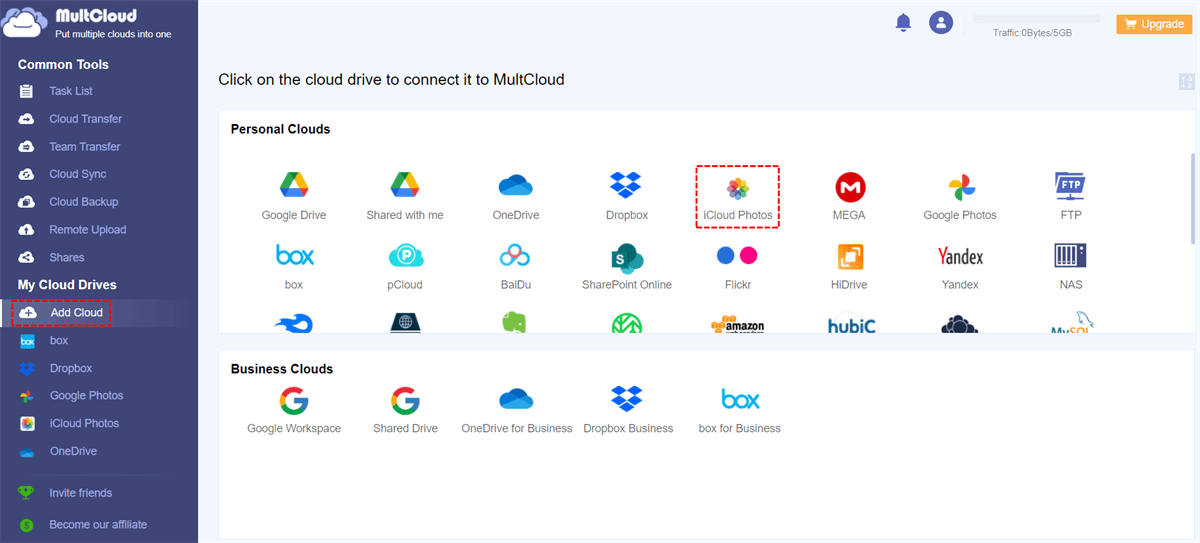
Step 2. Click "Add Cloud" under the sidebar menu of "My Cloud Drives". Then select the iCloud Photos icon on the left.
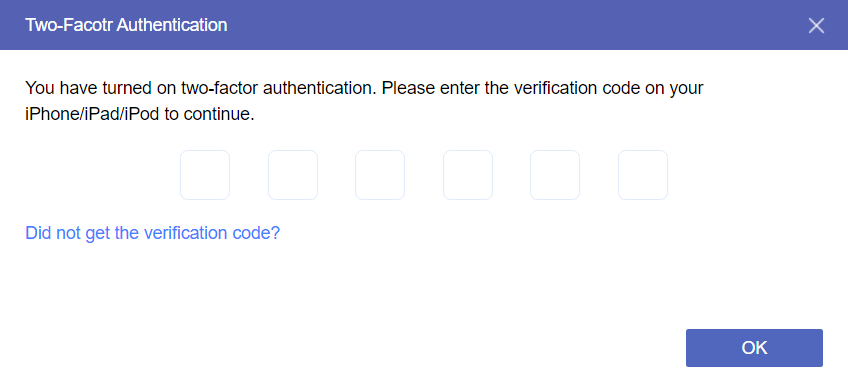
Step 3. In the pop-up window, complete the two-factor authentication process to allow MultCloud to access photos in your iCloud account.
Notes:
- MultCloud supports adding more than 30+ cloud drives. If necessary, you can add all cloud accounts to better manage multiple cloud storage accounts.
- If you want to share photos from other cloud accounts, for example, sharing photos on Google Photos, just find and add the cloud in the "My Cloud Drives" list, and then select the folder you want to share.
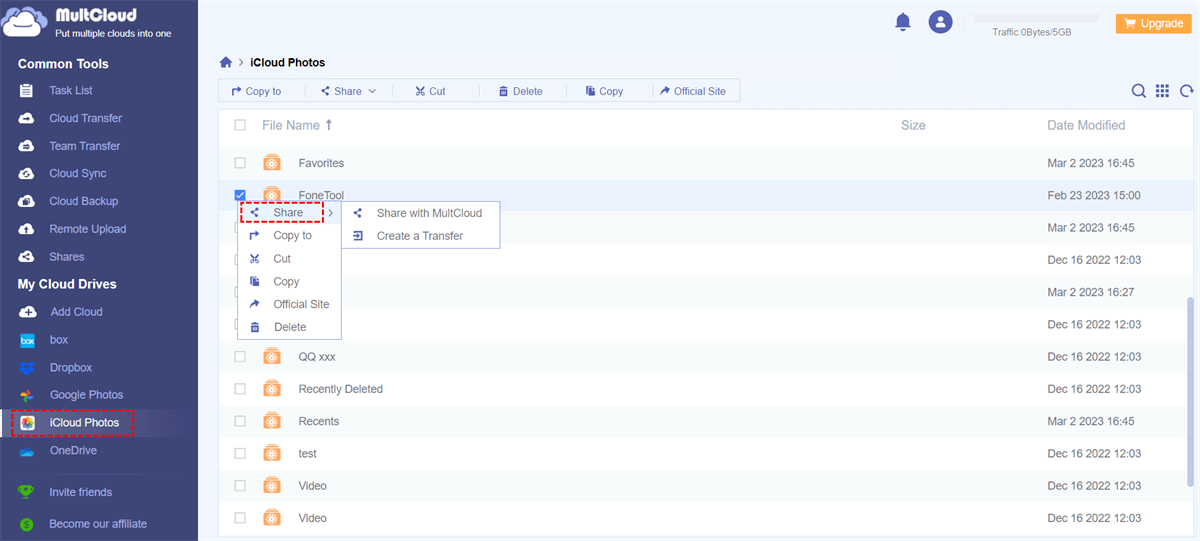
Step 4. Check the boxes in front of the photos or the entire album you want to share with family or friends. Then right-click on the folder, select "Share" in the pop-up window, and select "Share with MultCloud".
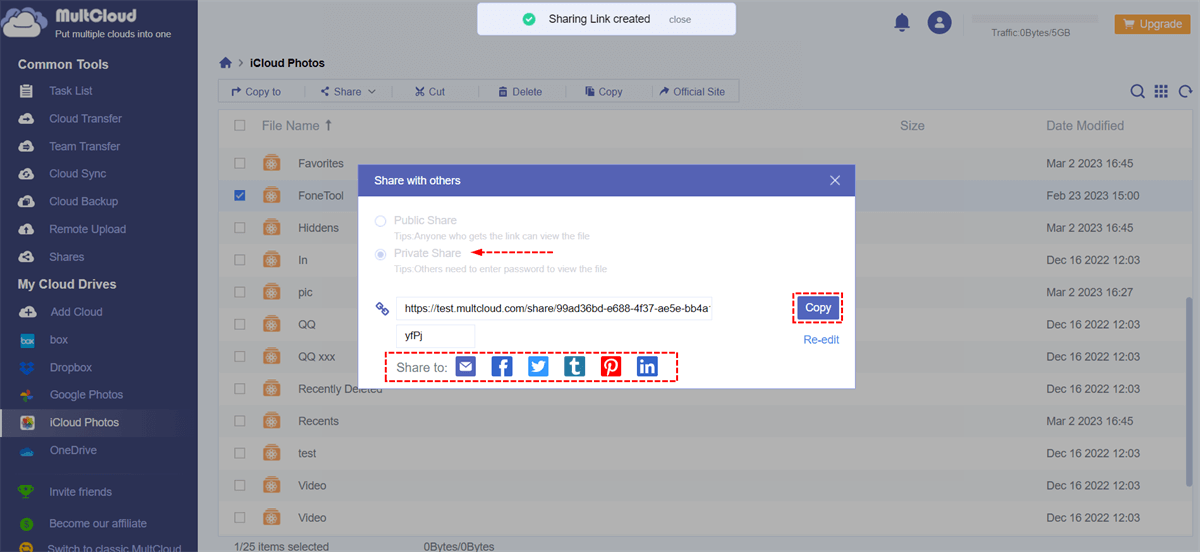
Step 5. Select a sharing method in the pop-up window. Then click the purple button "Create Share". To share your photos more securely or privately, you need to select "Private Share" mode.
Step 6. Copy the link and password, then share. You can also share the link via email, Facebook, Twitter and other social media.
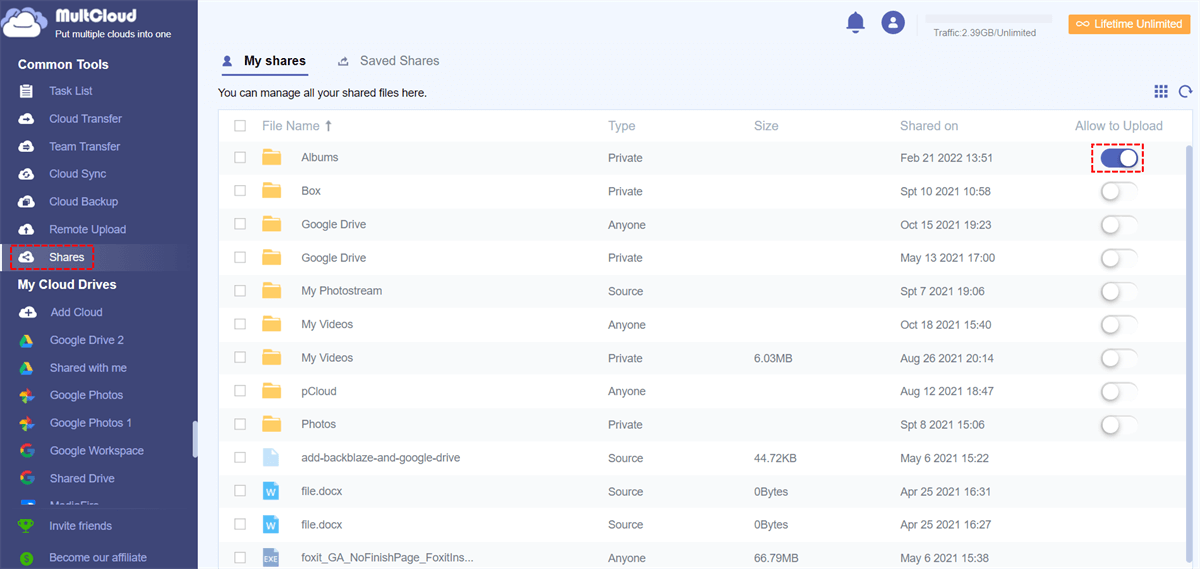
After sharing, you can manage all the content you share on the "Shares" interface, and you can also grant or revoke upload permissions for those who get the shared content.
Notes:
- The entire process can be completed on any device with a browser.
- When you create a private share link, you are given a random four-digit passcode, which you can change at will.
- After the user obtains the share link, he or she needs to enter the correct password to view the shared content.
Conclusion
Through the 3 methods listed in this article, you will have a clear understanding of how to make a shared album on iCloud and create iCloud link for Shared Album on iPhone, Mac or Windows. In addition, if you feel that the photo-sharing method provided by iCloud is not convenient and safe enough, you can use "Private Share" provided by MultCloud to share iCloud Photos data on any operating system.
MultCloud Supports Clouds
-
Google Drive
-
Google Workspace
-
OneDrive
-
OneDrive for Business
-
SharePoint
-
Dropbox
-
Dropbox Business
-
MEGA
-
Google Photos
-
iCloud Photos
-
FTP
-
box
-
box for Business
-
pCloud
-
Baidu
-
Flickr
-
HiDrive
-
Yandex
-
NAS
-
WebDAV
-
MediaFire
-
iCloud Drive
-
WEB.DE
-
Evernote
-
Amazon S3
-
Wasabi
-
ownCloud
-
MySQL
-
Egnyte
-
Putio
-
ADrive
-
SugarSync
-
Backblaze
-
CloudMe
-
MyDrive
-
Cubby
