Can I Create Scheduled File Copy Task?

User Case: “I am trying to create a scheduled task to copy files between folders automatically at a specific time daily or weekly. Can anybody tell me how to schedule file copy in Windows 10? I have searched through websites and created a batch file to run at a specific time by Windows Task Scheduler. But still, I was not able to copy files.”
For a desktop operating system, scheduled file transfer and copy are nothing new but common functions. There are so many tools for you to use for copying, backing up, or syncing files regularly on Windows 10/11, macOS, or Linux. To complete a scheduled and automated file copy task, you can try different kinds of services and software.
In this full guide about how to create a scheduled task to copy files, you will get two top helpful methods to create scheduled tasks to copy files in Windows 10 with and without professional computer skills and one simple scheduled cloud file transfer and copy method to automatically copy files from one folder to another of cloud storage services. Keep reading to find how to use scheduled tasks to copy files successfully.
How to Create Scheduled File Copy in Windows 10/11
For professional computer users, there are many ways to copy files between folders: drag and drop files in Windows Explorer, use PowerShell to copy items, or use the simple command. All you have to do are just specify the source and destination paths and set some other optional parameters for your automated schedule of copying files.
And for common users which know little about computers, you can try a reliable and convenient scheduled file copy software called AOMEI Backupper to create a scheduled task within 3 simple steps.
The next two methods will show you in detail how to use PowerShell or AOMEI Backupper to quickly and automatically copy one or more files from one folder to another.
Method 1. Create Scheduled Task Copy File in Windows 10/11 by PowerShell
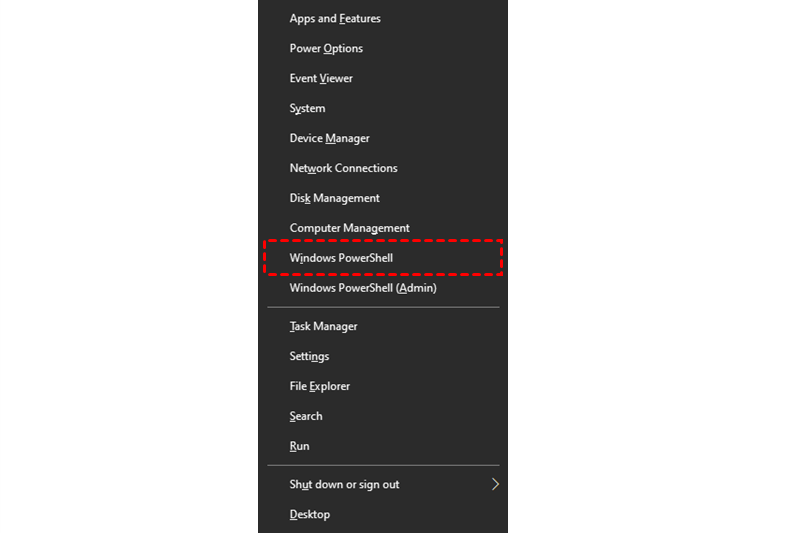
Step 1. As a Windows 10/11 user, Press the “Windows key” + “X” and choose “Windows PowerShell” in the pop-up menu.
Step 2. Create the “Script 1” to perform the file copy task with the following code.
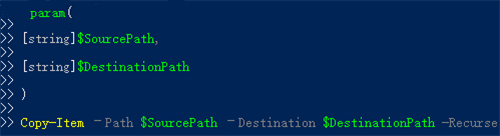
Tip: The “param()” section should be customized by yourself.
Step 3. Create the scheduled task action with the following code.

Step 4. Create a trigger to run the task at, let’s say, 6 a.m. every day.

Step 5. Create the scheduled task in memory with the scheduled task action and trigger.

Step 6. Create the file copy automation with your administrator account of your computer.

Method 2. Install Scheduled File Copy Software to Schedule File Copy in Windows 10
Step 1. Download and install AOMEI Backupper on the computer.
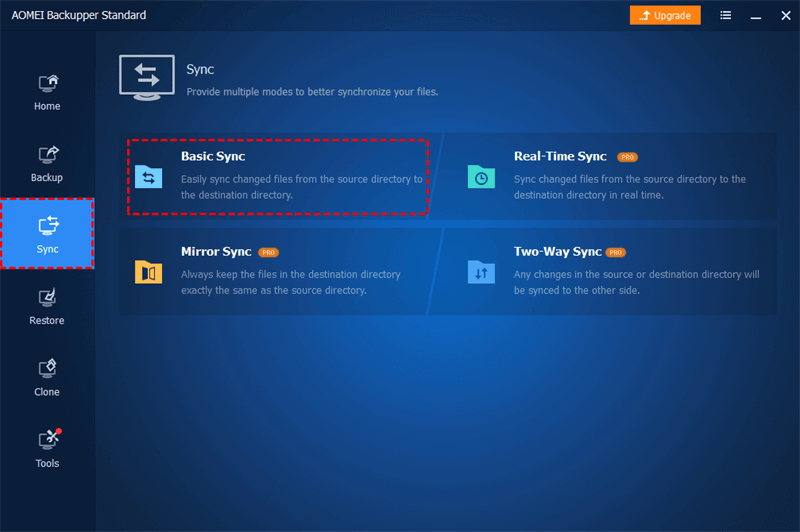
Step 2. Open the application and choose “Basic Sync” in the “Sync” interface.
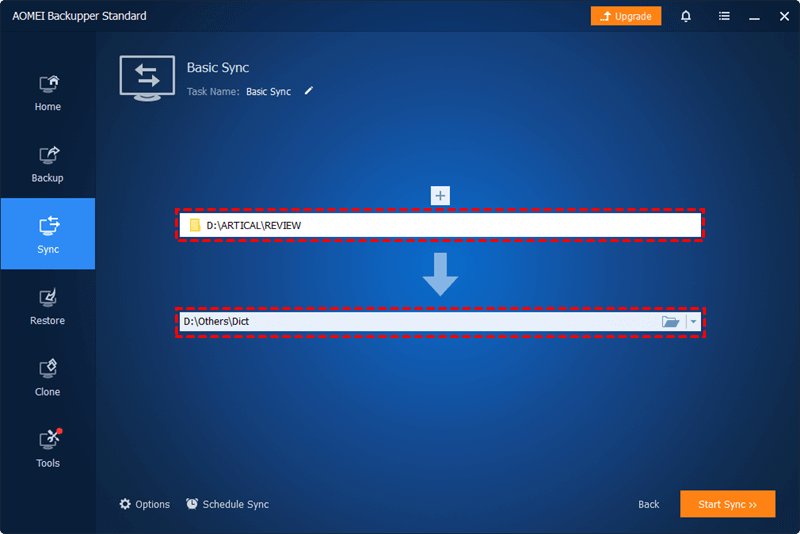
Step 3. Click “Add Folder” to select files which you are going to copy. Then click the destination bar to select another folder to save your copied files.
Step 4. Click “Schedule Sync” below to set up automated file copy tasks daily, weekly, or monthly according to your needs. Then click “OK” and “Start Sync” to let AOMEI Backupper perform the schedule file and folder copy task immediately.
How to Schedule Copy Files to Network Drive
If you want to set up a schedule plan to copy or transfer files from one folder to another of the same network drive or different cloud drives without manually downloading and uploading, the excellent method below will give you large help by using a free web-based cloud file manager called MultCloud without any installation.
.png)
As one of the best multiple cloud storage managers, MultCloud is professional to help you copy, transfer, sync, and backup files from source to destination between 30+ cloud storage services, FTP servers, and WebDAV seamlessly with schedule plan, other helpful options, and only a single click.
To automatically copy files and folders from one folder to another folder of clouds by MultCloud, you can try the Cloud Transfer function to easily set up and perform scheduled file copy tasks without any risk of data loss. Here we will take how to copy Google Drive folder from one account to another as a brief example.
Automatically Copy Files from One Folder to Another of Clouds by Cloud Transfer
Step 1. Create a MultCloud account and log in to its official website.
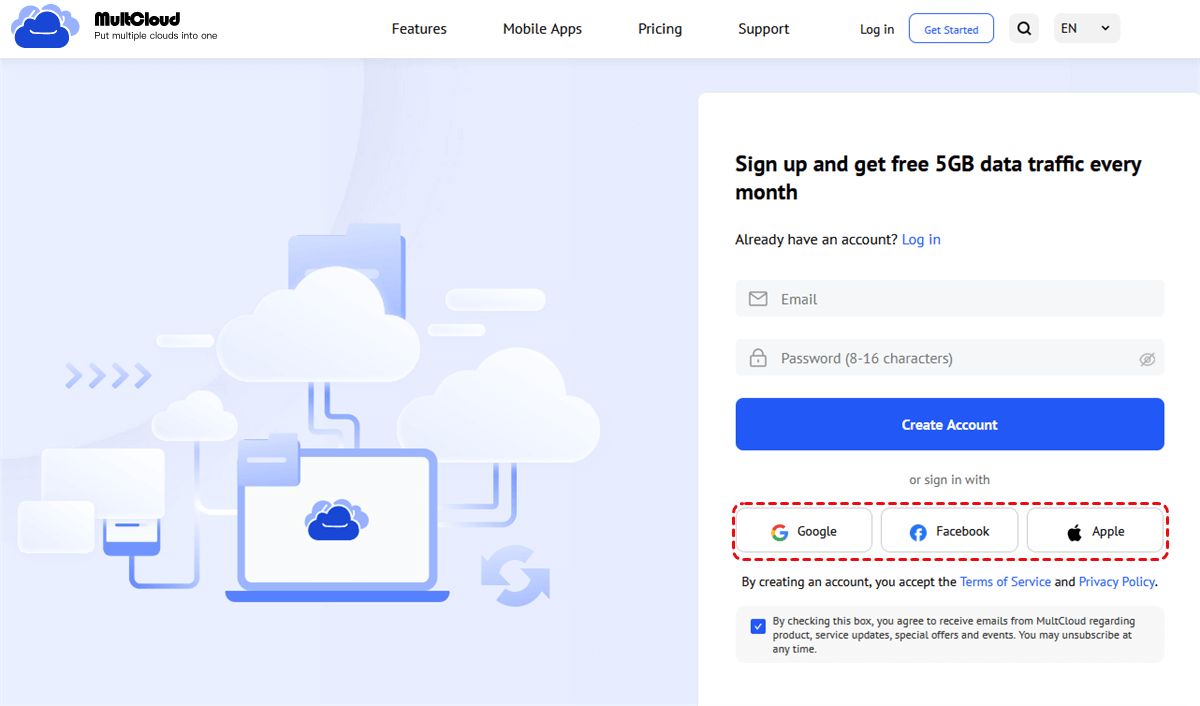
Tip: You can click “Try without signing up” to try MultCloud with a temp account.
Step 2. Choose “Google Drive” and add it to MultCloud with one of your Google accounts. Then repeat this step to add another Google Drive to MultCloud as well.
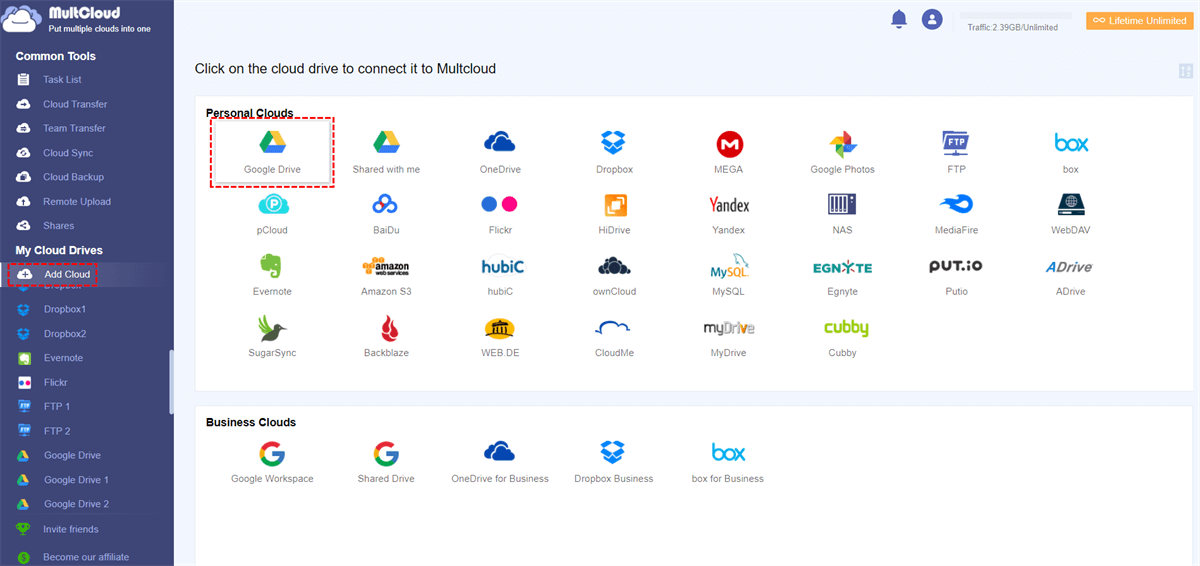
Tip: MultCloud allows you to add all your clouds to it for free and uses the OAuth authorization system to link your clouds without keeping the corresponding username and password.
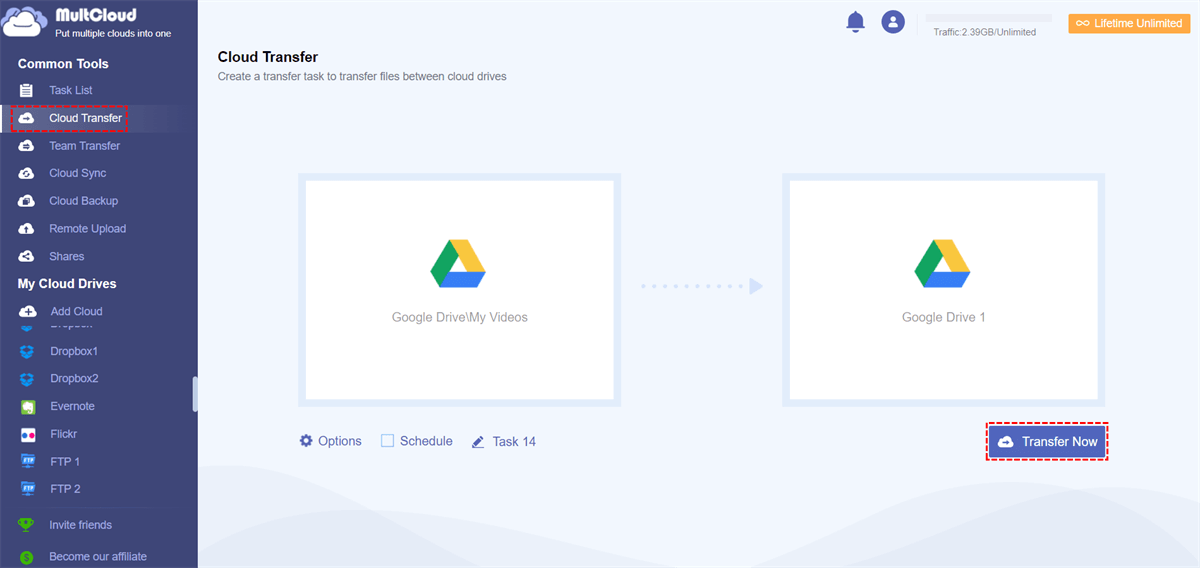
Step 3. Switch to the “Cloud Transfer” page, select files or folders of one Google Drive as the source, then select a folder of another Google Drive as the destination.
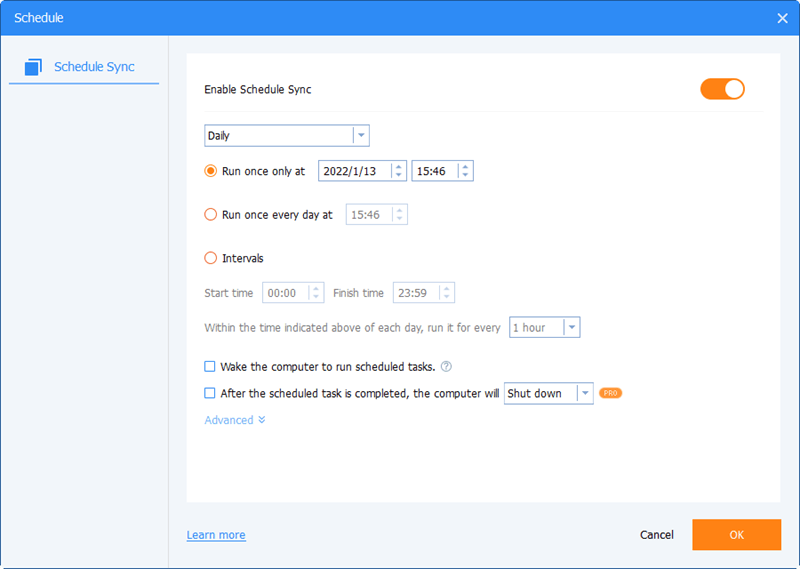
Step 4. Click “Schedule” to copy Google Drive folder to another account in a scheduled plan as your demand.
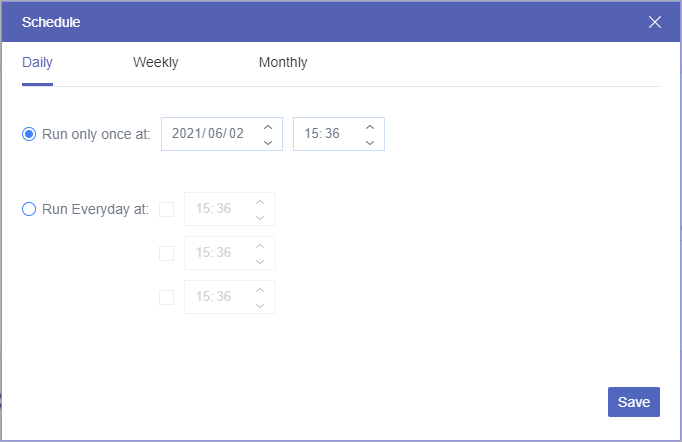
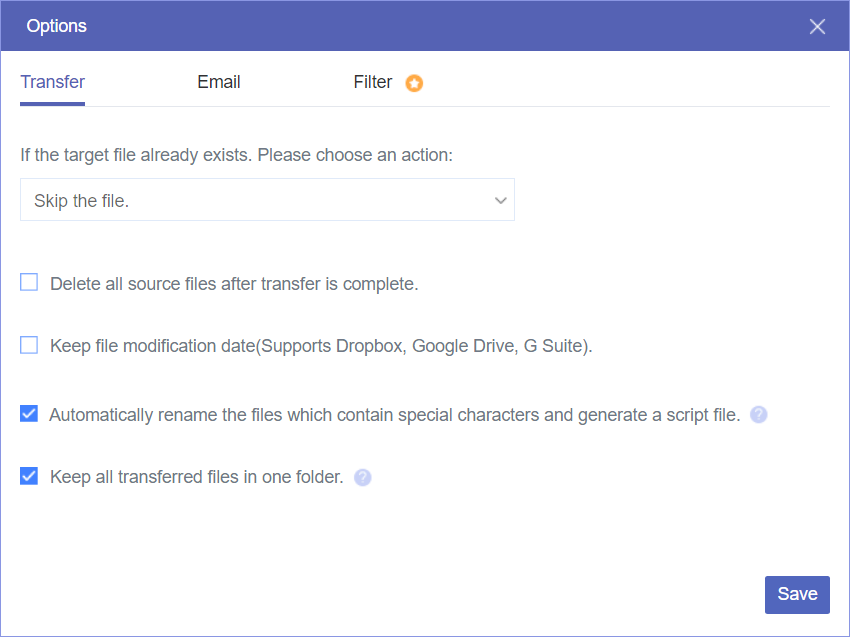
Tip: There are some other settings in the “Options” pop-up window to help the automatic file copy task. For example, you can turn on “email notification” to receive a message after the task is completed. Or you can use “Filter” to ignore or only copy files with certain extensions.
Step 5. Click the “Transfer Now” button in the lower right corner to let MultCloud schedule copy files to network drive at once.
Tips:
- MultCloud supports offline automatic file copy, which means you can close the website or shut down the PC after creating the Cloud Transfer task.
- You will get 30 GB of data traffic per month to transfer data across clouds for free.
- If the free traffic is not enough for you to continue the scheduled files copy task, you can upgrade to a premium MultCloud account and get more data traffic with incredibly fast transfer speed.
In the End
After learning about how to create scheduled file copy tasks by using 3 wonderful methods, now you can choose one and follow the related instruction to feel free to perform scheduled task copy files from folder to folder efficiently.
Besides, because MultCloud is a multifunctional tool, you can also use Cloud Sync, Cloud Backup, Remote Upload, Sub-accounts management, Public, Private, and Source Share, and full equipped cloud built-in functions to use and manage multiple cloud storage accounts most easily.
MultCloud Supports Clouds
-
Google Drive
-
Google Workspace
-
OneDrive
-
OneDrive for Business
-
SharePoint
-
Dropbox
-
Dropbox Business
-
MEGA
-
Google Photos
-
iCloud Photos
-
FTP
-
box
-
box for Business
-
pCloud
-
Baidu
-
Flickr
-
HiDrive
-
Yandex
-
NAS
-
WebDAV
-
MediaFire
-
iCloud Drive
-
WEB.DE
-
Evernote
-
Amazon S3
-
Wasabi
-
ownCloud
-
MySQL
-
Egnyte
-
Putio
-
ADrive
-
SugarSync
-
Backblaze
-
CloudMe
-
MyDrive
-
Cubby

Stay Updated With Our
Latest Tips
Add us as a preferred source on Google to never miss helpful guides.