Why Automatically Backup Folder to Network Drive?
A network drive is a centralized storage location on a server that multiple users can access over a network, enabling seamless file sharing and collaboration. Automatically backing up your local folders to a network drive offers several advantages and there are some common ones:
- Data Loss Prevention: Network drives provide an additional location for storing data, reducing the risk of data loss due to hardware failures, accidental deletions, or other unforeseen events.
- Remote Access: Storing data on a network drive allows for remote access. Users can access their files from different devices and locations, providing flexibility and convenience.
- Shared Resources: Network drives enable collaborative work by allowing multiple users to access and modify files stored in a central location. This is particularly useful in a business or team environment.
- Increased Storage Capacity: Network drives often provide scalable storage options. As data grows, additional storage space can be easily added to accommodate expanding needs.
Automatically Backup Folder to Network Drive [Advanced Way]
If you want to create a backup task in a simpler but more customizable way, you can use AOMEI Backupper. It is a free and professional Windows backup software and now it is updated to backup Windows 11, supporting System Backup, Disk Backup, Partition Backup, and File Backup.
To automatically backup folder to network drive, we will use File Backup. You can easily create a backup task with just 4 simple steps. Besides, File Backup also supports scheduled backup and some backup methods like Incremental Backup.
Let’s see how to use AOMEI Backupper File Backup:
Step 1: Download and launch the AOMEI Backupper Standard software from the official site.
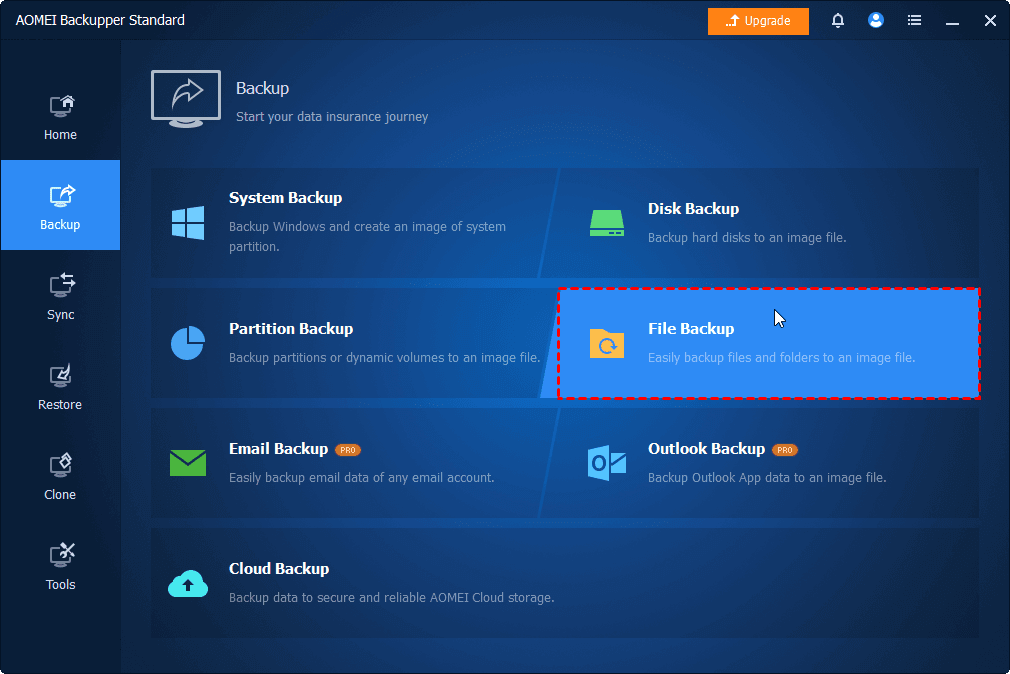
Step 2: Open AOMEI Backupper, choose “Backup” in the left sidebar, and select “File Backup”.
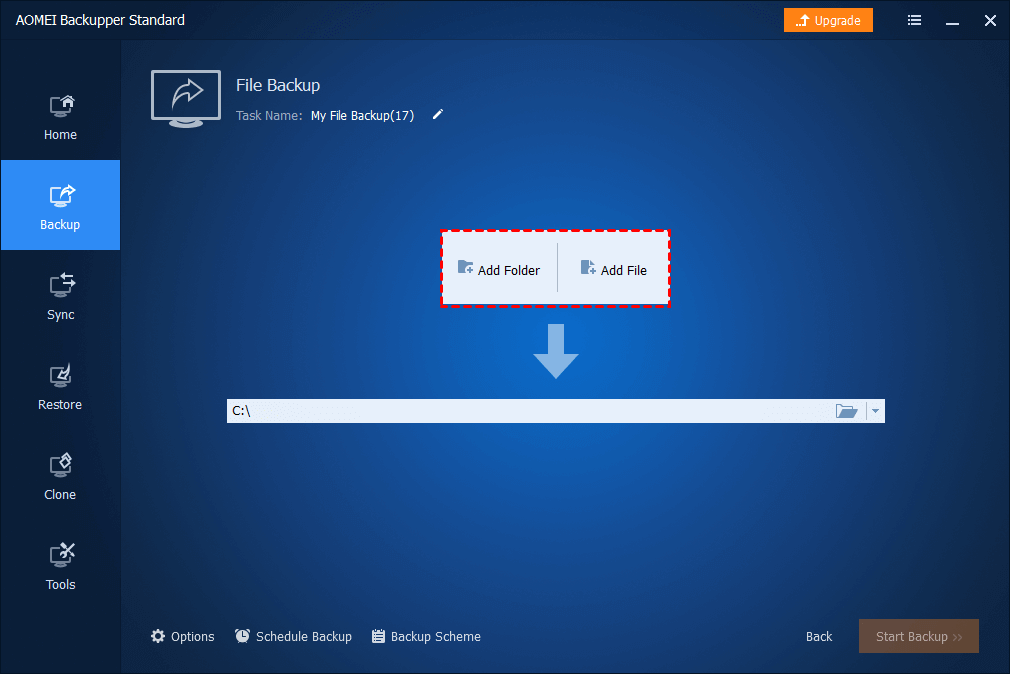
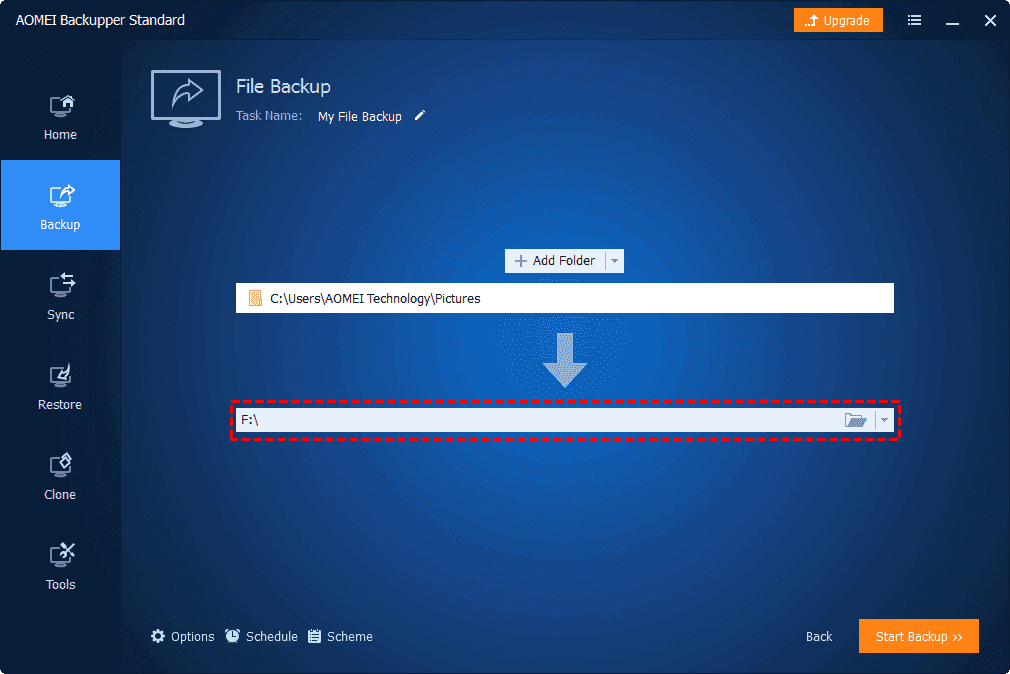
Step 3: Click “Add Folder” to choose which folders you want to backup to the network drive. Then, click the downward arrow, choose “Select a local path”, and select the network drive.
Step 4: Open “Schedule Backup” to set a preferred running time and click “Start Backup to run this task now.
Note: If you want this task to encrypt backup, automatically delete the old backup images, or only backup the changed files compared to the last process, you can download the AOMEI Backupper Professional.
Automatically Backup Folder to Network Drive [Common Ways]
In this part, we will show you 2 Windows built-in tools to backup folders to a network drive. The steps for using them are separately illustrated below.
Way 1: By Windows Backup and Restore
“Backup and Restore” is a built-in tool in Windows. It was first introduced on Windows 7 and now it also works for Windows 10. With this tool, you can configure the backup settings to regularly and automatically save selected folders and files to a designated network location
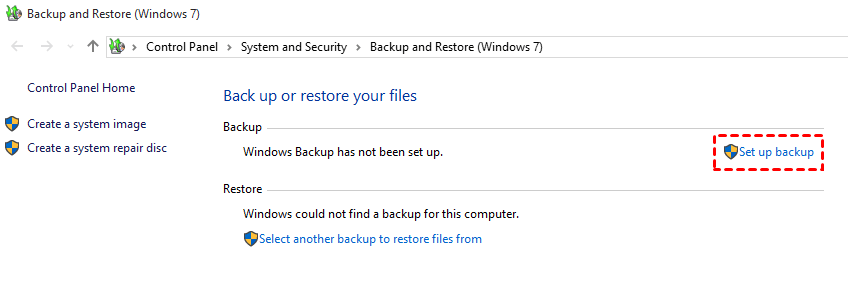
Step 1: Enter “Control Panel” in the search box on your desktop and choose “System and Security” on the “Control Panel” page.
Step 2: Select “Backup and Restore (Windows 7) in the list and then click “Set up backup”.
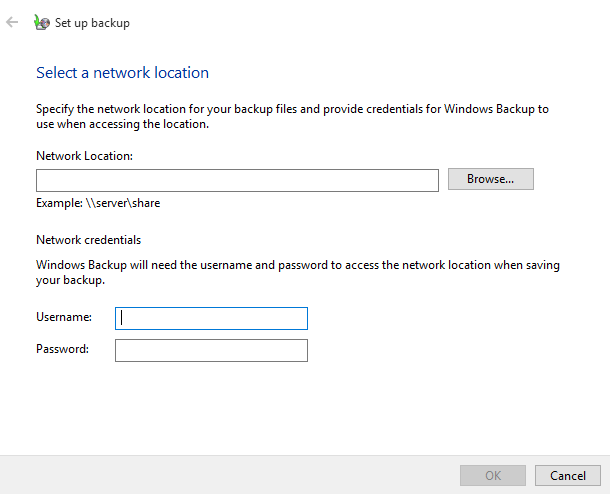
Step 3: Tap on the grey “Save on a network…” button and click “Browse…” to choose a network location. Then, enter the username and password to let Windows Backup access this location. After filling in the blanks, click “OK”.
Step 4: Choose “Let Windows choose” or “Let me choose” to create a backup task. If you choose the latter one, don’t forget to tick the box beside “Include a system image of drives …”. Then, click “Next”.
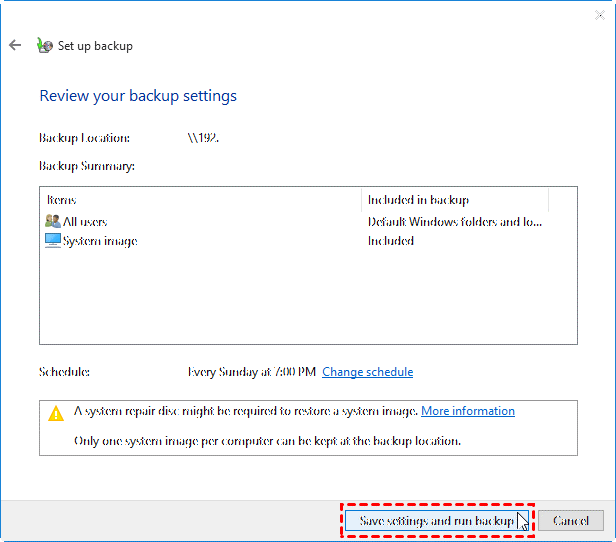
Step 5: If you want to run this automatic backup task at another time, you can click “Change schedule” beside “Schedule”. After all the settings, click on “Save settings and run backup”.
Way 2: By Windows File History
Windows “File History” is a built-in feature in Microsoft Windows that automatically backs up versions of files in user-specified folders to an external drive or network location. Therefore, you can also use this tool to let the Windows 10 backup folder into a network drive.
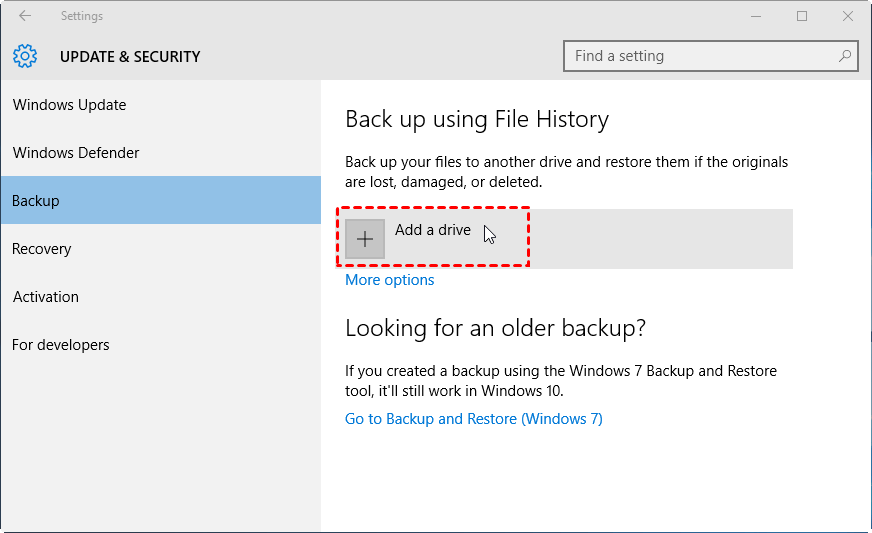
Step 1: Enter Windows Settings and choose “Update & Security”.
Step 2: Navigate to “Backup” and click the plus button to add a drive. Then, you can choose your network drive in the list.
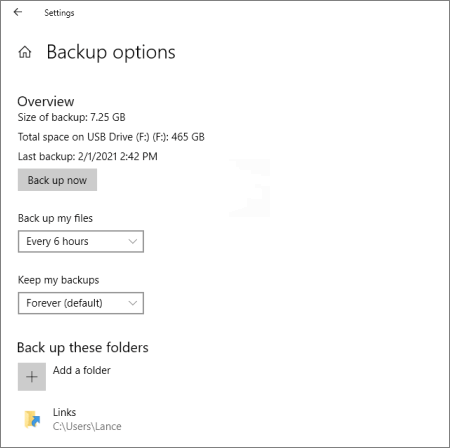
Step 3: Press “More options” under the plus button to decide how often can “File History” backup your folders, how long can the backups be saved on the network drive, and whether to add other folders for backup.
Step 4: Ensure you finish all the settings and click “Back up now” to automate the backup task.
Bonus Tip: Automatically Backup Cloud Folders to Network Drive
Except for backing up local folders to a network drive, if you want to backup a cloud folder to the network drive, especially a NAS device, MultCloud will be recommended. It is a cloud management service and offers a specific Cloud Backup function. Direct file transfer, scheduled backup, file filter, and versioning restore all be realized with this function. Besides, since MultCloud is a web app, you don’t have to install any desktop app that occupies your computer storage.
Step 1: Sign up for a free MultCloud account.
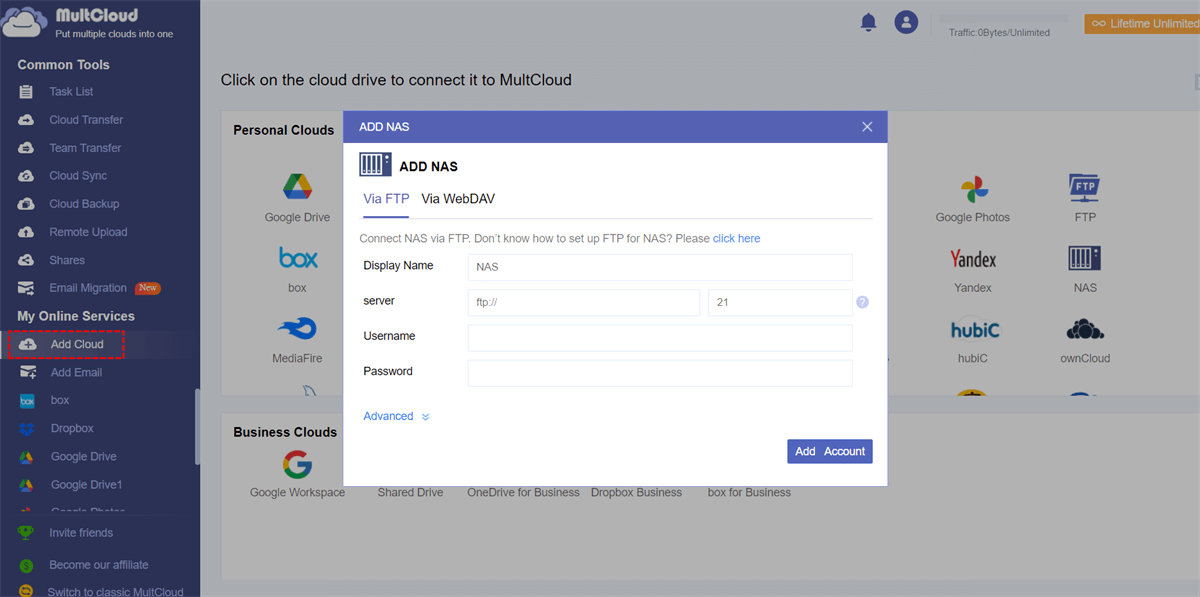
Step 2: Click “Add Cloud” and the NAS icon to let MultCloud access your network drive. Also, repeat the operations to add another cloud.
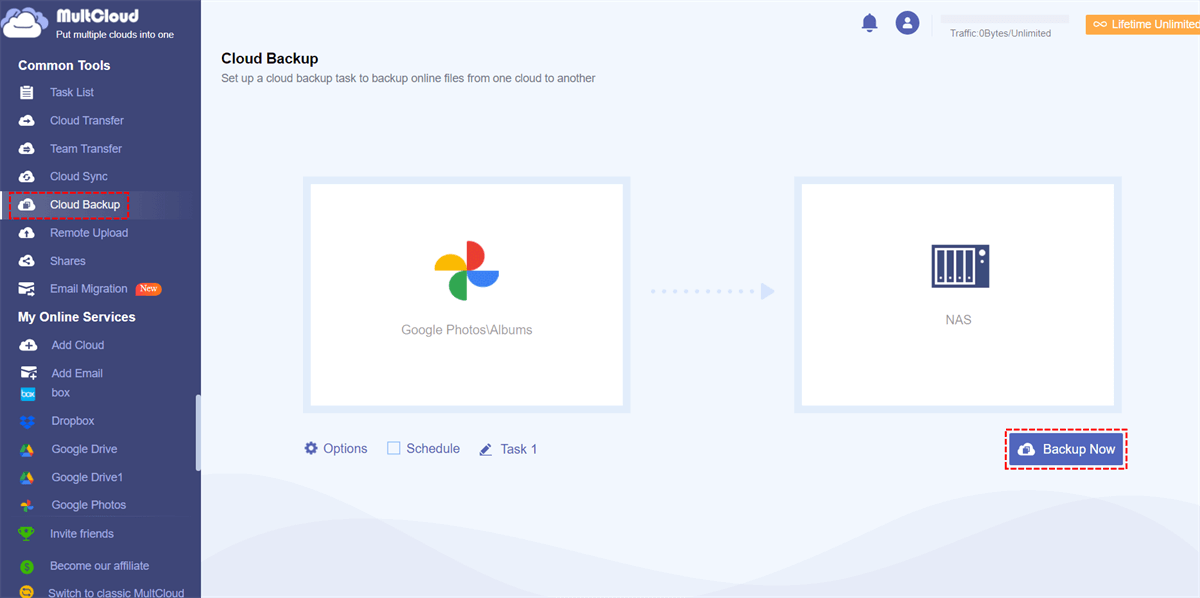
Step 3: Navigate to the “Cloud Backup” page and choose the cloud folders in the right box and NAS in the right box. Then, click “Backup Now” to initiate this task.
Step 4: To restore the backed-up files, go to “Task List”, find the backup task, and click the three-line icon. Then, choose “Restore” in the dropdown menu and choose restore versions and destination.
Note: MultCloud offers 5 GB of free traffic to backup files and folders. However, you can get more traffic by upgrading to a paid plan.
Conclusion
All the 3 ways to automatically backup folder to network drive are effective and you can choose your preferred one to try. Besides, if you are willing to backup a cloud like Google Drive, Dropbox, iCloud Drive, or OneDrive to a network drive, try MultCloud and it may be what you are looking for.

- Cloud Transfer: Transfer files from one cloud to another without downloading.
- Team Transfer: Match the sub-accounts under domain accounts correspondingly.
- Cloud Sync: Sync files between clouds with 10 helpful sync modes.
- Cloud Backup: Backup your cloud files to another cloud and restore with versions.
- Email Migration: Convert emails into PDFs and save them to a cloud in batches.
MultCloud Supports Clouds
-
Google Drive
-
Google Workspace
-
OneDrive
-
OneDrive for Business
-
SharePoint
-
Dropbox
-
Dropbox Business
-
MEGA
-
Google Photos
-
iCloud Photos
-
FTP
-
box
-
box for Business
-
pCloud
-
Baidu
-
Flickr
-
HiDrive
-
Yandex
-
NAS
-
WebDAV
-
MediaFire
-
iCloud Drive
-
WEB.DE
-
Evernote
-
Amazon S3
-
Wasabi
-
ownCloud
-
MySQL
-
Egnyte
-
Putio
-
ADrive
-
SugarSync
-
Backblaze
-
CloudMe
-
MyDrive
-
Cubby
