Preface
Have questions about how to view shared albums in iCloud? Photo sharing can be made more fun with the ability to access shared photos. No matter how much iCloud experience you have, iCloud's shared album access makes it easy for users to interact and view photos with friends and family. In this tutorial, we will explain the different reasons why you might see your shared albums in iCloud along with some useful tips to help you use the feature effectively.
Why View Shared Albums on iCloud?
Users may want to access and view albums shared in iCloud for several compelling reasons.
- Share Memories: Users can easily share precious moments with their loved ones using iCloud Shared Albums.
- Collaboration: Opportunity to collaborate on image collections. Any travel or project is easily accomplished this way.
- Cross-device Access: You can view shared albums using any device connected to your iCloud account.
- Privacy: Control who can see your shared albums to improve your privacy.
- Offline Viewing: You can download shared albums for offline viewing. Perfect for vacations or places with weak Internet service.
- Automatic Updates: All participants upgrade their albums based on shared changes.
- Simple Management: Use your iCloud account to organize and control shared albums.
How to View Shared Albums on iCloud
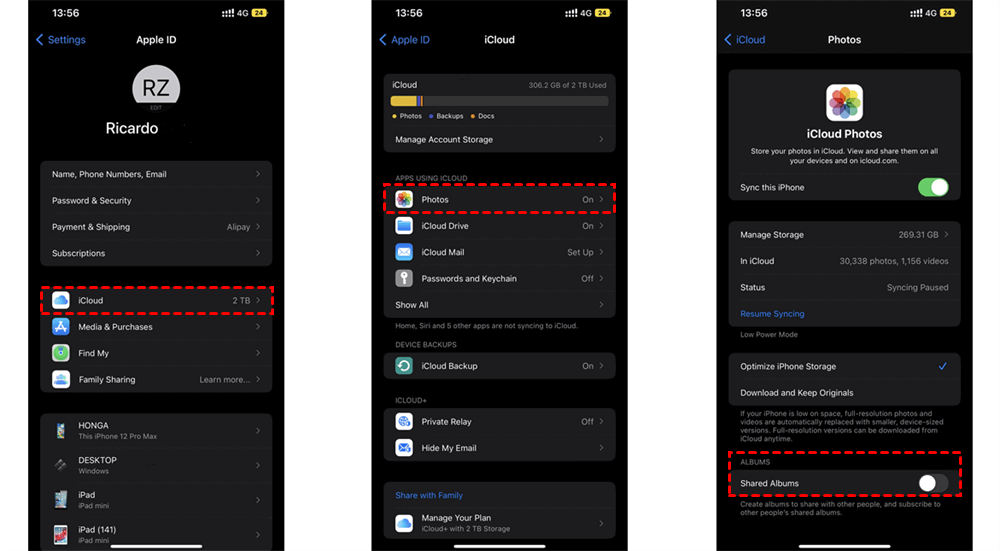
Before viewing shared albums on iCloud, please make sure you turn on Shared Albums in iCloud on your devices. To enable Shared Album in iCloud on iPhone, you can:
1. Open "Settings" on your iPhone and click on your profile picture.
2. Go to "iCloud" and choose "Photos".
3. Scroll the page and turn on the button next to "Shared Albums".
Solution 1: Use iCloud.com
You can view the shared album on the iCloud website on your iPhone, iPhone, or Mac.
Step 1: Enter icloud.com on any web browser you like and log in to your Apple ID.
Step 2: Go to the Photos section and view the desired shared album.
Solution 2: Use iCloud for Windows
Step 1: You need to download the iCloud for Windows application and install it from the official Apple website if you haven't already. With the help of this software, you can accumulate space between your Windows computer and your iCloud account to access shared albums and other iCloud features.
Step 2: After the installation is complete, you can open the iCloud for Windows software. It will most likely be stuck on your taskbar. Or, you can use it from the main menu.
Step 3: The app asks you to sign in with your Apple ID the first time you open the app. Use the same ID to access other Apple services and manage your iCloud account.
Step 4: After you sign in, you'll see a list of options that iCloud for Windows can control. To enable iCloud Photos, make sure the option behind "Photos" is selected.
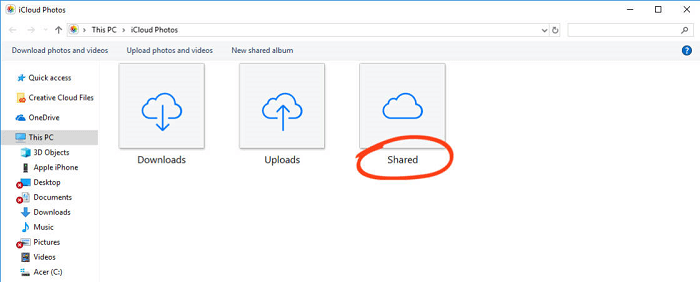
Step 5: Once you turn on iCloud Photos, try opening a file explorer program on your Windows computer. You will now see inside the left navigation bar called “iCloud Photos” and press the button.
Step 6: In "iCloud Photos", find the "Shared" section. All shared albums you have access to will be stored in this section. Double-click a shared album to view photos and videos in it.
Tips:
- Select what you download: By default, iCloud for Windows is unable to download the contents of any shared album. To ensure that shared albums may be seen without an internet connection, right-click on it and choose "Always save to this device." Your PC will download all of your pictures and movies as a result.
- Keep an eye on your storage space: If you download every shared album, your Windows computer's storage may get harmed. Organise shared albums containing significant downloads and select who can see them offline with ease.
Bonus Tip: Transfer or Sync Files between iCloud and Other Cloud Services
This article addresses the question "How to view shared albums on iCloud". If you're considering migrating files from your current cloud service to iCloud Photos, or vice versa, MultCloud can be extremely useful. Trusted by over 3 million users, MultCloud is a multi-cloud management tool that facilitates the transfer or synchronization of files between various cloud services.
For instance, it allows for seamless file transfers from cloud drives like Google Photos to iCloud Photos without the need to download and then re-upload files. MultCloud also enables you to access and manage all your cloud accounts via a single application. Currently, it supports more than 30 different cloud services, including Google Drive, OneDrive, Dropbox, Box, Google Photos, iCloud Photos, FTP, WebDAV, and more.

- Cloud Transfer: MultCloud can transfer files from one cloud service to another directly without downloading and re-uploading.
- Cloud Sync: With MultCloud, you can easily sync two folders between different cloud services in real-time.
- Cloud Backup: You can backup and restore data between different cloud services automatically.
- Instagram Downloader: MultCloud can help you download Instagram videos, photos, reels, and stories to local device or remotely upload them to your clouds.
- Email Migration: You can directly back up and save Gmail emails as PDFs to your computer or cloud drive in bulk.
- Manage all cloud accounts in one place: Connect all your clouds to MultCloud and you'll find it so easy to access and manage multiple cloud storage files with a single login.
Conclusion
By following these easy steps on how to view shared albums on iCloud, you may unlock the joy of accessing iCloud Shared Albums on any device. The next time the album is sent to you, confidently accept the request to share it because you have the means to save and relive priceless moments spent with your loved ones.
MultCloud Supports Clouds
-
Google Drive
-
Google Workspace
-
OneDrive
-
OneDrive for Business
-
SharePoint
-
Dropbox
-
Dropbox Business
-
MEGA
-
Google Photos
-
iCloud Photos
-
FTP
-
box
-
box for Business
-
pCloud
-
Baidu
-
Flickr
-
HiDrive
-
Yandex
-
NAS
-
WebDAV
-
MediaFire
-
iCloud Drive
-
WEB.DE
-
Evernote
-
Amazon S3
-
Wasabi
-
ownCloud
-
MySQL
-
Egnyte
-
Putio
-
ADrive
-
SugarSync
-
Backblaze
-
CloudMe
-
MyDrive
-
Cubby


