Introduction
Picture yourself shooting amazing pictures and recording priceless moments while traveling. But all of a sudden, there's a message saying "iCloud Storage Full". This may really ruin the mood, particularly if you're trying to get a funny video or the ideal sunset shot.
Fortunately, there's an easy fix: just switch the way you pay for iCloud. iCloud storage stores documents, videos, images, and more. It serves as your own digital safe. You may guarantee easy access to this essential area and carry on making priceless memories without worrying about storage restrictions by changing your payment method.
You can make sure your storage demands are always satisfied by following this advice, which will lead you through the process of changing your iCloud payment method on several devices.
Understanding iCloud Storage and Payment Methods
Prior to getting technical, let's review the idea of iCloud storage. Consider it your safe online locker for storing your digital assets. It removes the necessity of overcrowding your physical devices with files, movies, and critical documents. Moreover, iCloud maintains everything automatically up to date on all of your Apple devices, which is invaluable for maintaining organization!
How to Change Payment Method on iCloud?
Let's now discuss payment options. Apple takes several different forms of payment, including as debit and credit cards, as well as the balance on your Apple Gift Card. The ability to select the approach that best suits you is a huge benefit.
Method 1. Changing Your Payment Method on iPhone and iPad
There are two primary ways to change your payment method on an iPhone or iPad: using the Settings app and the App Store.
1. Using the Settings App:
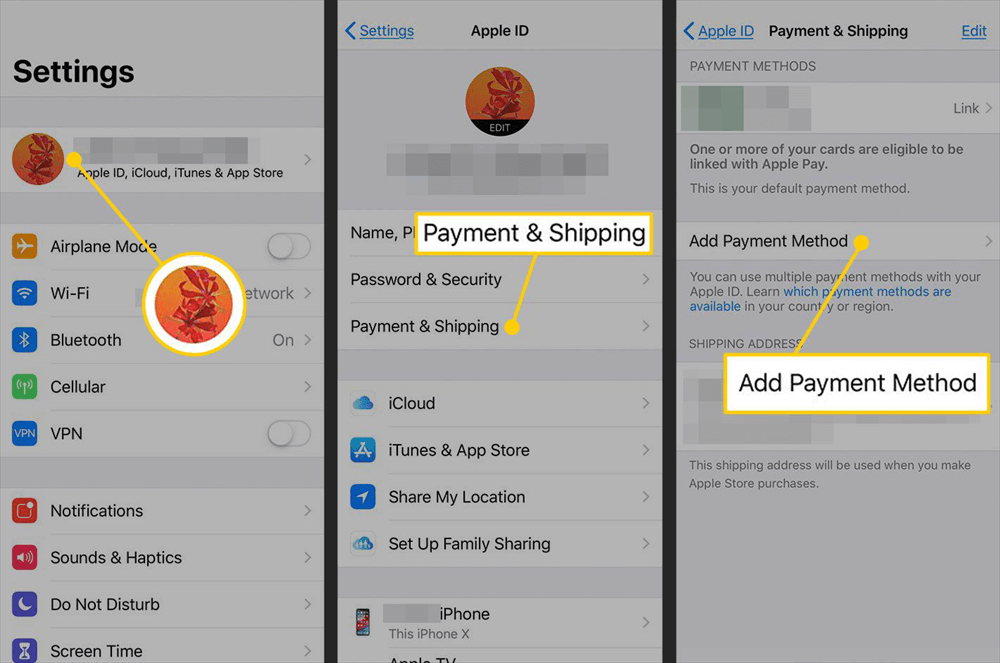
Step 1. Open the Settings app on your iPhone or iPad.
Step 2. Tap on your Apple ID at the top of the screen.
Step 3. Select Payment & Shipping. You may be prompted to enter your Apple ID password.
Step 4. Tap Add Payment Method. Enter your new payment information, including the card number, expiration date, and CVV code.
Step 5. Verify your billing information and tap Done.
2. Using the App Store:
Step 1. Launch the App Store app.
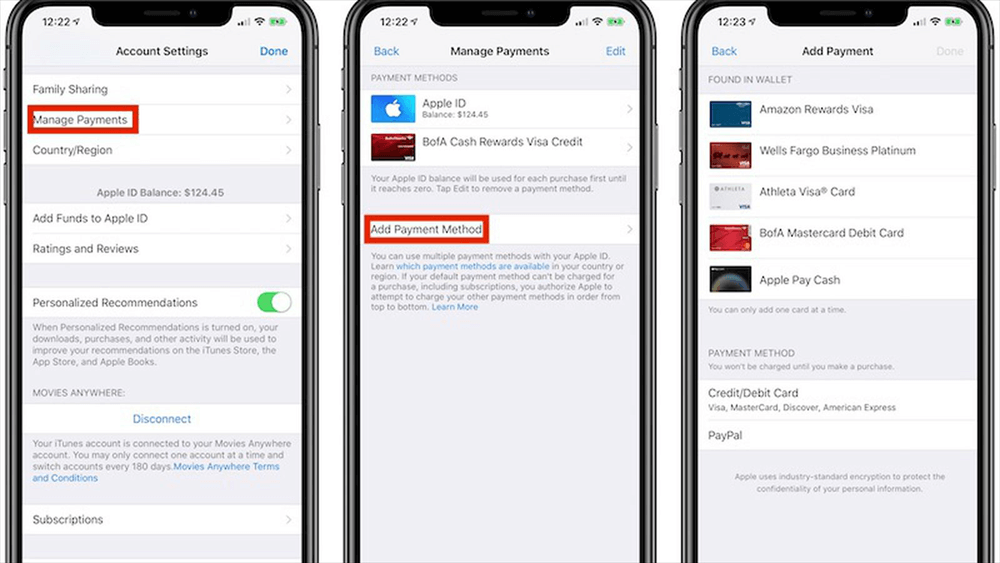
Step 2. Tap on your profile picture or Apple ID in the top right corner.
Step 3. Select Account Settings. You may be prompted to enter your Apple ID password again.
Step 4. Tap on Payment Method or Manage Payments.
Step 5. Choose Add Payment Method and enter your new payment information.
Step 6. Verify your billing information and tap Done.
Optional: After adding your new payment method, you can set it as the default payment option by tapping on it and selecting "Set as Default Payment Method".
Method 2. Changing Your Payment Method on Mac
If you prefer a larger screen, you can easily change your payment method on your Mac computer.
1. Using System Preferences:
Step 1. Open System Preferences on your Mac.
Step 2. Click on Apple ID.
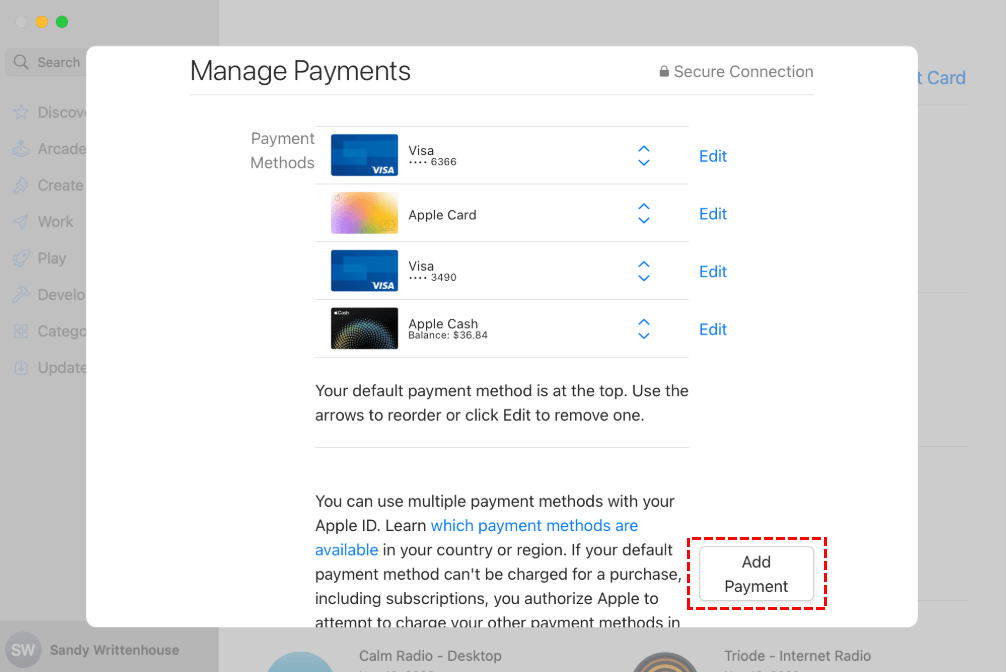
Step 3. Select Payment Method or Manage Payments. You may be prompted to enter your Apple ID password.
Step 4. Click on Add Payment Method and enter the details of your new payment method.
Step 5. Verify your billing information and click Done.
Optional: Similar to iPhone and iPad, you can set the newly added payment method as default by clicking on it and selecting "Set as Default Payment Method".
2. Changing Your Payment Method on iCloud.com
Unlike the methods mentioned above, iCloud.com itself doesn't offer a direct option to change your payment method. This might seem like a limitation, but there are still workarounds.
- Using a Trusted Device: If you have an iPhone, iPad, or Mac already linked to your Apple ID, you can use that device to update your payment method as described in the previous sections. Once the change is made on your trusted device, it will automatically reflect on iCloud.com.
- Contacting Apple Support: Another option is to contact Apple Support directly. Their representatives can guide you through the process of updating your payment method. You can reach Apple Support through their website or by phone.
Troubleshooting Tips
Even with clear instructions, occasional hiccups might occur. Here are some tips if you encounter issues:
- Verification Errors: Double-check all the payment information you entered, especially the card number, expiration date, and CVV code. Ensure there are no typos or mismatched details.
- Declined Transactions: If your payment gets declined, there could be several reasons. Check with your bank to ensure there are no spending restrictions on your account. Additionally, verify if your billing address on your Apple ID matches the address associated with your payment method.
- Still Facing Issues: If the above solutions don't resolve the problem, contacting Apple Support directly is the best course of action. They can diagnose the issue and guide you through a solution specific to your situation.
Conclusion
One of the most important steps to guaranteeing easy access to your priceless cloud storage space is managing your iCloud payment method. You may easily update your payment information across several devices using the above-mentioned ways, so storage issues won't interfere with your digital life. Remember, changing your payment method is a quick and straightforward process. So go forth, capture those memories, store important documents – iCloud has you covered, and now you know how to keep it that way!
Bonus Tip: Easy Way to Manage and Move Your iCloud Data
Managing and moving your iCloud data doesn’t have to be a hassle. With MultCloud, you can effortlessly handle everything from file organization to cross-cloud transfers. It’s all about streamlining your digital life so you can focus on what really matters.

- Cloud Transfer: Move one cloud data to another without downloading and re-uploading.
- Cloud Sync: Sync data across clouds seamlessly in real-time.
- Cloud Backup: Dynamically backup and restore files between clouds.
MultCloud Supports Clouds
-
Google Drive
-
Google Workspace
-
OneDrive
-
OneDrive for Business
-
SharePoint
-
Dropbox
-
Dropbox Business
-
MEGA
-
Google Photos
-
iCloud Photos
-
FTP
-
box
-
box for Business
-
pCloud
-
Baidu
-
Flickr
-
HiDrive
-
Yandex
-
NAS
-
WebDAV
-
MediaFire
-
iCloud Drive
-
WEB.DE
-
Evernote
-
Amazon S3
-
Wasabi
-
ownCloud
-
MySQL
-
Egnyte
-
Putio
-
ADrive
-
SugarSync
-
Backblaze
-
CloudMe
-
MyDrive
-
Cubby


