About Dropbox Cache
If you're a Dropbox user, you've probably heard about cache files. They're hidden away in your system, but they serve a crucial role in keeping Dropbox fast and responsive. When you use Dropbox, it creates temporary files (cache) to speed up performance and minimize data transfers. This cache helps Dropbox run smoothly by storing recently accessed data. But as time passes, these cache files can grow, consuming valuable disk space. If you've noticed your storage shrinking or Dropbox acting sluggish, deleting the cache could give your system a boost.
Why You Delete Dropbox Cache?
Why would someone need to delete Dropbox cache? Here are 5 reasons:
⭕ Resolve syncing issues: Cache corruption can sometimes lead to sync problems. Clearing the cache can resolve these issues, ensuring your files are synced correctly.
⭕ Improve performance: An overloaded cache can slow down Dropbox. By deleting it, you can improve the speed and responsiveness of the application.
⭕ Fix error messages: If you've encountered odd error messages in Dropbox, it could be due to cache-related issues. Deleting the cache might fix these errors.
⭕ Reduce system lag: Cache files can impact your computer's overall performance. Clearing them can help reduce system lag and make things run smoother.
3 Solutions for Deleting Dropbox Cache
Now that we've established why you might want to delete Dropbox cache, let's dive into the solutions. Whether you're using Windows or Mac, these step-by-step instructions will guide you through the process.
Solution 1: Deleting Dropbox Cache on Windows
One way to clear the Dropbox cache on Windows is to manually access the cache folder and delete its contents. This method is effective if you need to free up space or resolve Dropbox-related issues.
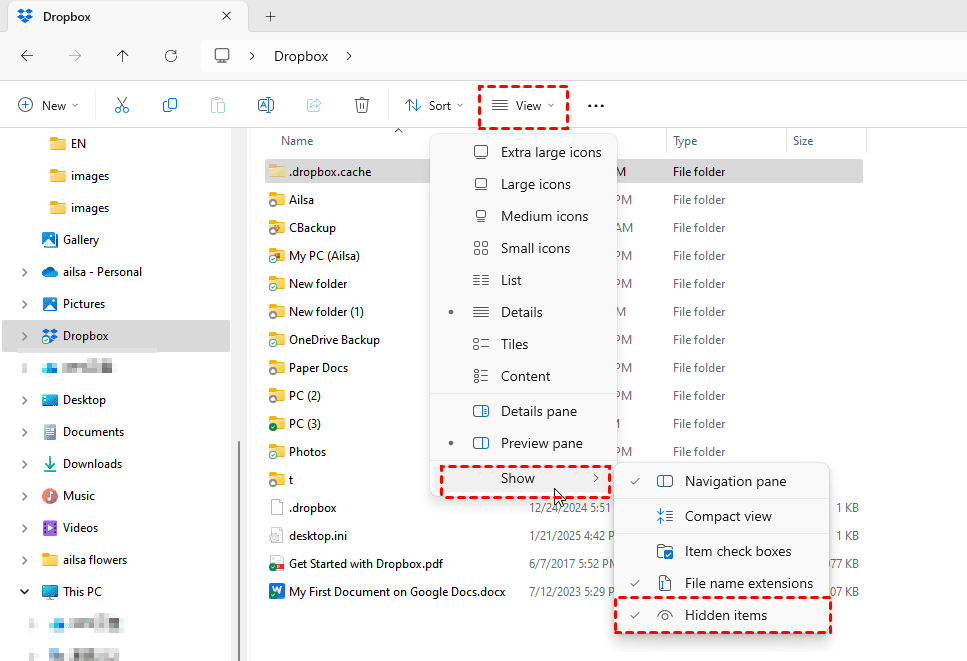
To begin, locate the Dropbox cache folder. It's typically found in your Dropbox directory under ".dropbox.cache." To get there:
1. Open the File Explorer and navigate to your Dropbox folder. You can usually find it under "This PC" or "Quick Access".
2. Inside the Dropbox folder, locate the hidden ".dropbox.cache" folder. If you can't see it, enable the option to view hidden files by clicking "View" on the toolbar in File Explorer and checking the "Show" > "Hidden items" box.
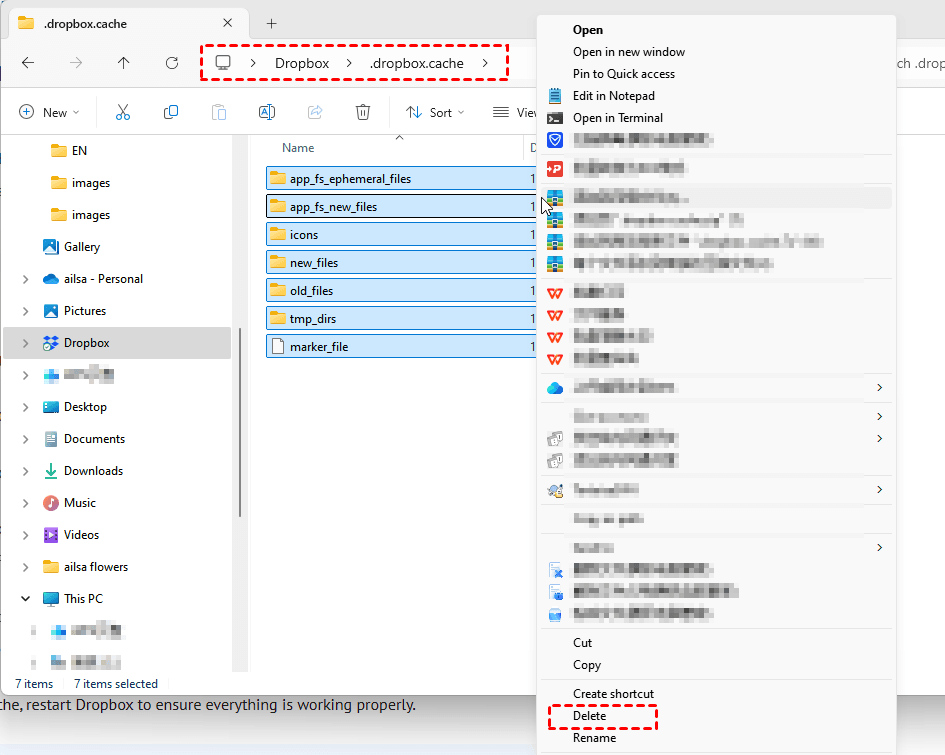
3. Once you find the cache folder, open it and delete all files within it. Don't worry about accidentally deleting important files—the cache folder is solely for temporary data.
After deleting the cache, restart Dropbox to ensure everything is working properly.
Solution 2: Deleting Dropbox Cache on Mac
Mac users can also clear Dropbox cache by accessing the appropriate folder and removing its contents. This is helpful for freeing up space or fixing Dropbox-related glitches.
To delete Dropbox cache on Mac, start by locating the cache folder:
1. Open Finder and navigate to your Dropbox folder. It's often in your user directory.
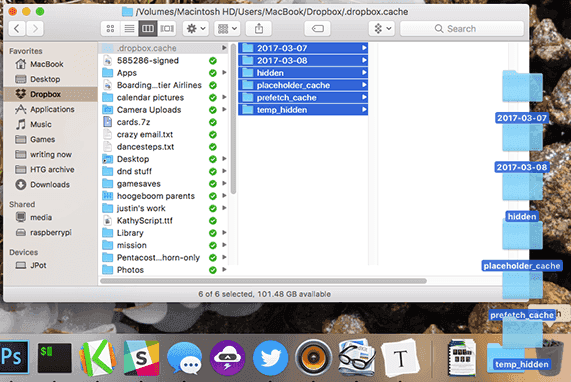
2. Like in Windows, you'll need to access the hidden ".dropbox.cache" folder. To do this, press Cmd + Shift + Period to toggle hidden files. You should now see the cache folder.
3. Open the ".dropbox.cache" folder and delete all files within it. This won't affect your actual Dropbox files, as the cache is temporary data.
After deleting the cache, close Dropbox and reopen it to ensure everything is running smoothly.
Solution 3: Using Third-Party Tools for Cache Removal
If you'd rather not manually delete cache files, you can utilize third-party tools designed to clear cache and other temporary data. These tools can automate the process, saving you time and effort. Before utilizing a third-party tool, guarantee it's reputable and secure to utilize. Some recommended choices include CCleaner and CleanMyMac X, both of which have a track record of effectively clearing cache files.
Here's how to utilize CCleaner to delete Dropbox cache on Windows:
- Download and install CCleaner from the official site. Follow the installation instructions.
- Once installed, open CCleaner and navigate to the Cleaner section.
- Under "Applications", find "Dropbox". This will include cache and other temporary files associated with Dropbox.
- Click "Run Cleaner" to start the cache removal process. This will clear Dropbox cache along with other temporary files.
- After the process is complete, restart your computer and check Dropbox to guarantee everything is working correctly.
On Mac, CleanMyMac X is a popular option for clearing cache files:
- Download and install CleanMyMac X from the official site. Take after the setup instructions.
- Open CleanMyMac X and go to the System Junk section. This section scans for cache files, including Dropbox cache.
- Click "Scan", then "Clean" to remove cache and other temporary files. This process helps free up space and improve system performance.
- After cleaning, restart your Mac and verify that Dropbox is working without issues.
Bonus Tip: Transfer or sync files between Dropbox and other clouds
This article addresses the question “delete Dropbox cache” If you’re considering migrating files from your current cloud service to Dropbox, or vice versa, MultCloud can be extremely useful. Trusted by over 3 million users, MultCloud is a multi-cloud management tool that facilitates the transferring or synchronizing of files between various cloud services.
For instance, it allows for seamless file transfers from cloud drives like Google Drive to Dropbox without downloading and re-uploading files. MultCloud also enables you to access and manage all your cloud accounts via a single application. Currently, it supports more than 30 different cloud services, including Google Drive, OneDrive, Dropbox, Box, Google Photos, iCloud Photos, FTP, WebDAV, iCloud Drive, pCloud, Amazon S3, 4shared, Icedrive, Wasabi, ownCloud, Backblaze, IDrive e2, Box for Business, Google Workspace, Gmail, Outlook, MySQL, NAS, FTP/SFTP, and more.

- Cloud Transfer: Move one cloud data to another without download and re-upload.
- Cloud Sync: Sync data across clouds seamlessly in real time.
- Cloud Backup: Dynamically backup and restore files between clouds.
- Instagram Downloader: Download Instagram videos, photos, reels and stories to local device or remotely upload them to your clouds.
- Email Migration: You can directly back up and save Gmail emails as PDFs to your computer or cloud drive in bulk.
- Manage all cloud accounts in one place: Connect all your clouds to MultCloud and you'll find it so easy to access and manage multiple cloud storage files with a single login.
- Automatic: Set up a schedule to make task automatically run as preferred.
- Offline: Transfer, sync or backup cloud data online without going through local.
- Efficient: Access and manage all your clouds with a single login.
On the Bottom Line
These solutions should help you effectively delete Dropbox cache, whether you're on Windows or Mac. By following these steps, you can resolve issues like limited storage, performance slowdowns, and other Dropbox-related issues. If you have extra concerns or technical issues, consider reaching out to Dropbox support for assistance.
MultCloud Supports Clouds
-
Google Drive
-
Google Workspace
-
OneDrive
-
OneDrive for Business
-
SharePoint
-
Dropbox
-
Dropbox Business
-
MEGA
-
Google Photos
-
iCloud Photos
-
FTP
-
box
-
box for Business
-
pCloud
-
Baidu
-
Flickr
-
HiDrive
-
Yandex
-
NAS
-
WebDAV
-
MediaFire
-
iCloud Drive
-
WEB.DE
-
Evernote
-
Amazon S3
-
Wasabi
-
ownCloud
-
MySQL
-
Egnyte
-
Putio
-
ADrive
-
SugarSync
-
Backblaze
-
CloudMe
-
MyDrive
-
Cubby


