Quick Search:
User Case: How to Migrate iCloud Photos to NAS?
Case 1: "Since I also want to backup my photos to my NAS, I would like to know what is the best way to export all my photos (including RAW photos) from my iCloud Photos to the NAS."
Case 2: "There are about 2TB of photos in my iCloud photos that need to be moved to my NAS server. Is there a feasible solution? I'm going crazy!"
Case 3: "How to migrate Apple iCloud photos to Synology and QNAP NAS? I really need some help."
Why Transfer iCloud Photos to NAS?
iCloud Photos is an Apple product that works only with Apple devices and does not support other types of devices. While you're at it, you pay a monthly fee for space to store your backups, photos, and other content in Apple's cloud.
And Synology NAS is installed locally in your home and local server. Users only need to purchase the required amount of physical storage (4 TB, 6 TB, etc.) to use on multiple operating systems (not just Apple devices) and enjoy additional app features to enhance the primary storage solution. So, if you are a non-Apple user who prefers to work with local hardware at home, Synology NAS is a great choice for storing photos.
- Better value for money: Compared to iCloud Photos, NAS gives you more storage space for the same cost. Your storage capacity is unlimited as long as you are willing to pay for more space.
- More useful features: iCloud Photos doesn't give you more features: file and image editing, scanning documents, or working offline. NAS functions are more down-to-earth, simplified to standard sharing and access, and user rights and permissions set.
- Easy access by family and friends: Since NAS is a storage service based on a home network, users can use NAS to easily access pictures and share them with others, especially for home video storage.
Common Way to Transfer iCloud Photos to NAS
This is one of the easiest ways for photos or other file transfer from one cloud to another. It's as easy as transferring photos from your laptop to a USB thumb drive. Here, you're transferring photos to a NAS, not a thumb drive.
Stage 1: Download iCloud Photos to iPhone
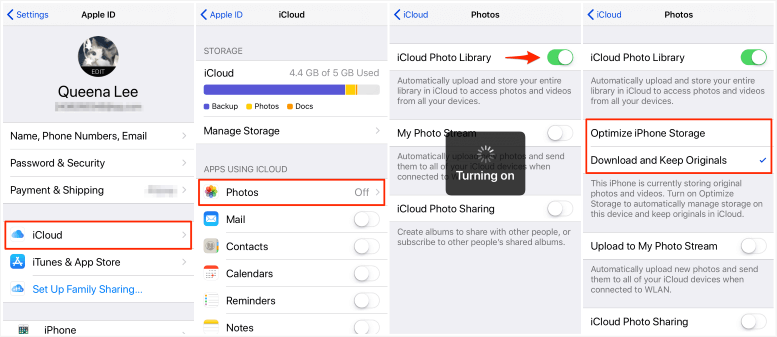
The first stage of image transfer is to download the images from your iCloud to the local device. If you want to save a copy of photos and videos from iCloud.com to your iPhone, follow these steps.
Step 1. Go to the "Settings" app.
Step 2. Swipe down and tap "Photos".
Step 3. Tap the switch next to iCloud Photos to turn it green.
Step 4. Choose between "Optimize iPhone Storage" or "Download and Keep Originals".
You can select "Optimize iPhone Storage" if you want iCloud Photos to take up less space on your iPhone or iPad. If you have enough storage space on your device, choose "Download and Keep Originals".
Stage 2: Upload iCloud Photos to Synology NAS
Before uploading, you need to install the Synology Photos app on your iPhone (if you are using an Android phone, you need to install it from Google Play). The app is compatible with iOS 11 or iPadOS 11 or later and Android 5.0 or later.
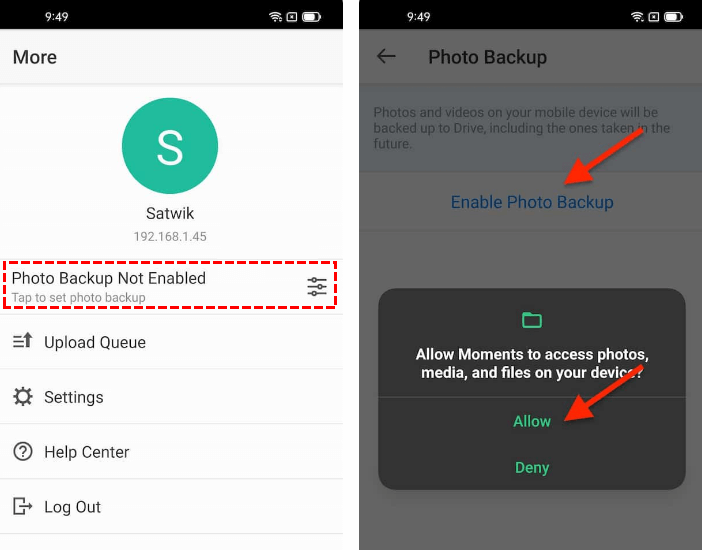
Step 1. Open the Synology Photos app on your phone and tap "More".
Step 2. Click "Photo Backup Not Enabled" and then "Enable Photo Backup" to allow the Photos app to access the storage.
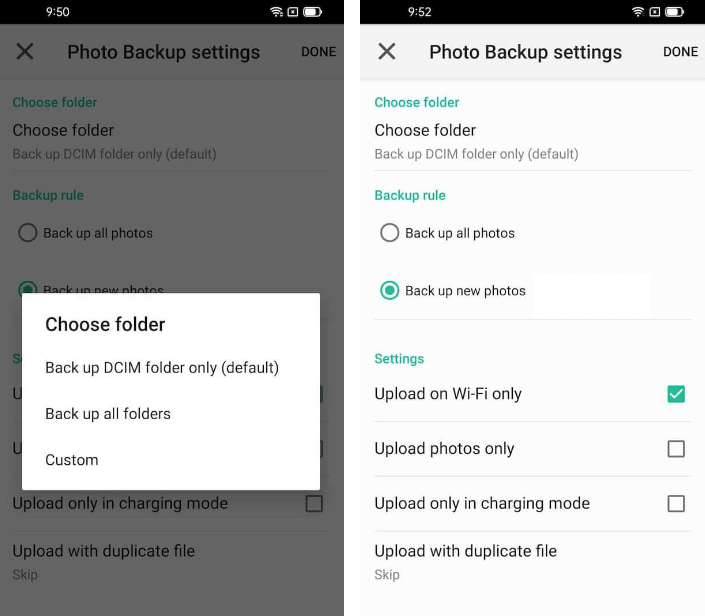
Step 3. Click to select a folder. You can select a folder or customize the path according to your needs, and it is best to choose the path containing all pictures of iCloud Photos. If you want to back up all photos, including WhatsApp and other downloaded photos, click "Back up all folders".
Again, you need to choose a backup rule: back up all photos or back up new photos. "Back up all photos" means that all existing photos stored in your Photos, including new photos you take in the future, will be backed up to the NAS. If you choose "Back up new photos", only new photos you take or download from the web will be transferred to the NAS from now on.
After all the program settings are completed, the Synology Photos application will automatically upload pictures to the NAS according to the rules. After uploading, you can view photos on the NAS by opening the Synology Photos app on the NAS or the Moments folder in the File Station app.
Quick Way to Transfer iCloud Photos to NAS
Is there any way to transfer iCloud Photos data to NAS directly and quickly? You can try this multiple cloud storage manager---MultCloud. You can add iCloud Photos, NAS or other cloud drive accounts to MultCloud to easily manage cloud data without switching accounts and complicated configuration steps.
The tool not only can combine cloud storage accounts into one space, but also can achieve cloud-to-cloud transfer, sync or backup data between multiple cloud accounts with Cloud Transfer, Team Transfer, Cloud Sync, and Cloud Backup features.

- Cloud Transfer: Seamless cloud migration between different services and accounts, supporting scheduled migration.
- Team Transfer: Seamless cloud migration between different enterprise storage services, supporting batch migration of sub-accounts.
- Cloud Sync: Real-time sync of data between different services, supporting 10 sync modes.
- Cloud Backup: Important data backup between different services, supporting version management and data recovery.
- Remote Upload: The content in URLs, torrent files or magnet links is automatically parsed to the cloud drive.
The "Cloud Transfer" function provided by MultCoud can help you quickly complete the data migration from iCloud Photos to NAS, without frequent account switching and complicated operation steps.
Step 1. Create a MultCloud account. First, you need to create an account with MultCloud.
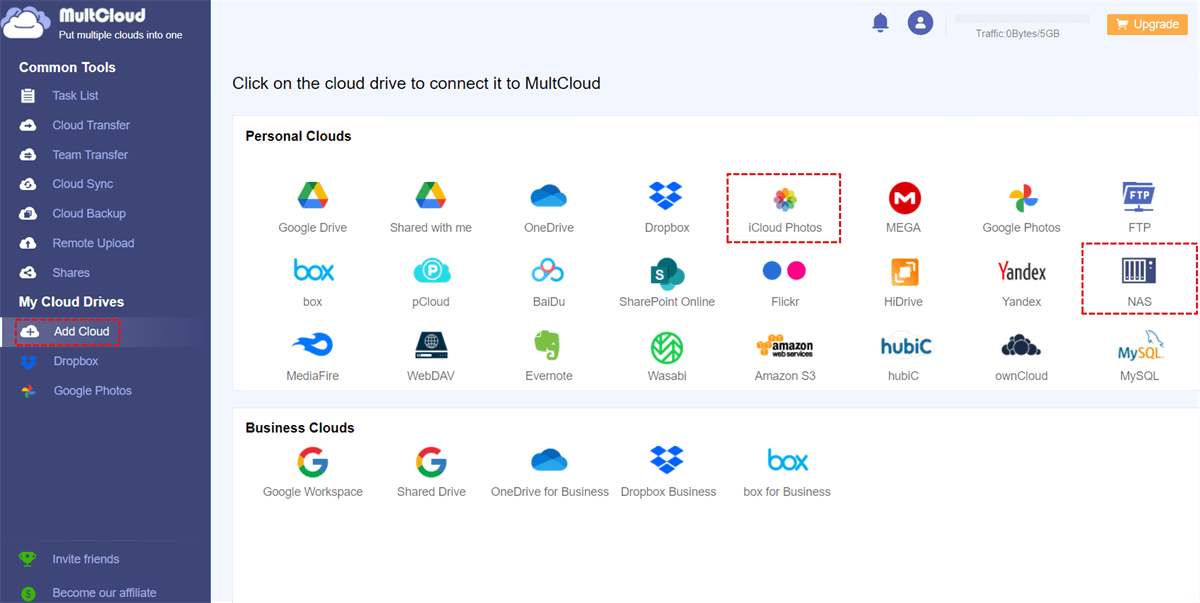
Step 2. Add iCloud Photos and NAS account to MultCloud. Click "Add Cloud", select iCloud Photos, and follow the steps to add iCloud Photos to MultCloud. Then, add the NAS account to MultCloud in the same way.
Step 3. Transfer iCloud Photos to NAS using Cloud Transfer. After adding iCloud Photos and NAS account to MultCloud, click "Cloud Transfer", select the path in iCloud Photos as the source, select the NAS or a folder in it as the destination, click "Transfer Now" and wait for the process to complete.
Notes:
The "Cloud Transfer" function is more suitable for transferring large numbers of folders or entire clouds. If you want to transfer multiple files from iCloud Photos to NAS individually, you can use the "Copy" and "Paste" functions.
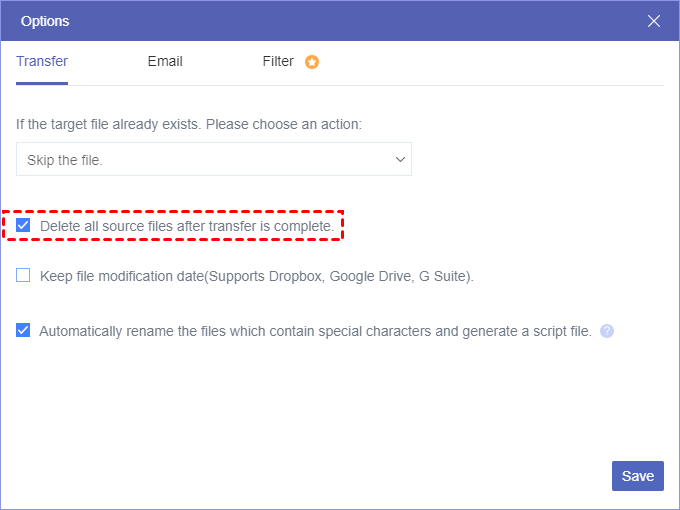
If you want to move all files from the iCloud Photos account to NAS account completely, you can enable "Delete all source files after transfer is complete" in "Options".
Conclusion
With the above 2 methods, you can easily transfer iCloud Photos to NAS. After, you can better edit and share all your photos with your NAS. Even, you can use MultCloud to manage multiple NAS accounts or sync NAS to Google Drive.
MultCloud Supports Clouds
-
Google Drive
-
Google Workspace
-
OneDrive
-
OneDrive for Business
-
SharePoint
-
Dropbox
-
Dropbox Business
-
MEGA
-
Google Photos
-
iCloud Photos
-
FTP
-
box
-
box for Business
-
pCloud
-
Baidu
-
Flickr
-
HiDrive
-
Yandex
-
NAS
-
WebDAV
-
MediaFire
-
iCloud Drive
-
WEB.DE
-
Evernote
-
Amazon S3
-
Wasabi
-
ownCloud
-
MySQL
-
Egnyte
-
Putio
-
ADrive
-
SugarSync
-
Backblaze
-
CloudMe
-
MyDrive
-
Cubby
